Дно для сумочки
06-10-2017 09:47
к комментариям - к полной версии
- понравилось!
вверх^
к полной версии
понравилось!
в evernote
Bag Base Tutorial for Peltex or Fast2Fuse
I've been meaning to update this bag base tutorial for a while. Not only was the original hastily put together from a black & white pdf document (long story involving band width), but I've ever-so-slightly changed my method since it was written. (And colour is always nicer than grey, don't you think?).
This tutorial is for a base in any boxed corner bag (and it can be adapted for other bag constructions).
 [показать]1. Measure the length of the base seam (above) and then the boxed corner seam (below).
[показать]
[показать]1. Measure the length of the base seam (above) and then the boxed corner seam (below).
[показать]
3. Cut a piece of Peltex (it doesn't matter if it's single-sided or double-sided fusible) or heavy weight Fast2Fuse to the (rounded down) dimensions of the base seams. (I find that a rotary cutter and quilting ruler are the businessfor this job).
[показать]
4. Roughly cut a scrap of fusible woven interfacing large enough to wrap about 2 and a half times around the base piece - folding along the long edge. You'll also need a generous seam allowance (overhanging the Peltex/Fast2Fuse) at each of the short ends. No need to worry about accuracy here, folks! [показать]
5. Wrap the interfacing around the base piece and fuse it all together with a hot iron. The interfacing will stiffen as it cools. You can add further layers of interfacing if you'd like to make the base more rigid.
NOTE: If you use double-sided fusible Peltex or Fast2Fuse, you can use calico or fabric scraps instead of interfacing. (That's what I used to do before I discovered the benefits of layering up fusible interfacing).
[показать]
9. Fold back the overhanging seam allowance at each of the short ends of the base and line up the Peltex/Fast2Fuse edge about 3mm (1/8 inch) from the boxed corner seam of the bag.
[показать]
10. Stitch the seam allowances of the base to the seam allowances of the bag - about 3mm (1/8 inch) from the other side of the seam (towards the raw edge of fabric, rather than on the body of the bag). Look carefully at the photo below.
[показать]The base is attached with a little bit of movement to avoid accidentally making it too tight (which looks awful). When the bag is in use, the base will sit firmly and exactly where it ought.
[показать]When you turn the bag through to the right side, you'll see that the base creates structure but is flexible enough to not damage the fabric with wear and tear (as template plastic can). It's also comfortable when the bag is worn against the body.
This tutorial is for a base in any boxed corner bag (and it can be adapted for other bag constructions).
[показать]1. Measure the length of the base seam (above) and then the boxed corner seam (below).
2. Round both measurements down by around 6mm (1/4 inch). For example, on the boxed corner seam below, I'd round down to 6.5cm.
[показать]3. Cut a piece of Peltex (it doesn't matter if it's single-sided or double-sided fusible) or heavy weight Fast2Fuse to the (rounded down) dimensions of the base seams. (I find that a rotary cutter and quilting ruler are the businessfor this job).
[показать]4. Roughly cut a scrap of fusible woven interfacing large enough to wrap about 2 and a half times around the base piece - folding along the long edge. You'll also need a generous seam allowance (overhanging the Peltex/Fast2Fuse) at each of the short ends. No need to worry about accuracy here, folks!
[показать]5. Wrap the interfacing around the base piece and fuse it all together with a hot iron. The interfacing will stiffen as it cools. You can add further layers of interfacing if you'd like to make the base more rigid.
NOTE: If you use double-sided fusible Peltex or Fast2Fuse, you can use calico or fabric scraps instead of interfacing. (That's what I used to do before I discovered the benefits of layering up fusible interfacing).
[показать]
6. Trim the seam allowances on the short ends to about 1.5cm (5/8 inch).
7. To make the base durable (through machine washes etc), machine stitch around the outside edge and through the centre to hold all the layers securely.
7. To make the base durable (through machine washes etc), machine stitch around the outside edge and through the centre to hold all the layers securely.
NOTE: Nobody will see this bit, so there's no need to worry about neatness.
9. Fold back the overhanging seam allowance at each of the short ends of the base and line up the Peltex/Fast2Fuse edge about 3mm (1/8 inch) from the boxed corner seam of the bag.
[показать]10. Stitch the seam allowances of the base to the seam allowances of the bag - about 3mm (1/8 inch) from the other side of the seam (towards the raw edge of fabric, rather than on the body of the bag). Look carefully at the photo below.
[показать]The base is attached with a little bit of movement to avoid accidentally making it too tight (which looks awful). When the bag is in use, the base will sit firmly and exactly where it ought.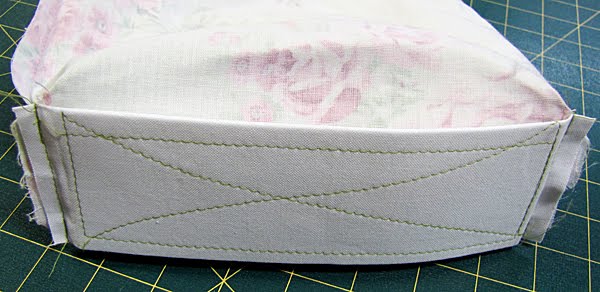 [показать]When you turn the bag through to the right side, you'll see that the base creates structure but is flexible enough to not damage the fabric with wear and tear (as template plastic can). It's also comfortable when the bag is worn against the body.
Вы сейчас не можете прокомментировать это сообщение.
Дневник Дно для сумочки | СВЕТИК_СОЛНЫШКО_2303 - Дневник СВЕТИК_СОЛНЫШКО_2303 |
Лента друзей СВЕТИК_СОЛНЫШКО_2303
/ Полная версия
Добавить в друзья
Страницы:
раньше»