Это цитата сообщения Mademoiselle_Viv Оригинальное сообщение
Декор "Кружева"
 [показать]
Это цитата сообщения fljuida Оригинальное сообщение
МК по лепке из холодного фарфора. Ландыши
Ландыши из холодного фарфора
Автор: ClayART
Для выполнения данной работы нам понадобятся следующие материалы и инструменты:
- холодный фарфор или близкая ему по качеству глинка
- проволока № 28
- масляные краски
- простой стек и шариковый стек
- клей ПВА

Это цитата сообщения Оленька_Коваленко Оригинальное сообщение
Готовимся ко Дню Святого Валентина: сердечки-валентинки с кодами
 [показать] |
 [показать] |
 [показать] |
 [показать] |
 [показать] |
 [показать] |
Это цитата сообщения Елена-Елена Оригинальное сообщение
Самодельный паста имитирующая снег. МК
Автор мастер класса Валерия Сидельникова
Как-то купив пасту "Снег", я задалась мыслью, а из чего она собственно сделана. Уж больно дорогая за такое количество. Методом эксперимента и логики, родился ее аналог. Ничем не хуже фабричного. Фото делать не стала, так как сам процесс изготовления безумно простой. В качестве основы у вас могут совершенно различные варианты: мелкий кварцевый песок, манка, пенопластовая крошка. От вашего наполнителя будет зависеть и сама фактура. В миску насыпаем небольшое количество выбранного вами материала. Примерно 1 граненый стакан. В данный сыпучий материал начинаем понемногу добавлять белую акриловую краску. По опыту лучше покупать ее в строительном магазине для фасадных работ. Добавляем до такого состояния, чтобы наши сыпучие частицы слиплись между собой, но не плавали в жидкости. Затем добавляем ПВА, желательно густой. Добавляем также совсем немного, чтобы смесь была эластичной и тягучей. Ну, и немного серебрянных блесток. Все перемешиваем и вуа-ля!!! Приятного творчества. (Изготавливать лучше небольшими партиями.)

автор сей красоты Asket из Польши
Это цитата сообщения Байкалочка_10 Оригинальное сообщение
Очень подробный МК по кукольной ножке!
Стащила отсюда http://members.home.nl/asrai/cursus-en.htm
|
The foot in this tutorial is from heel to big toe about 1.8 inch long. Always use the head as a comparison for the size of the feet. The length of the feet is equal to the size of the head. |
 [250x163] |
|
In this tutorial I will only make the right foot. Try to work simultaneously on both feet because it is hard to make an equal looking foot afterwards. You start off by making a 2.5 inch long cylinder shaped roll of clay, about 0.8 inch thick (pict. 1). Bend the roll of clay in an angle like in pict. 2. The top will become a part leg and the other part the foot. |
|
|
[250x163] |
[250x163] |
| Flatten the clay by pressing it together between thumb and point finger towards the 'toes'. Be careful not to make it too flat. (pict. 3 + 4). | |
|
[250x163] |
[250x163] |
|
Now it is time to form the heel. Push/smear some clay from under the foot backwards (towards the heel) and push/smear some clay from the lower leg down (towards the heel) (pict. 5). This way you'll get more clay on the heel and a better shape at the sole of the foot. Press the clay with your thumb on the inside of the foot to make it more hollow (pict. 6). |
|
|
[250x163] |
[250x163] |
|
Before you can make incisions for the toes, the front of the foot needs to be reshaped a bit. Cut off a piece of clay slantwise starting at the 'big toe' (pict. 7). After this smooth the edge with your fingers (pict. 8). |
|
|
[250x163] |
[250x163] |
|
Look at the foot to see if it's not too thick, if it is you can make it thinner by smearing the clay from the instep to the leg. You can also smear clay upwards just above the heel towards the leg, this way the foot will become slimmer (pict. 9). Sculpt as smooth as possible, use a damp finger to rub the clay for a smooth finish. Now you can make incisions for the toes with the help of a sharp tool. Don't forget the big toe needs to be bigger than the other toes (pict. 10). |
|
|
[250x163] |
[250x163] |
Это цитата сообщения Байкалочка_10 Оригинальное сообщение
Очень подробный МК по кукольной ручке!!
Опять с заграничного сайта! Ну очень подробно!!!!!!!! Стащила отсюда! Классный сайт по куклам! http://members.home.nl/asrai/cursus-en.htm
|
The hand I made for this lesson is from the palm of the hand to the finger tips about 1.80 inch. It is a bit bigger than I usually make, smaller gave some photographic problems 'cause I don't have a macro lens. |
|
[250x163] |
[250x163] |
|
The size of the hands depend on the size of the head. The length of a hand is equal to the length from chin to halfway the forehead. A face is usually about 2 hands wide. This can always vary a bit depending on the kind of doll. You start off by making 2 cylinder shaped rolls of fimo, in this lesson they are about 2.6 inch long and 0.60 inch thick (pict. 1). Sculpt one end in a kind of spoon shape by pressing the clay with your thumb. Sculpt the hand thinner to the "finger tips' by pushing it more flat (pict. 2). |
|
|
[250x163] |
[250x163] |
|
For this lesson I'll continue with the making of the right hand. Try to work simultaneously on both hands because it is hard to make an equal looking hand afterwards. To make a wrist, roll the clay between thumb and point finger like pict. 3 You now have a roughly shaped hand with a part arm. Make the arm thinner if necessary. Smooth the hand nice and round. The hollow part is the inside/hand palm of the hand (pict. 4). |
|
|
[250x163] |
[250x163] |
|
At pict. 5 you see the back of the hand. You will now make 3 incisions with a knife for separating the fingers. The thumb will be added later. Because this will be a right hand, the incision for the little finger is cut a little further than the other incisions, take your own hand as example. Bend the 2 outer fingers gently side wards so you have more space (pict. 6). Hold the fingers between your point finger and thumb. While warming the clay by the warmth of your hands, very gently roll the fingers slightly back and forth, so the inside of the fingers will also become round. You can use a sculpting tool for the areas that are difficult to reach. |
|
|
[250x163] |
[250x163] |
|
When the two outer fingers are smoothed, you start with the middle two. Bend them slightly apart and again roll them gently back and forth to round off the edges on the inside of the fingers (pict. 7). Do this very slowly, it is important that while you are doing this, the clay will be warmed by your fingers so they don't rip at the beginning. Use a sculpting tool to smooth the areas that are hard to reach (pict. 8). |
|
|
| |
«Девушка с жемчужной серёжкой» Яна Вермеера
Источник:http://kaplyasveta.ru/istoriya-odnoj-kartiny/devushka-s-zhemchuzhnoj-seryozhkoj.html
Рубрика «История одной картины»
Автор: Юлия Риа
Холст, масло. 44,5 на 39 см
Благодаря фильму Питера Уэббера «Девушка с жемчужиной серёжкой» 2003 года, огромное количество людей, далёких от живописи, узнали о замечательном нидерландском художнике Яне Вермеере, а также о его самой известной картине «Девушка с жемчужиной серёжкой».
Фильм этот снят по роману Трейси Шевалье, в котором писательница предлагает довольно вольную трактовку создания картины. И, кончено, многие, кто видел фильм, уверены, что это правдивая версия. Но, обо всём по

Это цитата сообщения Глебова_Елена Оригинальное сообщение
Бутоньерка из роз. Лепка. Отличный мастер-класс.
Источник. Далее текст автора.
Предлагаем вам изготовить своими руками потрясающую бутоньерку из нежных роз в модной технике лепки из полимерной глины. Эффектное украшение делается в течение считанных минут и через сутки становится красивой брошью или заколкой
Это цитата сообщения принцеска_1 Оригинальное сообщение
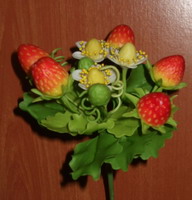
Мастер-класс - земляника,клубника из холодного фарфора, полимерн
Мастер-класс - земляника,клубника из холодного фарфора, полимерной глины
Как слепить землянику, клубнику
<<
Это цитата сообщения принцеска_1 Оригинальное сообщение
Мк Цветы сакуры от Амазонки с сайта clayart.com
Мк Цветы сакуры от Амазонки с сайта clayart.com
Мастер класс Цветы сакурыот Амазонки
На сайте clayart.com. нашла такой замечательный МК от Амазонки, не удержалась, забрала к себе. Такая красота!!!
Начнем с того что я делала каждую тычиночку отдельно. Брала кусочек лески №2, над зажигалкой каждую лесочку опаливала что б образовался шарик и этот шарик кунала в желтую акриловую краску. Затем сушила и укорачивала до нужной длинны. Для каждого цветочка понадобится около 10 таких тычинок. Потом каждую тычинку я приклеивала супермоментом к проволочке (без петельки)
[640x480]
<<
Это цитата сообщения Оленька_Коваленко Оригинальное сообщение
Распакованный скрап-набор "Утренее чаепитие"


Очень нежный скрап-набор. В нем Вы найдете множество цветов, заварочный пакетик чая, печенья, торт и пирожные, баночку меда, заварочный чайник и море красивейшего и интересного декора.
Это цитата сообщения Оленька_Коваленко Оригинальное сообщение
Распакованный скрап-набор "Маленькое рождественское чудо"


Очаровательный детский скрап-набор рождественской тематики. Еловые ветки, пряничный домик, рождественский венок, снеговик и дед мороз, море новогодних и детских игрушек. Прекрасный скрап-набор для оформления детских рождественских фоторафий!
Это цитата сообщения Оленька_Коваленко Оригинальное сообщение
Зимняя анимация с храмами


Это цитата сообщения Arnusha Оригинальное сообщение
Открытки со Старым Новым годом!
 [500x333]  [500x500] |

Это цитата сообщения Monro-Designs Оригинальное сообщение
И снова ошеломительный винтаж!
 [показать]
 [показать] [показать]Смотреть дальше