Это цитата сообщения Helam Оригинальное сообщение
Бежевый берет с цветком!
 [262x400]
 [321x400]
Бежевый берет с цветком!
Этот очаровательный берет с цветком вяжется крючком.
Описание из журнала "Вязание модно и просто".
Это цитата сообщения tatMel Оригинальное сообщение
Пэчворк блок «Калейдоскоп». Автор Анна Таланова.
Пэчворк блок «Калейдоскоп». Автор Анна Таланова.
 [показать] [показать]
 [показать]

Это цитата сообщения santa3 Оригинальное сообщение
Как связать цветы, овощи, фрукты крючком+схемы вязания. Продолжение
vКак связать цветы, овощи, фрукты крючком+схемы вязания. Продолжение. Как и обещала, продолжаю публикацию постов о том как связать цветы, овощи, фрукты крючком. Смотрите
1.
 [показать]
2.
 [показать]
Это цитата сообщения losik-kurnosik Оригинальное сообщение
Кукла Крупеничка (Зерновушка) – мастер-класс
|
Это цитата сообщения ADELERA Оригинальное сообщение
Цветной радужный коврик крючком. Схема
Не хотите связать крючком радужный коврик и использовать все остатки ниток? Схема коврика - ниже

Это цитата сообщения Федосеевна Оригинальное сообщение
белое кружевное платье "Шарлотта" от Ванессы Монторо


схемы см. http://kimcrinochet.blogspot.com/2013/01/vanessa-montoros-charlotte-dress.html
там же еще платье с похожим рисунком


Это цитата сообщения inNaLusia Оригинальное сообщение
Платье " Гламур 30-х"
1.
 [показать]
2.
 [показать]
3.
 [показать]
4.
 [показать]
Это цитата сообщения Корнейчук_Лидия Оригинальное сообщение
Розовые тапочки с вышивкой
Розовые тапочки с вышивкой
[показать]Это цитата сообщения gelexxx Оригинальное сообщение
Creation Point de Croix №34 Novembre / Decembre - 2013
[показать]Это цитата сообщения gelexxx Оригинальное сообщение
Crochet World - December 2013
[показать]Это цитата сообщения Veh07 Оригинальное сообщение
20 оригинальных, простых и дешёвых идей для дачи

Это цитата сообщения DragooonFly Оригинальное сообщение
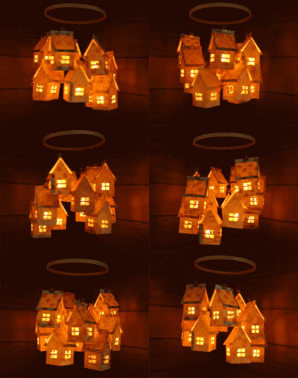
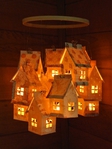
Сказочный мобиль для детской. Мастер- класс с шаблоном.
Хотите подарить ребенку сказку. Попробуйте сделать такой мобиль. А когда все будет готово, зажгите "свечи" внутри него, выключите свет и пригласите вашего ребенка!!! Он будет счастлив!!!
Это цитата сообщения Naniika Оригинальное сообщение
циновка (мк)
Циновка из рогоза
 [552x662]Читать далее
Это цитата сообщения Asm Оригинальное сообщение
Простая коробочка пирамидка
Простая пирамидка и ещё несколько таких же простых шаблонов. :)

Это цитата сообщения Xymena21 Оригинальное сообщение
Плетение коврика из старых футболок
 [показать]I thought that with all of the emphasis on recycling and reusing these days, a no-sew rag rug post would be more common. However, in my own internet research, I find that it’s something of a unicorn.
It follows the same principle that we all used in making those funny cotton loop potholders–under, over, under, over. See? You’ve already got 3/4ths of the technique.
No-Sew Homemade Rag Rug (Or trivet, potholder, centerpiece, place mat, what-have-you.)
1. Cut strips of fabric 1-3 inches wide and remove seams. I like three foot strips, but the length only matters for how often you want to be taking the time to join new strips.
 [показать]
2. Tie two strips in a simple loose knot. You’ll be trying to shove fabric through this later, so too tight and you might get aggravated. Also, notice that the pieces in the picture are UNEVEN. At the end of every strand, you’ll have to join a new one, and it looks better if that’s staggered.
 [показать]
3. If you want stripes like mine, arrange your strips so that they alternate A,B,A,B when you lay them flat. Then take the one on the right side and go under, over, under.
 [показать]4. Continue taking each right-hand strand and going under, over, under (Notice that it’s not a TIGHT braid. Just snug enough to lay flat and hold it’s shape.)
 [показать]
5. When you get a braid about 1/2 the length of the rug you want, it’s time to turn. I went under, over, under with that gray strip and then turned it to the right so I could tuck it in the edge of the original braid.
Это цитата сообщения Liousy Оригинальное сообщение
Шикарная шаль из медальонов. Крючок
 [501x700]
Вам потребуется:
пряжа «Новозеландская» (100% шерсть, 250 м/100 г) - 800 г натурального белого цвета,
крючок № 5.
ОПИСАНИЕ РАБОТЫ
Это цитата сообщения Рязаночка- Оригинальное сообщение
Ткацкий станок из коробки для детей
Две большие картины, как сделать ткацкой станок из коробки, челнок и бёрдышко из картона

Это цитата сообщения зверобой Оригинальное сообщение
ШАПОЧКА, ШТАНИШКИ, КУРТОЧКА И МЕДВЕДЬ
 [452x700]