Это цитата сообщения Manini Оригинальное сообщение
Вязание крючком для малышей
 [показать] |
[показать] |
[показать] |
| [показать] |
[показать] |
[показать] |
[показать] |
| [показать] |
[показать] |
[показать] |
[показать] |
| [показать] |
[показать] |
[показать] |
Это цитата сообщения Manini Оригинальное сообщение
Шапочка "Розовая мечта" МК
http://club.osinka.ru/search.php?q=%CC%CA.+%C4%E5%...+%F8%E0%EF%EE%F7%EA%E8&f=a
Вяжем шапочку "Розовая мечта"
нитки Yarn Art POLO 100% микрофибра, 200м на 100гр, крючок №3, обхват головы - 45 - 48 см, на 1год


Это цитата сообщения Nudeloper Оригинальное сообщение
вяжем заколочки для волос
 [показать]
 [показать]
 [показать]
 [показать]
 [показать]
 [показать]
 [показать]
Это цитата сообщения Разумники Оригинальное сообщение
Шапочка для мальчика
Источник: http://bugalugshandmade.blogspot.com/2010/05/broom-broom-boys-beanie.html

This hat is crocheted to fit a head approx 20 inches in size. Roughly 4 years old!
Made with a 4.00mm crochet hook and 8 ply yarn.
Create a ring by either the magic circle method or by chaining 2 and slip stitch into 2nd chain from hook.
Round 1 (in Blue): 12 Double crochet (DC) in circle, slip stitch (SS) in the top of 1st DC - 12DC's
Round 2: Chain 2, DC in 1st DC, 2DC in each DC around, SS into top of 1st DC - 24 DC's
Round 3: Chain 2, DC in 1st DC, *1 DC in next DC, 2DC's in next DC* Continue from * to * to the end. SS into top of 1st DC - 36DC's
Round 4: Chain 2, DC in 1st DC, *1 DC in the next 2 DC's, 2 DC's in the next DC* Continue from * to * to the end. SS into top of 1st DC - 48DC's
Round 5: Chain 2, DC in 1st DC, *1 DC in the next 3 DC's, 2 DC's in the next DC* Continue from * to * to end. SS into top of 1st DC - 60DC's
Round 6: Chain 2, DC in 1st DC, *1 DC in the next 4 DC's, 2 DC's in the next DC* Continue from * to * to end. SS into top of 1st DC - 72DC's
Round 7: Chain 2, DC in 1st DC, DC in each dc to the end. SS into top of 1st DC - 72DC's
Round 8: Repeat round 7
Round 9:Repeat round 7
Round 10: Repeat round 7
Cut Blue yarn leaving a tail to sew in and secure and attach a new yarn in Black.
Round 11- 14: Repeat round 7
Cut Black yarn leaving a tail to sew in and secure and attach a new yarn in Green.
Round 15 - 19: Repeat round 7
Cut and fasten off.
Sew in all ends.
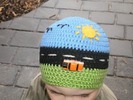
Now you can decorate it how you like. I used white yarn to make the lines of the road just stitching in the middle between rounds 12 and 13.
To make the sun I Created a ring by either the magic circle method or by chaining 2 and slip stitch into 2nd chain from hook.
Round 1 (in Yellow): 12 Double crochet (DC) in circle, slip stitch (SS) in the top of 1st DC - 12DC's. Just like how we started the beanie. Fasten off leaving a long tail and attach where you like it on the hat and stitch on some sun rays. I made some simple black birds too, all just stitching where you like the look of them.
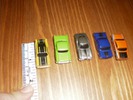
Here are the cars:
 [400x300]
They are called micro systemz. I got a pack of 5 for $5.00 at Big W.
They are approx. 1.5 inches long and .5 inches wide.
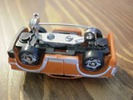
I also got some brooch backs from my local craft store they are small one's a little under an inch an I just ho glue gunned it to the under side of the car.
 [320x240]
So now you can have 5 different cars that can be put on the beanie as your child wishes. It also makes for easy removal for washing - and we all like that ;-)
 [320x240]
Это цитата сообщения Aelen Оригинальное сообщение
Вяжем пчёлку
http://www.babyblog.ru Автор Елена А.
Это цитата сообщения Алена_ЛиСаша Оригинальное сообщение
ВЯЗАНИЕ ОН-ЛАЙН ДЛЯ ДЕВОЧЕК НА ОСИНКЕ (крючок)
ТАКОЙ САРАФАН И ВСЕ ЕГО ВАРИАЦИИ ВЯЖУТ ЗДЕСЬ: http://club.osinka.ru/topic-48760
 [291x536]
 [699x652]
 [530x30]
ЯПОНСКОЕ ПЛАТЬЕ ДЛЯ МАЛЫШКИ ЗДЕСЬ: http://club.osinka.ru/topic-47578
 [468x699] [530x30]
САРАФАН И ШЛЯПКУ ЗДЕСЬ: http://club.osinka.ru/topic-49717
 [700x479] [530x30]
ПЛАТЬИЦЕ- РЕГЛАН ЗДЕСЬ: http://club.osinka.ru/topic-52658
 [699x479] [530x30]
ТОПИКИ ПО МОТИВАМ mylittlecitygirl ЗДЕСЬ: http://club.osinka.ru/topic-54655
 [699x529] [530x30]
ЖАКЕТИК С КАПЮШОНОМ ЗДЕСЬ: http://club.osinka.ru/topic-55443
 [424x640] [530x30]
ЖАКЕТИК С КРУЖЕВАМИ ЗДЕСЬ: http://club.osinka.ru/topic-56773
 [424x640] [530x30]
МАЛЕНЬКОЕ ЧЁРНОЕ ПЛАТЬЕ ЗДЕСЬ: http://club.osinka.ru/topic-58072
 [504x640] [530x30]
ПЛАТЬЕ "ДЕВИЧЬИ ГРЁЗЫ" ЗДЕСЬ: http://club.osinka.ru/topic-71759
 [359x500] [530x30]
САРАФАН И БОЛЕРО "РОМАШКОВОЕ ПОЛЕ" ЗДЕСЬ: http://club.osinka.ru/topic-72162
 [700x542] [530x30]
ЮБОЧКА СОБОРКОЙ ЗДЕСЬ: http://club.osinka.ru/topic-76079
 [350x500] [530x30]
ПЛАТЬИЦЕ ЗДЕСЬ: http://club.osinka.ru/topic-77173
 [647x699]
Это цитата сообщения Oksana_Hilles Оригинальное сообщение
Весенне-летние детские шапочки
[показать] [показать]
 [показать]
 [показать]
 [показать]
 [показать]
 [показать]
 [показать]
 [показать]
 [показать]
 [показать]
 [показать]
 [показать]
 [показать]
 [показать]
 [показать]
 [показать]
 [показать]
 [показать]
 [показать]
 [показать]
 [показать]
 [показать]
 [показать]
 [показать]
 [показать]
 [показать]
Это цитата сообщения Таня_Одесса Оригинальное сообщение
Юбочка
Что-то в последнее время меня пробило на юбочки, ну как мимо такой красоты можно пройти))))

Это цитата сообщения Гелла_Чара Оригинальное сообщение
Чудесные идеи для Вязания
В инэте вообще и на Ли.ру в частности есть масса разнообразных схем и описаний. Миллионы постов с журналами, картинками, подробными описаниями и обучением - стоит только ввести в поисковик нужное слово и получим тысячи вариантов и предложений. Поэтому еще раз хочу ответить заранее всем, намеревающимся вновь и вновь спросить про *схемку* - здесь только красивые фотки с примерами [показать]
