Это цитата сообщения pawy Оригинальное сообщение
Как можно быстро сделать коробочку для сувенира без клея, используя одну бумагу?
Материалы и инструменты:
бумага;
ножницы;
украшения.
1. Для начала делаем крышечку от коробки. Берём отрезок бумаги размером 21.5х21.5 см. и расчеричиваем её по диагонали. Линии идут от одного угла к противоположному.
 [показать]
2. Один из углов сгибаем так, чтобы он смотрел в самый центр. Затем сгибаем его еще раз, чтобы уже край этого сгиба шёл вровень с расчерченной полосой по центру.
3. Проделываем то же самое со всеми углами отрезка.
4. Делаем надрезы с двух сторон, как на фотографии.
5. И начинаем складывать поэтапно.
6. После того, как крышка от коробочки готова, нужно сделать её дно из отрезка бумаги размером чуть менее 21.2х21.2 см. Дно делается таким же образом, как и крышечка. В данном случае используется однотонная бумага.
Вот коробочка готова и её можно скрапить, главное - есть основа.
Можно делать коробочки разных размеров, но не надо забывать, что дно коробочки меньше в размере на 3 мм., чем её крышка!
Это цитата сообщения M_A_G_D_A Оригинальное сообщение
Настроение сейчас - wall, painting
ragged-on glazes makes even
less-than-perfect walls look
stunning.
Stone Sorcery
This timeless wall treatment does more than add texture and color to walls; it disguises imperfections such as cracks, dents, and rough patches.
Achieve this textured look by rolling on a liquid-stone product (similar in consistency to cake batter) and creating more textural variation with a trowel. Once the stone product dries, add more depth and color by ragging on two shades of glaze.
You can start with any wall color, but if the original paint is bold, bits of it may be visible when you're finished.
- Wide painter's tape
- Leakproof drop cloth
- Thick-nap paint roller
- McCloskey Special Effects Sculpture stone
- Trim brush
- Trowel or drywall mudding tool
- Clean, lint-free rags
- McCloskey Special Effects translucent color glazes: Mocha 94825 (MO), Taupe 217405 (TA)
- Plastic-foam or plastic plates
- Use wide painter's tape to mask around doors, windows, the ceiling, and the floor. Protect the floor with a drop cloth.
- Working in approximately 4-feet-square sections and using a thick-nap paint roller, roll the textured-stone product onto the wall, randomly applying it thicker in some areas and thinner in others. Coat corners and areas too small for the roller using a trim brush.
- Using a sweeping motion, gently smooth the textured stone with a trowel until you are satisfied with the random, subtle pattern you've created. As you work, try to develop a consistent texture so that each section will have a similar appearance. Wipe any excess product off the trowel with a clean, damp rag.
- Repeat the rolling-on-and-troweling process until you have finished an entire wall, then move to the opposite wall, and finally, to the walls in between. Allow the finish to dry overnight before applying glaze.
- Apply the glazes in two steps: Start with TA. Pour a shallow amount of the glaze onto a plate. Ball up a clean, lint-free rag in your hand, and dip it into the glaze. Next, rub the "loaded" rag onto the wall using a circular motion. Work the glaze into the crevices created by the textured-stone product. Continue dipping and rubbing until you have finished an entire wall, then move to the opposite wall, and finally, to the walls in between. Allow the glaze to dry overnight.
- Apply more in the same fashion, using as much as you desire. The wall shown was finished using equal amounts of the two glazes -- both applied in a thin layer.
Это цитата сообщения M_A_G_D_A Оригинальное сообщение
Wall Watercolor
Like clouds stirring in the sky on an overcast day, color-washed walls bring movement and drama to a room's vertical surfaces. Because the pattern is subtle, it is the perfect complement for a stenciled design. The technique is simple to master and you can layer on as many tones as you like; the more layers you add, the more interesting the finish.
- Wide painter's tape
- Benjamin Moore latex satin paints: Audubon Russet (AR), White (WH)
- Paint roller
- Benjamin Moore watercolor wash: Curry (CU), Moroccan Red (MR)
- Two clean buckets
- Clean, lint-free rags
- Low-tack spray adhesive
- Jan Dressler stencil: Elegant Frieze 681
- Level
- Modern Master Metal Effects: Copper (CO)
- Medium-size stencil brush
- Trim brush
- Plastic-foam or plastic plates
- Use wide painter's tape to mask around doors, windows, the ceiling, and the floor.
- Using a paint roller, base-coat a clean, dry wall with WH; let dry.
- To make the red wash, mix equal parts water and MR in a bucket.
- Working quickly, ball up a clean, lint-free rag in your hand, and dip it into the wash. Next, rub the "loaded" rag onto the wall using a circular motion, top left. Continue dipping and rubbing until you have finished an entire wall, then move to the opposite wall, and finally, to the walls in between.
- Repeat the ragging process with a second coat of the red wash; let dry overnight.
- To make the curry-color wash, mix equal parts of water and CU in a bucket. Repeat the ragging process using the color wash; let dry overnight.
- Spray adhesive onto the back of the stencil and, using a level, press the stencil into place on the wall.
- In the second bucket, mix AR and CO in a 3:1 ratio.
- Using a stencil brush and a gentle pouncing motion, apply the russet mixture to the stencil cutouts, using varying amounts of paint to create an aged effect. Move the stencil down and repeat the process as many times as necessary to complete each of the walls. To achieve the double border shown, repeat the stenciling process about an inch above the first border.
Это цитата сообщения M_A_G_D_A Оригинальное сообщение
Asian-Look Wall Techniques
Find out how to accomplish two Asian-theme paint effects: crisp grass cloth and exotic stylized clouds.
By Louise Ritchhart; decorative painting by Molly Spain
patterns add to the Asian theme.
Asian Clouds Wall Project
For centuries, Asian artists have captured nature's beauty in a unique, surrealistic style whose bold aesthetics, at once striking and serene, translate well to modern living.
These Asian clouds capture that style, and even if you are a novice artist, you can give them a try. Just express your creativity by painting a freehand design onto the wall.
The trick is to first draw the design on the base-coated wall using a colored pencil. When you are satisfied with the result, apply a stretchable automotive striping tape along the lines.
Brush an orange-red glaze mixture onto the wall using a horizontal dragging motion, then remove the tape to reveal the lines, seemingly etched in gold.
To increase the richness of the color, apply a dark brown stain to the entire wall. Use this technique to create any linear design or motif that complements your decorating style.
Download and Print the Cloud Pattern
- Create design with tape
- Drag glaze horizontally
- Add thickened mixture
- Remove tape and repeat
- Apply gel stain with cloth
- 2-inch blue low-tack painter's tape
- Drop cloth
- Stir sticks
- Paint tray
- Standard roller frame with 9-inch roller cover
- Paints: gold satin-finish latex paint for base coat; red satin-finish latex paint for glaze coat
- Colored pencil: tan
- 1/4-inch plastic automotive striping tape
- Crafts knife
- Glazing medium
- Plastic container with printed measurements
- Brush: 4-inch chip
- Minwax Aged Oak gel stain
- Small paint pan
- Rubber gloves
- Lint-free cotton cloths
Это цитата сообщения M_A_G_D_A Оригинальное сообщение
Grass Cloth Wall Project
Grass cloth wall coverings are a popular way to evoke the faraway cultures of Asia as well as the rich texture of natural grasses.
A painted grass cloth finish can be a stylish substitute for expensive wall coverings without their potential fraying and easy soiling. Also, by painting instead of wallpapering the design, you can vary the colors to suit your decor.
Grass cloth adds interest to a wide variety of settings. It is a natural choice for plantation- and Asian-theme rooms, but also works in transitional and relaxed modern decor.
- Mark wall in sections
- Brush glaze horizontally
- Drag squeegee through glaze
- Lightly dry-brush lines
- Apply glaze mixture
- Soften and blend lines
- 2-inch low-tack painter's tape
- Drop cloth
- Stir sticks
- Paint tray
- Standard roller frame with 9-inch roller cover
- Paints: antique-white satin-finish latex paint for base coat; warm-olive, greenish-gray, and mossy-brown satin-finish latex paints for glaze coat
- Squeegee notched into points
- Ruler
- Fine-tip marker
- Crafts knife
- Self-healing cutting mat
- Metal yardstick
- Pencil
- Three plastic containers with printed measurements
- Glazing medium
- Brush: 4-inch chip
- Lint-free cotton cloths
Это цитата сообщения M_A_G_D_A Оригинальное сообщение
Sponge Painting How-To
Add visual punch to a plain-color wall with sponging. It's a quick and easy way to achieve a subtle texture and add depth to your walls. And if you mess up, it's easy to fix less-than-perfect spots. Just follow our no-fail steps and study the how-to photos for can-do confidence.
- Benjamin Moore paints: We use Jack o' Lantern 2156-30 and Harvest Brown 2104-30. Satin sheen is preferred but semigloss works too; flat is not recommended.
- Benjamin Moore Studio Finish latex glaze in Clear
- Paint roller for base coat
- Wide painter's tape
- 2 plastic paint buckets
- Paint stir stick
- Paper plates
- 2 natural sponges
- Newspaper
- Cardboard
- Trim brush or sponge roller
Using a paint roller, base-coat a clean, dry wall with a Jack o' Lantern; let dry. Apply a second coat if needed and allow to dry. Use wide painter's tape to mask around doors, windows, the ceiling, and the floor.
In a paint bucket, mix 1 part Harvest Brown and 4 parts Studio Finish latex glaze. Fill another bucket half full of water for rinsing sponges.
1. Pour a small amount of glaze mixture onto a paper plate.
2. Dampen a sponge with water and wring it out thoroughly. Dip the sponge into the glaze mixture and blot excess onto newspaper. Practicing on a piece of cardboard, dab the sponge lightly, overlapping edges of color and rotating the sponge for a random effect. When comfortable with the color intensity and texture, apply the sponging technique to the wall, beginning in an upper corner.
4. When the sponge becomes saturated with glaze mixture, rinse it in the bucket of water and wring it out thoroughly before continuing.

Это цитата сообщения Gunesimka Оригинальное сообщение
Бабочка из пластиковой бутылки
[400x300]Нам понадобится:
[400x300]Пластиковая бутылка
Ножницы
водостойкий (перманентный) фломастер для контура
Рисунок бабочки
Лак для ногтей
блестяшки(глиттер)
Клей
Проволока
Бусины
Отрезать от бутылки основу для бабочки, положить шаблон под основу и нарисовать контур водостойким фломастером.
[400x300]Для удобства можно взять другую бутылку, положить на неё рисунок и прижать основой отрезанной от бутылки, чтобы рисунок не скользил можно прикрепить его скотчем.
Вырезать бабочку, согнуть вот так
[400x300]Контур должен быть на верхней (!) стороне.
[400x300]Желательно взять краску которая не смывается или чёрный лак для ногтей и нанести сверху на контур, я нарисовала просто водостойким фломастером он тоже не смывается водой.
Потом перевернуть бабочку и на обратной стороне (!) лаком дла ногтей разрисовать фрагменты.
[400x300]*
[400x300]*
[400x300]из проволоки сделать усики, нанизать бусины разных размеров для тельца, закрепить на самой бабочке, для этого в основе сделать дырочки
[400x300]На верхней стороне нанести клей по контурам и посыпать блестяшками, можно приклеить камешки
[400x300]Бабочка готова.
[400x300]*
[400x300]*
[400x300]Желаю всем красивых бабочек!
[400x343]*
[384x400]*
[400x262]
мастер класс взят отсюда: blogs.mail.ru/mail/www.maximum.ru/tag/%CC%E0%F1%F2%E5%F0-%EA%EB%E0%F1%F1
Это цитата сообщения Olga_Zab Оригинальное сообщение
[показать]Что значит для женщины счастье в браке? Значит ли это иметь уютный дом? Счастливых и здоровых детей?
Успешного мужа? Время для своих увлечений? Никаких проблем с деньгами? Совместный отдых и развлечения?
Значит ли это чувствовать себя хорошей хозяйкой? Значит ли это быть уважаемой своим окружением?
Все эти вещи очень важны, а некоторые и обязательны, но главной является одна потребность.
Женщина должна чувствовать,
Это цитата сообщения Olga_Zab Оригинальное сообщение
ВХОЖДЕНИЕ В ТРАНС
Встреча с такими простыми. но потрясающими понятиями - Ум и истина никогда не встречаются... Потому, что ум всегда ищет истину в прошлом или будущем, а истина - в настоящем...
Ум же никогда не пребывает в настоящем - ему там нет места... Ошо открывает тайны тантрического дыхания и представляет все техники, с помощью которых достигли просветления Будда и другие...
Название: из "Книги Тайн" Вхождение в транс
Автор: Ошо
Жанр: Совершенствование
Длительность: 1 час 36 мин
Слушать аудиокнигу онлайн http://abook.life-super.com/index.php?session=7b8a...;p=/books/book_preview/57.html
Серия сообщений "Эзотерические":Слушать Развитие способностейЧасть 1 - Трансерфинг реальности
Часть 2 - Посланник слушать онлайн
...
Часть 13 - Управление сновидением слушать онлайн
Часть 14 - Брида слушать онлайн
Часть 15 - из "Книги Тайн" Вхождение в транс слушать онлайн
Часть 16 - Трансерфинг реальности Ступень 2 Шелест утренних звезд слушать онлайн
Часть 17 - Письма Баламута слушать онлайн
...
Часть 25 - Ванга.Тайна дара болгарской Кассандры
Часть 26 - Влахос Иерофей Архимандрит - "Одна ночь в пустыне Святой Горы"
Часть 27 - Джо Витале - Жизнь без ограничений слушать онлайн
Это цитата сообщения Ненечка Оригинальное сообщение
Название: Схемы для вышивки Новогодние сапожки

Это цитата сообщения Семи-цветочка Оригинальное сообщение
Девочки, еще один интереснейший мастер-класс... тема: использование в работе позитивных мигрирующих бейцев. О них автор немного говорила на предыдущем занятии.
Очень рекомендую посмотреть всем декупажницам, узнаете много нового... Лично я - в восторге))) [показать]
Это цитата сообщения fljuida Оригинальное сообщение
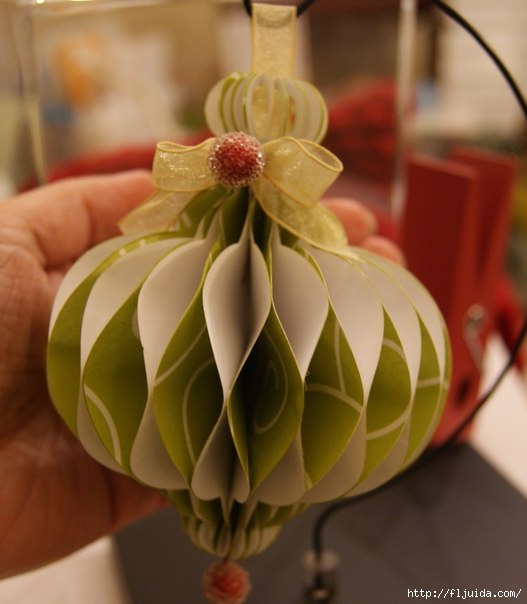
Новогодняя поделка из бумаги.
А почему бы и нет ?:) Ведь еще есть времечко :))) Изучаем :)
 [527x604]
Это цитата сообщения Шрек_Лесной Оригинальное сообщение
РЕКЛАМА В БЛОГЕ
Красиво! Словно в сказке. Деткам, мальчикам и девочкам , этот светильник очень понравится. Хотя здесь их несколько. Смотрите , как сделать детский светильник из простой трубы.


