Продолжение
05-05-2012 11:52
к комментариям - к полной версии
- понравилось!
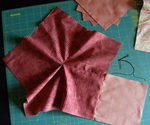
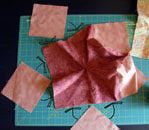
7) Lay out the bottom piece as you see above. Pin the first of the side squares in exactly this position, and sew it in place (this is one of the stages where things can go awry with the shape).
 [475x396]
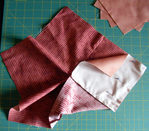
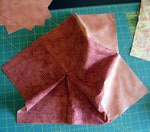
8 ) Lay it down again on your table top in the same position. The arrow above indicates where you will be sewing your next seam.
 [475x417]
You will need to fold the bottom like this to sew this next seam.
 [475x359]
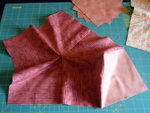
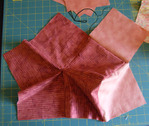
You cushion bottom should now look like this (above).
 [475x383]
9) Orient your cushion bottom in the same way as the photo above, and pin the next side-square in the corresponding place. Sew this square in place, from dot to dot.
 [475x401]
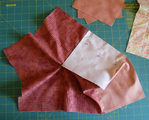
10) The arrow (shown left) indicates where you will be sewing your next seam. You will need to fold your cushion bottom like this, (see below right) to sew this seam.

 [475x419]
After you have completed step 10), your cushion bottom should look like this (above).
 [475x414]
вверх^
к полной версии
понравилось!
в evernote
[475x414]
вверх^
к полной версии
понравилось!
в evernote
7) Lay out the bottom piece as you see above. Pin the first of the side squares in exactly this position, and sew it in place (this is one of the stages where things can go awry with the shape).
[475x396]8 ) Lay it down again on your table top in the same position. The arrow above indicates where you will be sewing your next seam.
[475x417]You will need to fold the bottom like this to sew this next seam.
[475x359]You cushion bottom should now look like this (above).
[475x383]9) Orient your cushion bottom in the same way as the photo above, and pin the next side-square in the corresponding place. Sew this square in place, from dot to dot.
[475x401]10) The arrow (shown left) indicates where you will be sewing your next seam. You will need to fold your cushion bottom like this, (see below right) to sew this seam.
[475x419]After you have completed step 10), your cushion bottom should look like this (above).
[475x414]
Вы сейчас не можете прокомментировать это сообщение.
Дневник Продолжение | Joardana - Дневник Trois_couleurs_de_la_vie |
Лента друзей Joardana
/ Полная версия
Добавить в друзья
Страницы:
раньше»