Мастер-класс на английском языке, но по фото все понятно, мне кажется. Достаточно просто и красиво!
This is the rose I’m going to create in today’s Stitch Play tutorial. When you choose the colors to make this flower, feel free to select colors that blend together better. I selected white for the outer ring for two reasons: 1. I thought the contrast would make the photos for the tutorial a bit clearer; and 2. I didn’t have a lighter pink, anyway! But you can work the flower from the dark center to light on the outside, using a gradual change of shade for each layer (it will look a little more natural), or you can work from light in the center to dark on the outside, depending on the look you want.
If you’d like to work this flower, it will help to familiarize yourself first with the cast-on stitch and then with the simple cast-on stitch layered flower.
You don’t need to mark the shape of the flower onto the fabric, as everything builds from the center out.
 [показать]
To build the rose, start by working a central petal in the cast-on stitch. The amount of fabric that you’ll pick up to make the stitch is minimal. I picked up only two threads of fabric for the petal. Cast about 12 stitches onto the needle, so that when you pull through….
[показать]
… you end up with a petal shape on the surface of your fabric.
[показать]
Now, begin working the next color around your central petal, making a petal shape by picking up a longer bit of fabric and casting on enough stitches to cover double the length of the fabric you picked up (see the simple cast-on flower tutorial for more detail on this).
For this middle layer of petals, I cast 16 stitches onto the needle.
Work one cast on stitch in the middle color right next to your central petal. Work close to the central petal. Build the stitches around the central petal, starting each stitch inside the curve of the previous stitch, as shown in the photo above.
[показать]
As you move around that central petal, you can nudge it out of the way if you need to.
[показать]
You can see in the photo above that the casting on is done with the needle coming up inside the curve of the previous petal.
[показать]
Keep working around the central petal, always starting your stitch (coming up with the needle the first time) in the curve of the previous petal, which will be the same point where the petal-before-last ended.
[показать]
You can see that I’ve taken my needle down somewhat close to the central petal and brought it back up where I first emerged, on the inside curve of the previous petal. This is the position of the needle when you begin casting on your stitches.
[показать]
When you get to the point of the last petal to complete the layer, you’ll bring your needle up at A, inside the curve of the first petal worked in the layer, and take it down at B, from the outside of the last petal you worked. Getting the placement of this stitch right is important, to make sure the layers all swirl together the way they’re supposed to. So do make sure that point B is approached from outside the last petal you worked.
[показать]
In your final step for this layer, to end your last cast-on stitch petal, take the needle to the back at point B.
That finishes the second layer. This is a good stopping point for a small rose-like flower. But if you want a larger flower, then you can work another layer around the outside of this layer, in the same manner.
[показать]
Now that you have one full layer of petals already worked, you’ll use that layer as a guide for the placement of your next layer. As you work the outer layer, you will probably have to cast more stitches onto your needle, because you will picking up slightly more fabric, to work around the outer circle. I cast 18 stitches onto my needle for the outside layer of petals.
[показать]
Work all the way around the rose again, making sure that you’re bringing your needle up the first time for each stitch, inside the curve of the previous cast-on stitch petal.
[показать]
This is what the set-up for your needle should look like, before you start casting on the stitches. If the center part of the rose gets in your way, just fold the petals out of the way. You can put them back in place once the whole flower is finished.
[показать]
You can see here that I’ve got that inside part of the flower really folded out of the way, as I work on the outer layer. It’s not going to hurt the flower, so don’t worry about pushing the petals out of the way if you need to.
[показать]
When you get to the last stitch on the outside layer, remember that you will come up at A, inside the curve of the first petal you worked, and go down at B, which is accessed from the outside of the ring of petals.
[показать]
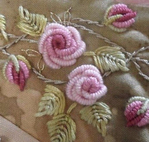
When you pull that final stitch through, this is what you’ll have!
Очень симпатичная розочка получилась, ни чем не хуже вот таких: