Двухстороннее вязание жаккардовых узоров- МК
11-03-2015 15:18
к комментариям - к полной версии
- понравилось!
Это цитата сообщения ратибор1962 Оригинальное сообщение
Двухстороннее вязание жаккардовых узоров- МК
вверх^
к полной версии
понравилось!
в evernote
Это цитата сообщения ратибор1962 Оригинальное сообщение
Двухстороннее вязание жаккардовых узоров- МК
|
В этом мастер-классе я покажу вам способ двухстороннего вязания жаккардового узора. В результате такого вязания получается двойное полотно, как если бы я вязала обычную полую резинку /forum.tamica.ru/styles/Knitsubsilver/theme/prime_links/window.gif" target="_blank">http://forum.tamica.ru/styles/Knitsubsilver/theme/prime_links/window.gif); background-attachment: initial; background-origin: initial; background-clip: initial; background-color: initial; color: rgb(90, 120, 107); text-decoration: none; border-bottom-width: 1px; border-bottom-style: dashed; border-bottom-color: initial; background-position: 100% 50%; background-repeat: no-repeat no-repeat; ">http://tamica.ru/page/polajadvojnaja-rezinka с той лишь разницей, что в случае с жаккардовым узором:
1) заднее и переднее полотно оказываются сцепленными между собой в местах смены нитей; 2) т.к. в вязании используется две нити, то при вязании лицевого ряда полотна одновременно вяжется и изнаночный ряд. Я буду вязать вот такого дельфинчика. /forum.tamica.ru/styles/Knitsubsilver/theme/prime_links/window.gif" target="_blank">http://forum.tamica.ru/styles/Knitsubsilver/theme/prime_links/window.gif); background-attachment: initial; background-origin: initial; background-clip: initial; background-color: initial; color: rgb(90, 120, 107); text-decoration: none; border-bottom-width: 1px; border-bottom-style: dashed; border-bottom-color: initial; background-position: 100% 50%; background-repeat: no-repeat no-repeat; ">  /forum.tamica.ru/styles/Knitsubsilver/theme/prime_links/window.gif" target="_blank">http://forum.tamica.ru/styles/Knitsubsilver/theme/prime_links/window.gif); background-attachment: initial; background-origin: initial; background-clip: initial; background-color: initial; color: rgb(90, 120, 107); text-decoration: none; border-bottom-width: 1px; border-bottom-style: dashed; border-bottom-color: initial; background-position: 100% 50%; background-repeat: no-repeat no-repeat; "> /forum.tamica.ru/styles/Knitsubsilver/theme/prime_links/window.gif" target="_blank">http://forum.tamica.ru/styles/Knitsubsilver/theme/prime_links/window.gif); background-attachment: initial; background-origin: initial; background-clip: initial; background-color: initial; color: rgb(90, 120, 107); text-decoration: none; border-bottom-width: 1px; border-bottom-style: dashed; border-bottom-color: initial; background-position: 100% 50%; background-repeat: no-repeat no-repeat; "> Для этого потребуются нити двух контрастных цветов и спицы подходящего размера. 1. Складываю две нити вместе и набираю обычным способом 18 двойных петель. На спице получается 36 петель - 18 зелёных и 18 сиреневых. Важно! Петли обязательно должны чередоваться. /forum.tamica.ru/styles/Knitsubsilver/theme/prime_links/window.gif" target="_blank">http://forum.tamica.ru/styles/Knitsubsilver/theme/prime_links/window.gif); background-attachment: initial; background-origin: initial; background-clip: initial; background-color: initial; color: rgb(90, 120, 107); text-decoration: none; border-bottom-width: 1px; border-bottom-style: dashed; border-bottom-color: initial; background-position: 100% 50%; background-repeat: no-repeat no-repeat; ">  2. Начинаю вязать первый ряд. Первая петля на спице зелёная. Это значит, что в этом ряду лицевая сторона полотна будет зелёная и зелёные петли будут вязаться лицевыми. А обратная (изнаночная) сторона полотна сиреневая и сиреневые петли будут провязаны изнаночными. При вязании обе нити находятся на пальце. Важно! Нити между собой не переплетаются, а идут паралелльно друг другу. При вязании лицевой петли обе нити расположены за работой. Итак, провязываю первую петлю лицевой. /forum.tamica.ru/styles/Knitsubsilver/theme/prime_links/window.gif" target="_blank">http://forum.tamica.ru/styles/Knitsubsilver/theme/prime_links/window.gif); background-attachment: initial; background-origin: initial; background-clip: initial; background-color: initial; color: rgb(90, 120, 107); text-decoration: none; border-bottom-width: 1px; border-bottom-style: dashed; border-bottom-color: initial; background-position: 100% 50%; background-repeat: no-repeat no-repeat; ">  3. Вторая петля - сиреневая, провязываю её изнаночной, обе нити находятся перед работой. /forum.tamica.ru/styles/Knitsubsilver/theme/prime_links/window.gif" target="_blank">http://forum.tamica.ru/styles/Knitsubsilver/theme/prime_links/window.gif); background-attachment: initial; background-origin: initial; background-clip: initial; background-color: initial; color: rgb(90, 120, 107); text-decoration: none; border-bottom-width: 1px; border-bottom-style: dashed; border-bottom-color: initial; background-position: 100% 50%; background-repeat: no-repeat no-repeat; "> 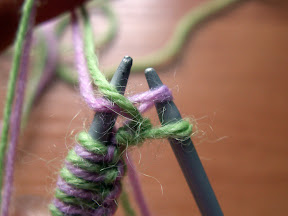 4. Третья петля - петля переднего полотна, вяжу её лицевой. Ещё раз обращаю внимание, сейчас нити находятся за работой. /forum.tamica.ru/styles/Knitsubsilver/theme/prime_links/window.gif" target="_blank">http://forum.tamica.ru/styles/Knitsubsilver/theme/prime_links/window.gif); background-attachment: initial; background-origin: initial; background-clip: initial; background-color: initial; color: rgb(90, 120, 107); text-decoration: none; border-bottom-width: 1px; border-bottom-style: dashed; border-bottom-color: initial; background-position: 100% 50%; background-repeat: no-repeat no-repeat; "> 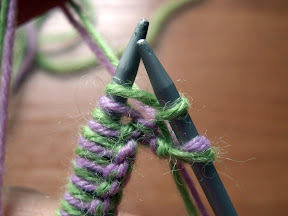 5. Четвёртая петля - петля заднего полотна, провязываю изнаночной сиреневой нитью. Нити находятся перед работой. /forum.tamica.ru/styles/Knitsubsilver/theme/prime_links/window.gif" target="_blank">http://forum.tamica.ru/styles/Knitsubsilver/theme/prime_links/window.gif); background-attachment: initial; background-origin: initial; background-clip: initial; background-color: initial; color: rgb(90, 120, 107); text-decoration: none; border-bottom-width: 1px; border-bottom-style: dashed; border-bottom-color: initial; background-position: 100% 50%; background-repeat: no-repeat no-repeat; ">  6. И ещё раз - лицевая ... /forum.tamica.ru/styles/Knitsubsilver/theme/prime_links/window.gif" target="_blank">http://forum.tamica.ru/styles/Knitsubsilver/theme/prime_links/window.gif); background-attachment: initial; background-origin: initial; background-clip: initial; background-color: initial; color: rgb(90, 120, 107); text-decoration: none; border-bottom-width: 1px; border-bottom-style: dashed; border-bottom-color: initial; background-position: 100% 50%; background-repeat: no-repeat no-repeat; ">  7. ... и изнаночная. /forum.tamica.ru/styles/Knitsubsilver/theme/prime_links/window.gif" target="_blank">http://forum.tamica.ru/styles/Knitsubsilver/theme/prime_links/window.gif); background-attachment: initial; background-origin: initial; background-clip: initial; background-color: initial; color: rgb(90, 120, 107); text-decoration: none; border-bottom-width: 1px; border-bottom-style: dashed; border-bottom-color: initial; background-position: 100% 50%; background-repeat: no-repeat no-repeat; "> 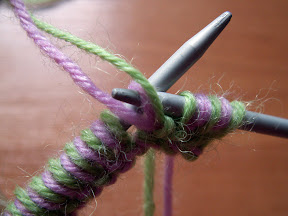 8. Провязала 6 петель - 3 петли переднего и 3 петли заднего полотна. /forum.tamica.ru/styles/Knitsubsilver/theme/prime_links/window.gif" target="_blank">http://forum.tamica.ru/styles/Knitsubsilver/theme/prime_links/window.gif); background-attachment: initial; background-origin: initial; background-clip: initial; background-color: initial; color: rgb(90, 120, 107); text-decoration: none; border-bottom-width: 1px; border-bottom-style: dashed; border-bottom-color: initial; background-position: 100% 50%; background-repeat: no-repeat no-repeat; ">  9. Таким образом вяжем до конца ряда. Вот такая получилась лицевая сторона и ... /forum.tamica.ru/styles/Knitsubsilver/theme/prime_links/window.gif" target="_blank">http://forum.tamica.ru/styles/Knitsubsilver/theme/prime_links/window.gif); background-attachment: initial; background-origin: initial; background-clip: initial; background-color: initial; color: rgb(90, 120, 107); text-decoration: none; border-bottom-width: 1px; border-bottom-style: dashed; border-bottom-color: initial; background-position: 100% 50%; background-repeat: no-repeat no-repeat; ">  10. ... изнаночная сторона полотна. /forum.tamica.ru/styles/Knitsubsilver/theme/prime_links/window.gif" target="_blank">http://forum.tamica.ru/styles/Knitsubsilver/theme/prime_links/window.gif); background-attachment: initial; background-origin: initial; background-clip: initial; background-color: initial; color: rgb(90, 120, 107); text-decoration: none; border-bottom-width: 1px; border-bottom-style: dashed; border-bottom-color: initial; background-position: 100% 50%; background-repeat: no-repeat no-repeat; "> 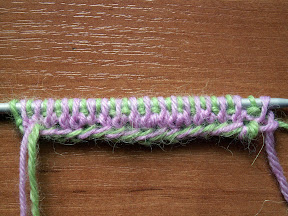 11. Аналогично вяжется второй ряд. Разница лишь в том, что теперь лицевая сторона полотна уже сиреневая, а изнаночная - зелёного цвета. Так выглядит лицевая сторона и ... /forum.tamica.ru/styles/Knitsubsilver/theme/prime_links/window.gif" target="_blank">http://forum.tamica.ru/styles/Knitsubsilver/theme/prime_links/window.gif); background-attachment: initial; background-origin: initial; background-clip: initial; background-color: initial; color: rgb(90, 120, 107); text-decoration: none; border-bottom-width: 1px; border-bottom-style: dashed; border-bottom-color: initial; background-position: 100% 50%; background-repeat: no-repeat no-repeat; "> 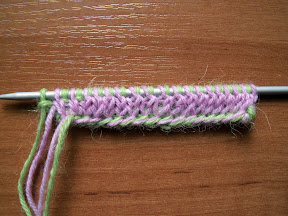 12. ... изнаночная сторона работы в конце второго ряда. /forum.tamica.ru/styles/Knitsubsilver/theme/prime_links/window.gif" target="_blank">http://forum.tamica.ru/styles/Knitsubsilver/theme/prime_links/window.gif); background-attachment: initial; background-origin: initial; background-clip: initial; background-color: initial; color: rgb(90, 120, 107); text-decoration: none; border-bottom-width: 1px; border-bottom-style: dashed; border-bottom-color: initial; background-position: 100% 50%; background-repeat: no-repeat no-repeat; "> 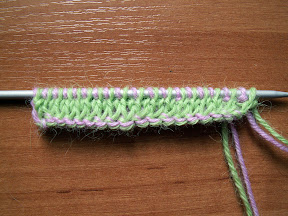 13. С 3-его ряда начинается рисунок. Первые четыре пары петель вяжутся как в предыдущих рядах. Следующие 7 пар петель - это рисунок. Для того, чтобы получился рисунок, необходимо перед началом вывязывания рисунка нити поменять местами, т.е. зелёные лицевые петли вязать сиреневой нитью, изнаночные сиреневые петли - зелёной нитью. /forum.tamica.ru/styles/Knitsubsilver/theme/prime_links/window.gif" target="_blank">http://forum.tamica.ru/styles/Knitsubsilver/theme/prime_links/window.gif); background-attachment: initial; background-origin: initial; background-clip: initial; background-color: initial; color: rgb(90, 120, 107); text-decoration: none; border-bottom-width: 1px; border-bottom-style: dashed; border-bottom-color: initial; background-position: 100% 50%; background-repeat: no-repeat no-repeat; "> 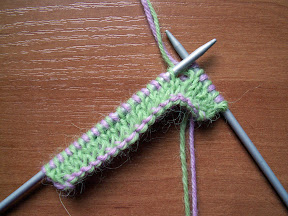 14. Для этого зелёную нить оставляю за работой в стороне и сиреневой нитью вяжу лицевую петлю первой пары петль рисунка, а ... /forum.tamica.ru/styles/Knitsubsilver/theme/prime_links/window.gif" target="_blank">http://forum.tamica.ru/styles/Knitsubsilver/theme/prime_links/window.gif); background-attachment: initial; background-origin: initial; background-clip: initial; background-color: initial; color: rgb(90, 120, 107); text-decoration: none; border-bottom-width: 1px; border-bottom-style: dashed; border-bottom-color: initial; background-position: 100% 50%; background-repeat: no-repeat no-repeat; "> 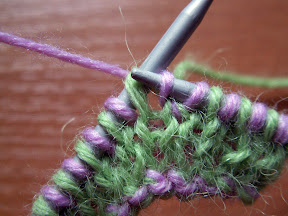 15. ... зелёной нитью вяжу изнаночную петлю. /forum.tamica.ru/styles/Knitsubsilver/theme/prime_links/window.gif" target="_blank">http://forum.tamica.ru/styles/Knitsubsilver/theme/prime_links/window.gif); background-attachment: initial; background-origin: initial; background-clip: initial; background-color: initial; color: rgb(90, 120, 107); text-decoration: none; border-bottom-width: 1px; border-bottom-style: dashed; border-bottom-color: initial; background-position: 100% 50%; background-repeat: no-repeat no-repeat; "> 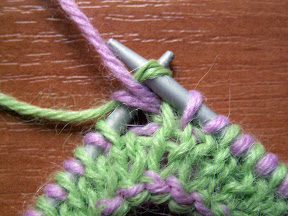 16. Таким образом вяжу все 7 пар петель рисунка. Обратите внимание, что на полотне можно увидеть, где произошла смена нитей. /forum.tamica.ru/styles/Knitsubsilver/theme/prime_links/window.gif" target="_blank">http://forum.tamica.ru/styles/Knitsubsilver/theme/prime_links/window.gif); background-attachment: initial; background-origin: initial; background-clip: initial; background-color: initial; color: rgb(90, 120, 107); text-decoration: none; border-bottom-width: 1px; border-bottom-style: dashed; border-bottom-color: initial; background-position: 100% 50%; background-repeat: no-repeat no-repeat; ">  17. Следующие 7 пар петель - это петли фона, поэтому опять меняю нити местами и зелёные лицевые петли вяжу зелёной нитью, а сиреневые изнаночные - сиреновой нитью. /forum.tamica.ru/styles/Knitsubsilver/theme/prime_links/window.gif" target="_blank">http://forum.tamica.ru/styles/Knitsubsilver/theme/prime_links/window.gif); background-attachment: initial; background-origin: initial; background-clip: initial; background-color: initial; color: rgb(90, 120, 107); text-decoration: none; border-bottom-width: 1px; border-bottom-style: dashed; border-bottom-color: initial; background-position: 100% 50%; background-repeat: no-repeat no-repeat; ">  /forum.tamica.ru/styles/Knitsubsilver/theme/prime_links/window.gif" target="_blank">http://forum.tamica.ru/styles/Knitsubsilver/theme/prime_links/window.gif); background-attachment: initial; background-origin: initial; background-clip: initial; background-color: initial; color: rgb(90, 120, 107); text-decoration: none; border-bottom-width: 1px; border-bottom-style: dashed; border-bottom-color: initial; background-position: 100% 50%; background-repeat: no-repeat no-repeat; "> 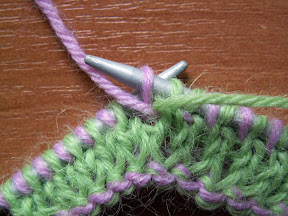 18. Так выглядит лицевая сторона полотна в конце ряда. /forum.tamica.ru/styles/Knitsubsilver/theme/prime_links/window.gif" target="_blank">http://forum.tamica.ru/styles/Knitsubsilver/theme/prime_links/window.gif); background-attachment: initial; background-origin: initial; background-clip: initial; background-color: initial; color: rgb(90, 120, 107); text-decoration: none; border-bottom-width: 1px; border-bottom-style: dashed; border-bottom-color: initial; background-position: 100% 50%; background-repeat: no-repeat no-repeat; ">  19. В следующем ряду рисунок читаем в обратном направлении, слева направо. Первые 6 пар петель - это петли фона, после нити меняю местами и вяжу 9 пар петель рисунка. /forum.tamica.ru/styles/Knitsubsilver/theme/prime_links/window.gif" target="_blank">http://forum.tamica.ru/styles/Knitsubsilver/theme/prime_links/window.gif); background-attachment: initial; background-origin: initial; background-clip: initial; background-color: initial; color: rgb(90, 120, 107); text-decoration: none; border-bottom-width: 1px; border-bottom-style: dashed; border-bottom-color: initial; background-position: 100% 50%; background-repeat: no-repeat no-repeat; "> 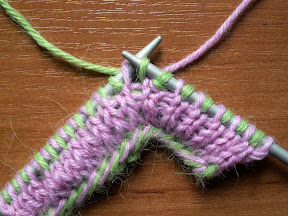 /forum.tamica.ru/styles/Knitsubsilver/theme/prime_links/window.gif" target="_blank">http://forum.tamica.ru/styles/Knitsubsilver/theme/prime_links/window.gif); background-attachment: initial; background-origin: initial; background-clip: initial; background-color: initial; color: rgb(90, 120, 107); text-decoration: none; border-bottom-width: 1px; border-bottom-style: dashed; border-bottom-color: initial; background-position: 100% 50%; background-repeat: no-repeat no-repeat; "> 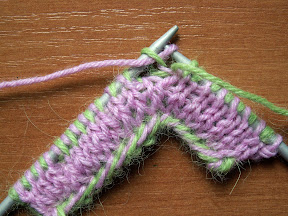 20. Дальше опять смена нитей и вязание фона. Уже на этом этапе становится видным первый ряд рисунка. /forum.tamica.ru/styles/Knitsubsilver/theme/prime_links/window.gif" target="_blank">http://forum.tamica.ru/styles/Knitsubsilver/theme/prime_links/window.gif); background-attachment: initial; background-origin: initial; background-clip: initial; background-color: initial; color: rgb(90, 120, 107); text-decoration: none; border-bottom-width: 1px; border-bottom-style: dashed; border-bottom-color: initial; background-position: 100% 50%; background-repeat: no-repeat no-repeat; "> 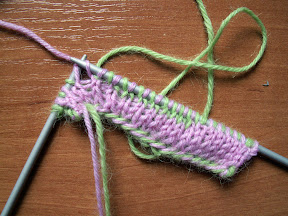 /forum.tamica.ru/styles/Knitsubsilver/theme/prime_links/window.gif" target="_blank">http://forum.tamica.ru/styles/Knitsubsilver/theme/prime_links/window.gif); background-attachment: initial; background-origin: initial; background-clip: initial; background-color: initial; color: rgb(90, 120, 107); text-decoration: none; border-bottom-width: 1px; border-bottom-style: dashed; border-bottom-color: initial; background-position: 100% 50%; background-repeat: no-repeat no-repeat; "> 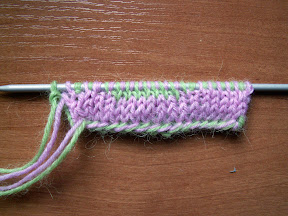 21. Так выглядит изнаночная сторона полотна в конце ряда. /forum.tamica.ru/styles/Knitsubsilver/theme/prime_links/window.gif" target="_blank">http://forum.tamica.ru/styles/Knitsubsilver/theme/prime_links/window.gif); background-attachment: initial; background-origin: initial; background-clip: initial; background-color: initial; color: rgb(90, 120, 107); text-decoration: none; border-bottom-width: 1px; border-bottom-style: dashed; border-bottom-color: initial; background-position: 100% 50%; background-repeat: no-repeat no-repeat; "> 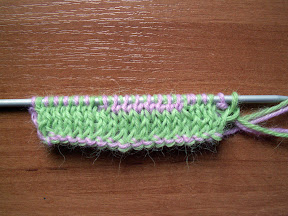 22. Дальше продолжаю вязание. Промежуточные результат работы. /forum.tamica.ru/styles/Knitsubsilver/theme/prime_links/window.gif" target="_blank">http://forum.tamica.ru/styles/Knitsubsilver/theme/prime_links/window.gif); background-attachment: initial; background-origin: initial; background-clip: initial; background-color: initial; color: rgb(90, 120, 107); text-decoration: none; border-bottom-width: 1px; border-bottom-style: dashed; border-bottom-color: initial; background-position: 100% 50%; background-repeat: no-repeat no-repeat; "> 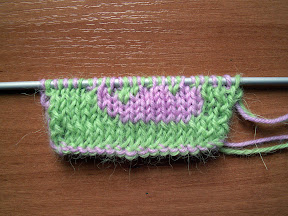 23. А вот и результат. Полотно получилось размером 18 петель х 15 рядов. /forum.tamica.ru/styles/Knitsubsilver/theme/prime_links/window.gif" target="_blank">http://forum.tamica.ru/styles/Knitsubsilver/theme/prime_links/window.gif); background-attachment: initial; background-origin: initial; background-clip: initial; background-color: initial; color: rgb(90, 120, 107); text-decoration: none; border-bottom-width: 1px; border-bottom-style: dashed; border-bottom-color: initial; background-position: 100% 50%; background-repeat: no-repeat no-repeat; "> 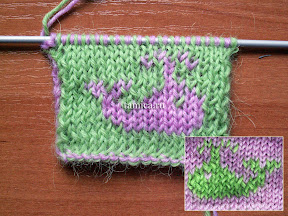 Такой способ вязания особенно хорош для вязания зимних шапок. А чтобы наборный край получился ещё более аккуратным, можно использовать итальянский способ набора петель /forum.tamica.ru/styles/Knitsubsilver/theme/prime_links/window.gif" target="_blank">http://forum.tamica.ru/styles/Knitsubsilver/theme/prime_links/window.gif); background-attachment: initial; background-origin: initial; background-clip: initial; background-color: initial; color: rgb(90, 120, 107); text-decoration: none; border-bottom-width: 1px; border-bottom-style: dashed; border-bottom-color: initial; background-position: 100% 50%; background-repeat: no-repeat no-repeat; ">http://tamica.ru/page/italjanskij-nabor-petel
|
Вы сейчас не можете прокомментировать это сообщение.
Дневник Двухстороннее вязание жаккардовых узоров- МК | Elena-Viktorovna - Дневник Elena-Viktorovna |
Лента друзей Elena-Viktorovna
/ Полная версия
Добавить в друзья
Страницы:
раньше»