Это цитата сообщения Kantri Оригинальное сообщение
Наколка на манекене — конструирование спинки
http://korfiati.ru/?s=макетирование

Наколка на манекене: макетирование спинки лифа
Для создания конструкции спинки необходимо для начала подготовить прямоугольный кусок макетной ткани нужного размера. Он должен соответствовать длине и ширине спинки с прибавками. Для этого снимем несколько мерок.
Мерка 1: Длина спинки до талии 2 (ДТС2) — 41 см.
Снимается от точки сочленения шеи с плечом до линии талии (рис. 1)
Мерка 2: Расстояние от центра спинки до бокового шва по линии уровня груди — 20 см. (рис. 2)
 [x658]/korfiati.ru/wp-content/uploads/2017/03/measurement-5-1-239x328.jpg" target="_blank">http://korfiati.ru/wp-content/uploads/2017/03/measurement-5-1-239x328.jpg 239w, http://korfiati.ru/wp-content/uploads/2017/03/measurement-5-1-345x473.jpg 345w, http://korfiati.ru/wp-content/uploads/2017/03/measurement-5-1.jpg 720w" style="margin: 0px auto; padding: 0px; border: 0px; font-style: inherit; font-variant: inherit; font-weight: inherit; font-stretch: inherit; font-size: inherit; line-height: inherit; font-family: inherit; vertical-align: baseline; max-width: 100%; height: auto; border-radius: 10px; transition: opacity 0.2s ease;" title="Наколка на манекене" width="480" />
Рис. 1. Мерка Длина спинки до талии 2
 [x658]/korfiati.ru/wp-content/uploads/2017/03/measurement-6-1-239x328.jpg" target="_blank">http://korfiati.ru/wp-content/uploads/2017/03/measurement-6-1-239x328.jpg 239w, http://korfiati.ru/wp-content/uploads/2017/03/measurement-6-1-345x473.jpg 345w, http://korfiati.ru/wp-content/uploads/2017/03/measurement-6-1.jpg 720w" style="margin: 0px auto; padding: 0px; border: 0px; font-style: inherit; font-variant: inherit; font-weight: inherit; font-stretch: inherit; font-size: inherit; line-height: inherit; font-family: inherit; vertical-align: baseline; max-width: 100%; height: auto; border-radius: 10px; transition: opacity 0.2s ease;" title="Метод наколки на манекене" width="480" />
Рис. 2. Снятие мерки 2
Мерка 3: Расстояние от линии горловины спинки до линии лопаток, измерение произведите по линии середины спинки — 13,5 см (рис. 3).
Мерка 4: Расстояние от линии горловины до линии груди — 22,5 см (рис. 4).
 [x658]/korfiati.ru/wp-content/uploads/2017/03/measurement-7-1-239x328.jpg" target="_blank">http://korfiati.ru/wp-content/uploads/2017/03/measurement-7-1-239x328.jpg 239w, http://korfiati.ru/wp-content/uploads/2017/03/measurement-7-1-345x473.jpg 345w, http://korfiati.ru/wp-content/uploads/2017/03/measurement-7-1.jpg 720w" style="margin: 0px auto; padding: 0px; border: 0px; font-style: inherit; font-variant: inherit; font-weight: inherit; font-stretch: inherit; font-size: inherit; line-height: inherit; font-family: inherit; vertical-align: baseline; max-width: 100%; height: auto; border-radius: 10px; transition: opacity 0.2s ease;" title="Метод наколки на манекене" width="480" />
Рис. 3. Снятие мерки 3
 [x658]/korfiati.ru/wp-content/uploads/2017/03/measurement-8-239x328.jpg" target="_blank">http://korfiati.ru/wp-content/uploads/2017/03/measurement-8-239x328.jpg 239w, http://korfiati.ru/wp-content/uploads/2017/03/measurement-8-345x473.jpg 345w, http://korfiati.ru/wp-content/uploads/2017/03/measurement-8.jpg 720w" style="margin: 0px auto; padding: 0px; border: 0px; font-style: inherit; font-variant: inherit; font-weight: inherit; font-stretch: inherit; font-size: inherit; line-height: inherit; font-family: inherit; vertical-align: baseline; max-width: 100%; height: auto; border-radius: 10px; transition: opacity 0.2s ease;" title="Метод наколки на манекене" width="480" />
Рис. 4. Снятие мерки 4
Выкроите кусок ткани, используя снятые мерки, с припускам на швы как показано на рис. Расчет ткани для макетирования спинки лифа
 [x840]/korfiati.ru/wp-content/uploads/2017/03/Textile-size-back-239x418.png" target="_blank">http://korfiati.ru/wp-content/uploads/2017/03/Textile-size-back-239x418.png 239w, http://korfiati.ru/wp-content/uploads/2017/03/Textile-size-back-345x604.png 345w, http://korfiati.ru/wp-content/uploads/2017/03/Textile-size-back.png 720w" width="480" />
Наколка ткани на спинку
Припуск по центру спинки подогните и закрепите булавками. Совместите точку Уровня лопаток на подготовленном куске ткани с линией на манекене, закрепите булавкой (рис. 1).
Совместите линию середины спинки и закрепите булавками. Совместите линию лопаток с линией на манекене и закрепите булавками (рис. 2).
 [x637]/korfiati.ru/wp-content/uploads/2017/03/design-back-pattern-on-a-mannequin-2-239x317.jpg" target="_blank">http://korfiati.ru/wp-content/uploads/2017/03/desi...n-on-a-mannequin-2-239x317.jpg 239w, http://korfiati.ru/wp-content/uploads/2017/03/desi...n-on-a-mannequin-2-345x458.jpg 345w, http://korfiati.ru/wp-content/uploads/2017/03/desi...k-pattern-on-a-mannequin-2.jpg 720w" style="margin: 0px auto; padding: 0px; border: 0px; font-style: inherit; font-variant: inherit; font-weight: inherit; font-stretch: inherit; font-size: inherit; line-height: inherit; font-family: inherit; vertical-align: baseline; max-width: 100%; height: auto; border-radius: 10px; transition: opacity 0.2s ease;" title="Метод наколки на манекене" width="480" />
Рис. 1. Конструирование лифа спинки
 [x637]/korfiati.ru/wp-content/uploads/2017/03/design-back-pattern-on-a-mannequin-3-239x317.jpg" target="_blank">http://korfiati.ru/wp-content/uploads/2017/03/desi...n-on-a-mannequin-3-239x317.jpg 239w, http://korfiati.ru/wp-content/uploads/2017/03/desi...n-on-a-mannequin-3-345x458.jpg 345w, http://korfiati.ru/wp-content/uploads/2017/03/desi...k-pattern-on-a-mannequin-3.jpg 720w" style="margin: 0px auto; padding: 0px; border: 0px; font-style: inherit; font-variant: inherit; font-weight: inherit; font-stretch: inherit; font-size: inherit; line-height: inherit; font-family: inherit; vertical-align: baseline; max-width: 100%; height: auto; border-radius: 10px; transition: opacity 0.2s ease;" title="Метод наколки на манекене" width="480" />
Рис. 2. Конструирование лифа спинки
Заложите талевую вытачку длиной 14-16 см и глубиной 3 см и закрепите булавками. Старайтесь расположить вытачку по центру на отрезке талии спинки. Глубина вытачки должна быть направлена к центру спинки (рис. 3). Рассеките ткань вдоль линии принцесс до линии талии (рис. 4).
 [x637]/korfiati.ru/wp-content/uploads/2017/03/design-back-pattern-on-a-mannequin-4-1-239x317.jpg" target="_blank">http://korfiati.ru/wp-content/uploads/2017/03/desi...on-a-mannequin-4-1-239x317.jpg 239w, http://korfiati.ru/wp-content/uploads/2017/03/desi...on-a-mannequin-4-1-345x458.jpg 345w, http://korfiati.ru/wp-content/uploads/2017/03/desi...pattern-on-a-mannequin-4-1.jpg 720w" style="margin: 0px auto; padding: 0px; border: 0px; font-style: inherit; font-variant: inherit; font-weight: inherit; font-stretch: inherit; font-size: inherit; line-height: inherit; font-family: inherit; vertical-align: baseline; max-width: 100%; height: auto; border-radius: 10px; transition: opacity 0.2s ease;" title="Метод наколки на манекене" width="480" />
Рис. 3. Конструирование лифа спинки
 [x637]/korfiati.ru/wp-content/uploads/2017/03/design-back-pattern-on-a-mannequin-6-1-239x317.jpg" target="_blank">http://korfiati.ru/wp-content/uploads/2017/03/desi...on-a-mannequin-6-1-239x317.jpg 239w, http://korfiati.ru/wp-content/uploads/2017/03/desi...on-a-mannequin-6-1-345x458.jpg 345w, http://korfiati.ru/wp-content/uploads/2017/03/desi...pattern-on-a-mannequin-6-1.jpg 720w" style="margin: 0px auto; padding: 0px; border: 0px; font-style: inherit; font-variant: inherit; font-weight: inherit; font-stretch: inherit; font-size: inherit; line-height: inherit; font-family: inherit; vertical-align: baseline; max-width: 100%; height: auto; border-radius: 10px; transition: opacity 0.2s ease;" title="Метод наколки на манекене" width="480" />
Рис. 4. Конструирование лифа спинки
Закрепите булавками ткань по линии бока (рис. 5). Надсеките ткань по линии горловины спинки и закрепите булавками вдоль линии горловины спинки. (рис. 6).
 [x637]/korfiati.ru/wp-content/uploads/2017/03/design-back-pattern-on-a-mannequin-7-1-239x317.jpg" target="_blank">http://korfiati.ru/wp-content/uploads/2017/03/desi...on-a-mannequin-7-1-239x317.jpg 239w, http://korfiati.ru/wp-content/uploads/2017/03/desi...on-a-mannequin-7-1-345x458.jpg 345w, http://korfiati.ru/wp-content/uploads/2017/03/desi...pattern-on-a-mannequin-7-1.jpg 720w" style="margin: 0px auto; padding: 0px; border: 0px; font-style: inherit; font-variant: inherit; font-weight: inherit; font-stretch: inherit; font-size: inherit; line-height: inherit; font-family: inherit; vertical-align: baseline; max-width: 100%; height: auto; border-radius: 10px; transition: opacity 0.2s ease;" title="Метод наколки на манекене" width="480" />
Рис. 5. Конструирование спинки лифа
 [x637]/korfiati.ru/wp-content/uploads/2017/03/design-back-pattern-on-a-mannequin-8-1-239x317.jpg" target="_blank">http://korfiati.ru/wp-content/uploads/2017/03/desi...on-a-mannequin-8-1-239x317.jpg 239w, http://korfiati.ru/wp-content/uploads/2017/03/desi...on-a-mannequin-8-1-345x458.jpg 345w, http://korfiati.ru/wp-content/uploads/2017/03/desi...pattern-on-a-mannequin-8-1.jpg 720w" style="margin: 0px auto; padding: 0px; border: 0px; font-style: inherit; font-variant: inherit; font-weight: inherit; font-stretch: inherit; font-size: inherit; line-height: inherit; font-family: inherit; vertical-align: baseline; max-width: 100%; height: auto; border-radius: 10px; transition: opacity 0.2s ease;" title="Метод наколки на манекене" width="480" />
Рис. 6. Конструирование лифа спинки
Надсеките ткань до линии проймы в нескольких местах. Излишек ткани можно вырезать, оставив припуск по пройме около 5 см (рис. 7). Закрепите ткань в крайней точке плеча, по линии плеча сформируйте вытачку длиной 9-10 см и глубиной 1,5-2 см. Сформируйте правильную посадку ткани вдоль линии проймы (рис. 8).
 [x637]/korfiati.ru/wp-content/uploads/2017/03/design-back-pattern-on-a-mannequin-10-1-239x317.jpg" target="_blank">http://korfiati.ru/wp-content/uploads/2017/03/desi...n-a-mannequin-10-1-239x317.jpg 239w, http://korfiati.ru/wp-content/uploads/2017/03/desi...n-a-mannequin-10-1-345x458.jpg 345w, http://korfiati.ru/wp-content/uploads/2017/03/desi...attern-on-a-mannequin-10-1.jpg 720w" style="margin: 0px auto; padding: 0px; border: 0px; font-style: inherit; font-variant: inherit; font-weight: inherit; font-stretch: inherit; font-size: inherit; line-height: inherit; font-family: inherit; vertical-align: baseline; max-width: 100%; height: auto; border-radius: 10px; transition: opacity 0.2s ease;" title="Метод наколки на манекене" width="480" />
Рис. 7. Конструирование лифа спинки
 [x637]/korfiati.ru/wp-content/uploads/2017/03/design-back-pattern-on-a-mannequin-11-1-239x317.jpg" target="_blank">http://korfiati.ru/wp-content/uploads/2017/03/desi...n-a-mannequin-11-1-239x317.jpg 239w, http://korfiati.ru/wp-content/uploads/2017/03/desi...n-a-mannequin-11-1-345x458.jpg 345w, http://korfiati.ru/wp-content/uploads/2017/03/desi...attern-on-a-mannequin-11-1.jpg 720w" style="margin: 0px auto; padding: 0px; border: 0px; font-style: inherit; font-variant: inherit; font-weight: inherit; font-stretch: inherit; font-size: inherit; line-height: inherit; font-family: inherit; vertical-align: baseline; max-width: 100%; height: auto; border-radius: 10px; transition: opacity 0.2s ease;" title="Метод наколки на манекене" width="480" />
Рис. 8. Конструирование лифа спинки
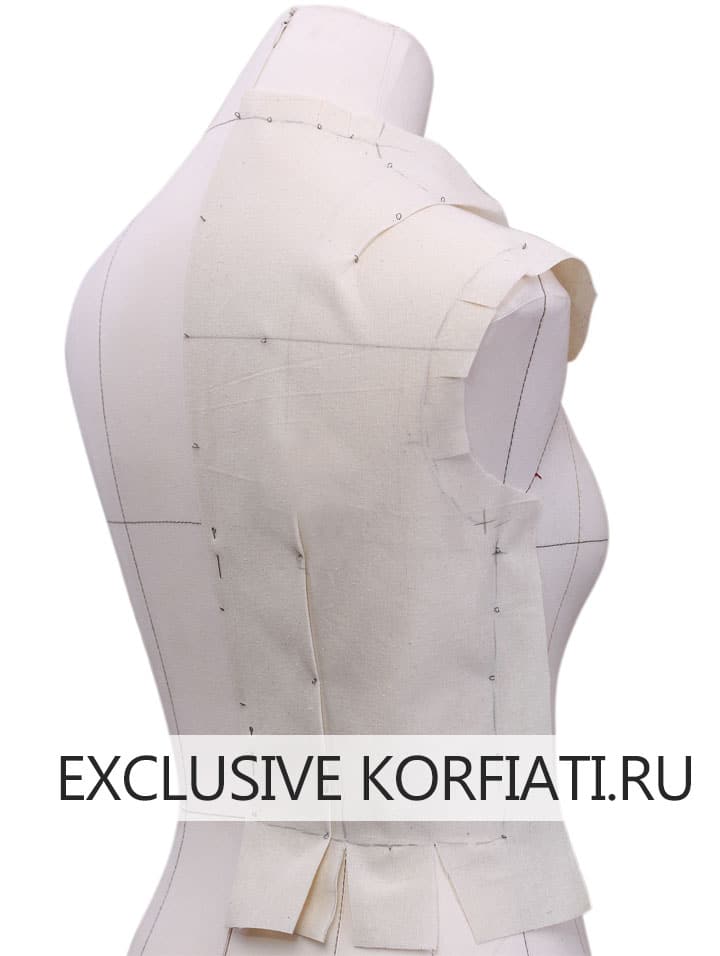
Карандашом или маркером обозначьте линии конструкции спинки — линию горловины, линию плеча, проймы, бокового шва, линию талии, обе стороны плечевой и талевой вытачек аналогично тому, как вы делали это на полочке.
[x956]/korfiati.ru/wp-content/uploads/2017/03/design-back-pattern-on-a-mannequin-11-1-239x317.jpg" target="_blank">http://korfiati.ru/wp-content/uploads/2017/03/desi...n-a-mannequin-11-1-239x317.jpg 239w, http://korfiati.ru/wp-content/uploads/2017/03/desi...n-a-mannequin-11-1-480x637.jpg 480w, http://korfiati.ru/wp-content/uploads/2017/03/desi...n-a-mannequin-11-1-345x458.jpg 345w" style="margin: 0px; padding: 0px; border: 0px; font-style: inherit; font-variant: inherit; font-weight: inherit; font-stretch: inherit; font-size: inherit; line-height: inherit; font-family: inherit; vertical-align: baseline; max-width: 100%; height: auto; border-radius: 10px; transition: opacity 0.2s ease;" title="Метод наколки на манекене" width="720" />
Рис. 9. Конструкция лифа спинки
Снимите ткань с манекена и перенесите на бумагу при помощи портновского резца (рис. 10).
Рис. 10. Перенос спинки и полочки на бумагу
Для обеспечения комфортной посадки по фигуре в конструкцию необходимо добавить прибавки на свободное облегание: по 0,5 см добавьте по линии груди к полочке и спинке — линии проведите параллельно линиям середины полочки и спинки, пройму полочки и спинки углубите на 1 см и расширьте на 0,5 см (рис. 11).