Сложное моделирование 2 Сидней, Новый Южный Уэльс
24-10-2014 10:04
к комментариям - к полной версии
- понравилось!
Это цитата сообщения adelaidaivi Оригинальное сообщение
Сложное моделирование 2 Сидней, Новый Южный Уэльс,
A huge shout out to all the FB fans who wrestled with the Pattern Puzzle this week. A valiant effort all round! First up the awkward shape that had everyone stumped.
On Saturday Karen, Marissa and Delwyn had a fun ol' time working out this simple but defying shape. Posted as the image below, the guesses were so close first time around for all. Quite rightly it could be a collar or a sleeve but is in fact a gathered yoke as both Karen and Delwyn guessed.
вверх^
к полной версии
понравилось!
в evernote
Это цитата сообщения adelaidaivi Оригинальное сообщение
Сложное моделирование 2 Сидней, Новый Южный Уэльс,
Pattern Puzzle - Mioara Cretu
For the first time in the short history of the Studio Faro #PatternPuzzles we have our first ever fan submission for the weekly event. Mioara Cretu, a textile teacher from Iassy, Romania submitted the fabulous pattern shape you see below.
Such a challenging shape had our #PatternPuzzlers staying back after school to solve the problem. With collective zeal Julie Eilber, Alison Calderwood and Karen Vogelsang finally solved the puzzle early Wednesday morning. Such stamina!
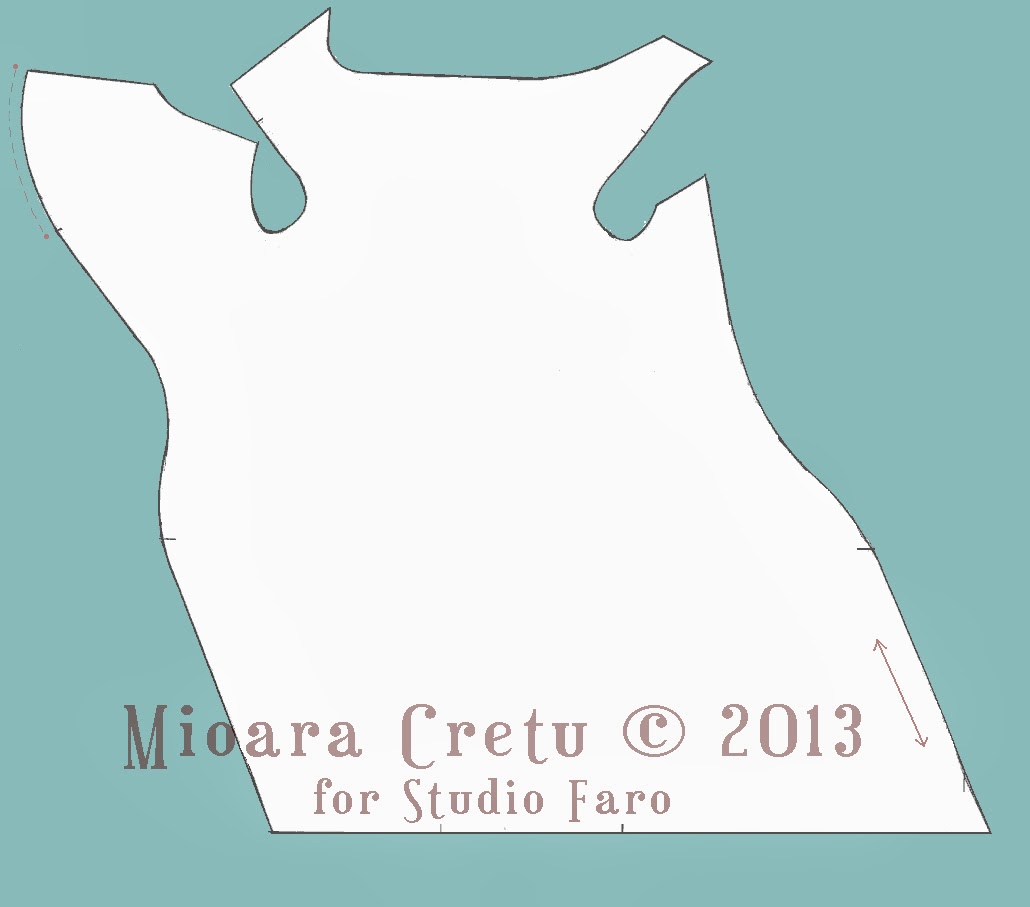
Mioara has a particular interest in clothing made a jersey and admires the Donna Karan idea of the 'one pattern dress' achieved by removing the side seams with clever pattern making. The front dress has a very subtle cowl with most of the interesting detail featured on the back view. The back detail starts with an asymmetric neckline that leads to a twisted seam flowing from the back to the lower front dress. Some gather/drape is developed at the shoulder blade level and both shoulder seams have been moved to suit the back styling and keep the pattern piece as one.

Below is the photo of the original Donna Karan style that inspired Mioara.

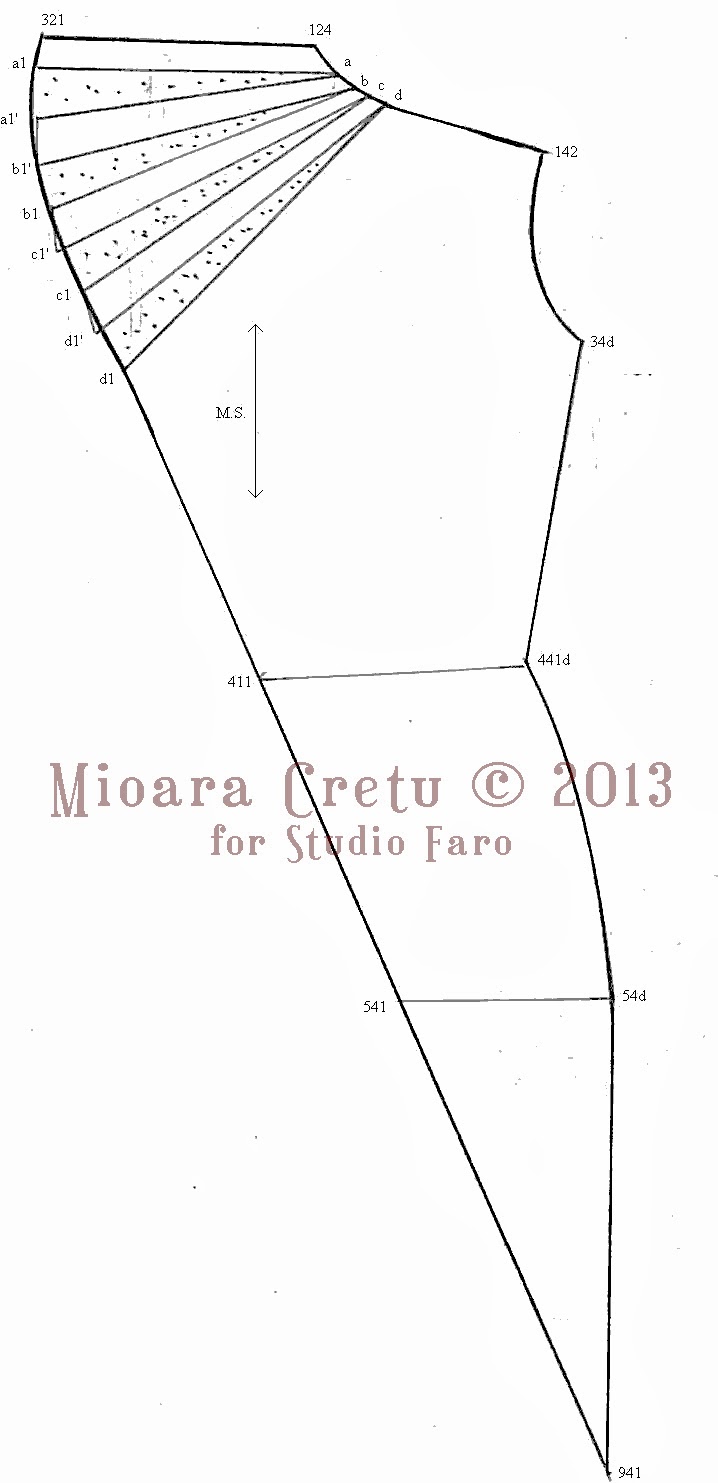
Although this dress is made form a two-way stretch jersey, Mioara has used a block with a front bust dart to produce and control the subtle cowl in the front neck. This is very unusual and also very clever. It is possible to convert a fitted block to a jersey block and still keep the bust dart for shaping. This I know in theory. However I have rarely seen this done and never tried it myself. The pattern plan below shows the bust dart transferred in to the neck line to make a small but controlled cowl.

The back view of the pattern plan is much more detailed. The asymmetric neckline and the twisted seam are the dominant features on the back of this dress. Note the style lines where small portions of the back pattern will be removed and added to the front shoulder to complete the one piece pattern. Also at the top of the twisted seam are the cutting lines for the drape alteration to make gather on the back panel.

The drape alteration is set out below in detail. This extra fabric will become drape and you can gather it or form small soft tucks.
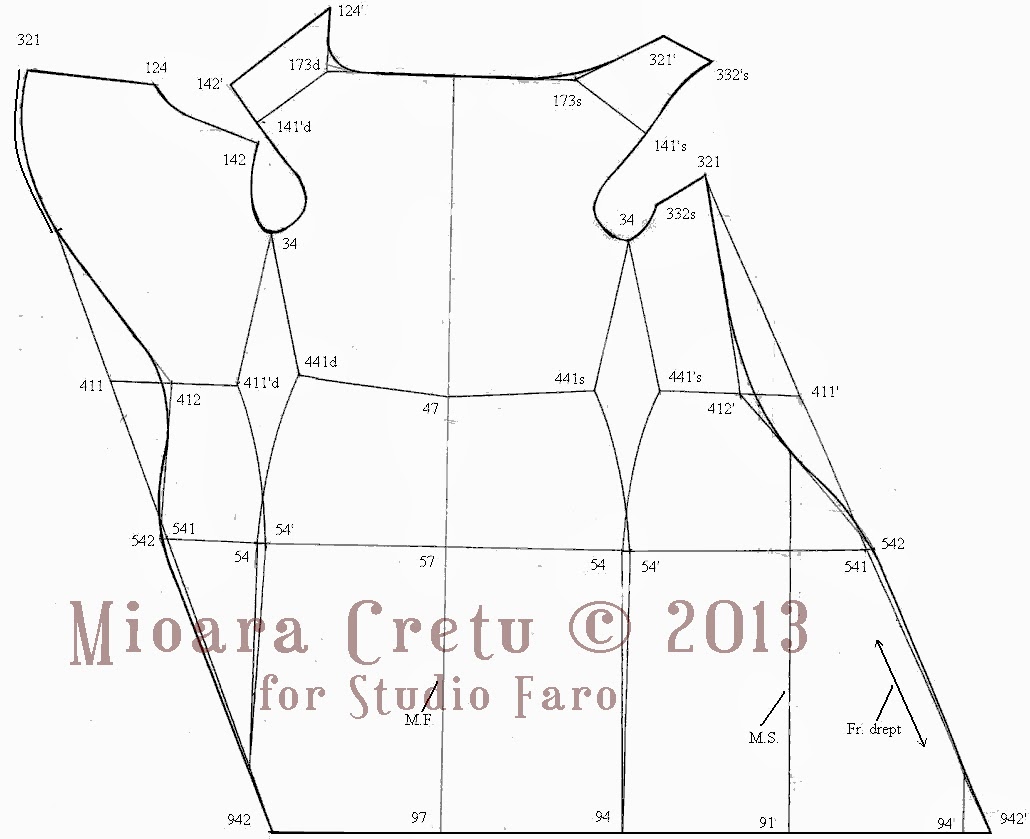
The final pattern piece below has enough detail for you to see where the original pattern has been altered to form the new pattern shape. Please note that Mioara has very cleverly transferred the side seam shaping, to the twisted seam edge, to maintain a sharp fit in this gorgeous dress.
A beautiful design, a challenging pattern and finally a very simple dress to make. Is anyone tempted to try this style?
Pattern Puzzle - 'Lady in Waiting'
A Development from the 'whiteonwhite' Trend
So here is the lovely coincidence. After deciding the pattern development was suitable for the Saturday morning Pattern Puzzle, I then remembered that the design was part of an earlier post about Design Development. Also featured on my Trends on Tumblr blog along with many other trend developments. I think I even shot some video footage??? Must look for that.....
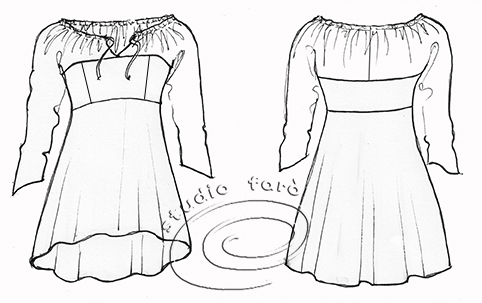
The design in question is in the centre at the top of the page and I have named it the 'Lady in Waiting'.
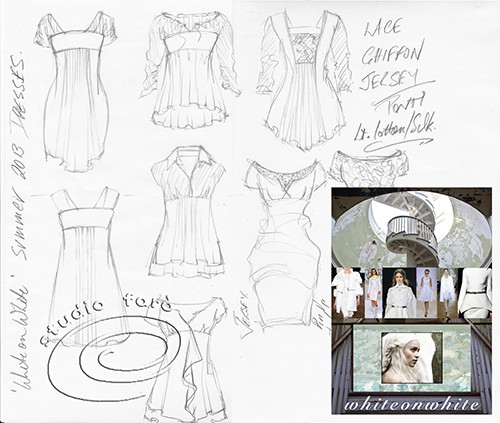
Here is the production sketch that includes all front and back detail, ready for patten making. In keeping with the original theme I would make this all in white, but create some interest by using three different fabric textures. From the top down I would use a chiffon/georgette for the sleeves and yoke, stretch woven for the bodice and a soft sheen woven, probably bias cut (not too transparent). You could choose to all silks or all polyesters depending on your price tolerance and laundering preferences.
Below is the pattern plan worked out on a dartless kimono block. As always I have developed the plan with front and back on top of each other (old habit with this block). Hoping this time the colour coding is a little easier to read and not so confusing. Please email if you would like me to produce a separate front and back pattern plan.
Worth noting that I have placed a waist dart in this unfitted block to help with the empire shaping (bodice). The two measurements you need to locate the bust point and then the waist dart are:
1. front length to bust point and
2. bust separation.
You can use these measurements to locate the bust point and build a waist dart that helps develop the empire shape and profile. Again, probably too much detail for this post, but do email if you would like to know more.
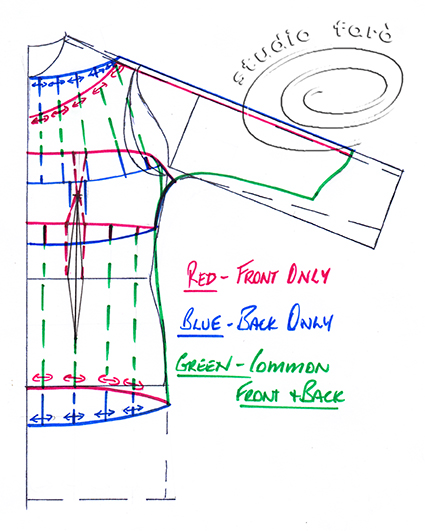
The delightfully confusing pattern piece I used in the Pattern Puzzle is below. This piece is the sleeve, all-in-one with the upper bodice, front and back. The extra fabric in the neckline will be gathered up with a drawstring (see the sketch above). I would probably cut this part of the garment in a semi-transparent chiffon or georgette. Cutting it on the bias will help the gather and the sleeve to drape well.

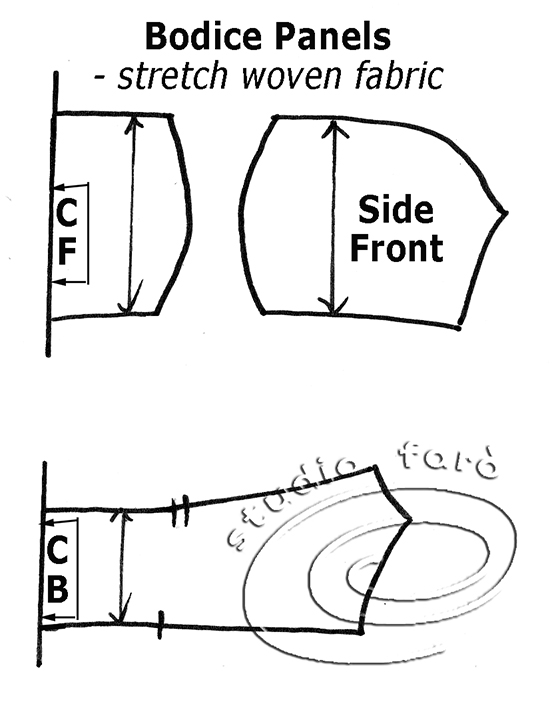
While developing the pattern plan I decided that the bodice panels would be great in a stretch woven making the firmer fit more comfortable. Also may eliminate the need for a zip opening.
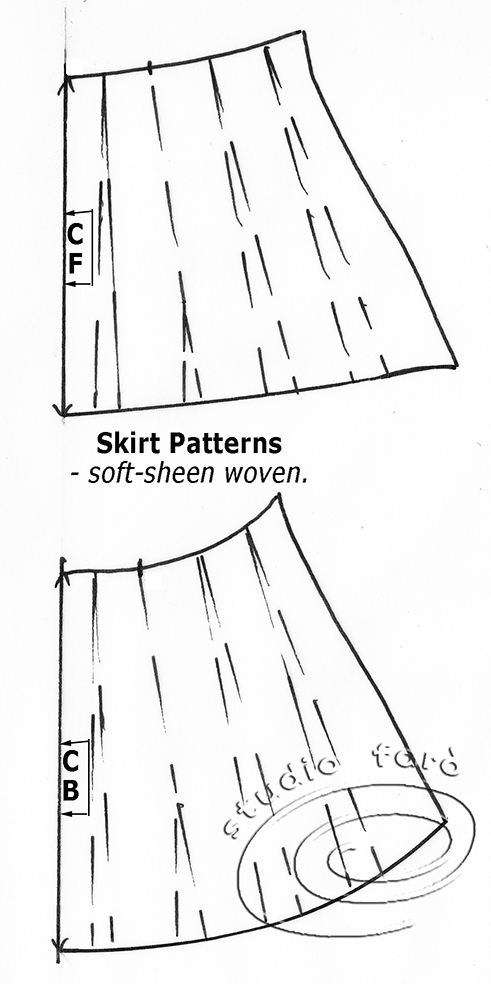
The front and back skirt panels have been flared toward the hem for fullness, without any fullness under the bust. I would most likely cut the skirts on the bias as long as the fabric is stable enough.
If anyone would like to discuss the seam allowances or construction for this style or any of the other Pattern Puzzle please don't hesitate to email me for more detail.
If you find you are liking the methods I use to develop patterns then consider enrolling in one of the Introductory Workshops coming up at the end of September.
Pattern Puzzle - Soft Pleat Jacket

If you turn the piece over and stand it up straight you can see that it is the front right side of this jacket with extra length added to the wrap to make the soft drape pleat between each button.

The pattern plan below is based on a loose kimono jacket fit. I have added a built up neckline, side body panels (front & back) and cuffs and pockets with a slightly wider profile. The front right side of the jacket is opened up to make the waterfall style drape buttoning. The extra fabric can be pressed into pleats or you could get inside the facing and gently tack those soft folds together. When the jacket is left open the right side will behave very differently to the left and give a strong asymmetric look to the garment.

The pattern pieces are set out below with different right and left fronts, the side front and side back panels and the centre back panel. Sleeve, cuff and pocket are featured at the top.
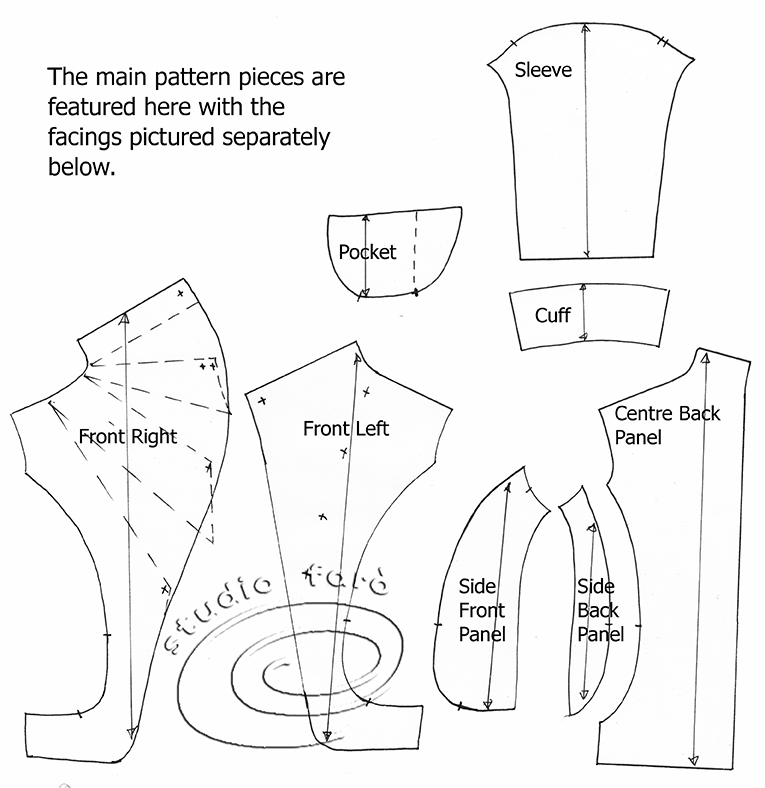
Because the fronts are so different you will see below that the same applies to the facings. Probably the one most important thing here is the cutting instructions for each of these four pieces. With the way I have laid out the pattern pieces here, all are placed right side up for better understanding. Cutting instructions for each piece would be Cut 1 Only R.S.U. (Right Side Up). And for the facings you would add fusible interlining. Back Facing would be Cut 1 Pair.

The pattern making style and complexity you see here is very much like the work we get into in the Advanced Workshops at Studio Faro later in the year.
In this post I have added the briefest of pattern making detail. If you would like more information regarding this style leave a comment and I will provide more detail.
Enjoy
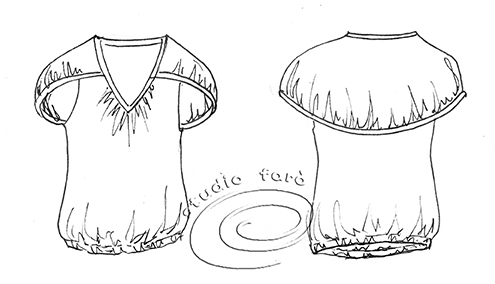
Pattern Puzzle - Gather Top

See below the production sketch shows gathering all round the yoke shape, creating a slightly puffed, cap sleeve. There is also gather in the 'V' neck feature and a loose cut caught by elastic in the hip area to create blouse near the hem.
Below is the pattern plan for the top, front and back, using a fitted block. The dashed lines indicate where the pattern will be opened to include extra fullness for gather and fullness.

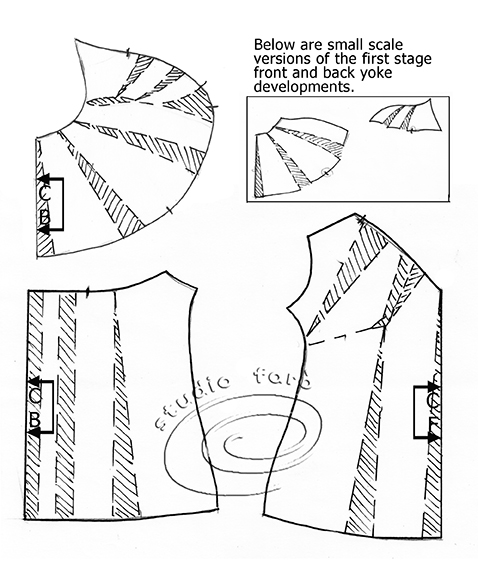
The unusual yoke shape was achieved by first expanding the front and back yoke separately as below. Then joining them together as one piece as you can see in the final pattern diagram. If you enjoy this kind of pattern making then join us at one of the Introductory workshops in the September vacation period.

Below are the final pattern pieces before they have seam allowances added, are then folded, stapled and cut as full pattern pieces. Note that the bust darts have been moved into the neckline to create gather. The shaded areas show the added fabric with the new style and the white areas are the original block. I think of these markings as the 'bones' of the pattern.
Let me know if you are interested in more detail on this particular style. Like us and join the Pattern Puzzle conversation next week. Send me your challenging ideas and patterns. Happy to share. :)
Комментарии (2):
26-05-2017-19:19
удалить
KSULAPL помогите мне, пожалуйста, хочу сшить платье ... никто не поймет фасон...http://www.fresher.ru/mary/1-2016/samaya-stilnaya-zvezda-2015-goda-po-versii-people/2.jpg... от рукава на спину идет пелерина
26-05-2017-19:21
удалить
http://www.fresher.ru/mary/1-2016/samaya-stilnaya-zvezda-2015-goda-po-versii-people/2.jpg
Комментарии (2):
вверх^
Вы сейчас не можете прокомментировать это сообщение.
Дневник Сложное моделирование 2 Сидней, Новый Южный Уэльс | KSULAPL - Дневник KSULAPL |
Лента друзей KSULAPL
/ Полная версия
Добавить в друзья
Страницы:
раньше»