Это цитата сообщения SvetlanaLikova Оригинальное сообщение
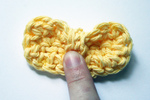
 [408x640]
http://handmade-paradise.ru/bantiki-kryuchkom-dlya-kukolok-amigurumi/
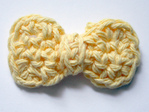
[408x640]
http://handmade-paradise.ru/bantiki-kryuchkom-dlya-kukolok-amigurumi/
 [538x264]
http://sdelala-sama.ru/1711-bantik-kryuchkom-shema.html
[538x264]
http://sdelala-sama.ru/1711-bantik-kryuchkom-shema.html
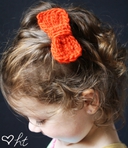
 [299x271]
http://soulblossom.ru/publ/aksessuary_krjuchkom/vintazhnyj_bantik_krjuchkom/5-1-0-81
[299x271]
http://soulblossom.ru/publ/aksessuary_krjuchkom/vintazhnyj_bantik_krjuchkom/5-1-0-81
 [700x525]
БАНТИК КРЮЧКОМ С ВИДЕО-УРОКОМ
[700x525]
БАНТИК КРЮЧКОМ С ВИДЕО-УРОКОМ
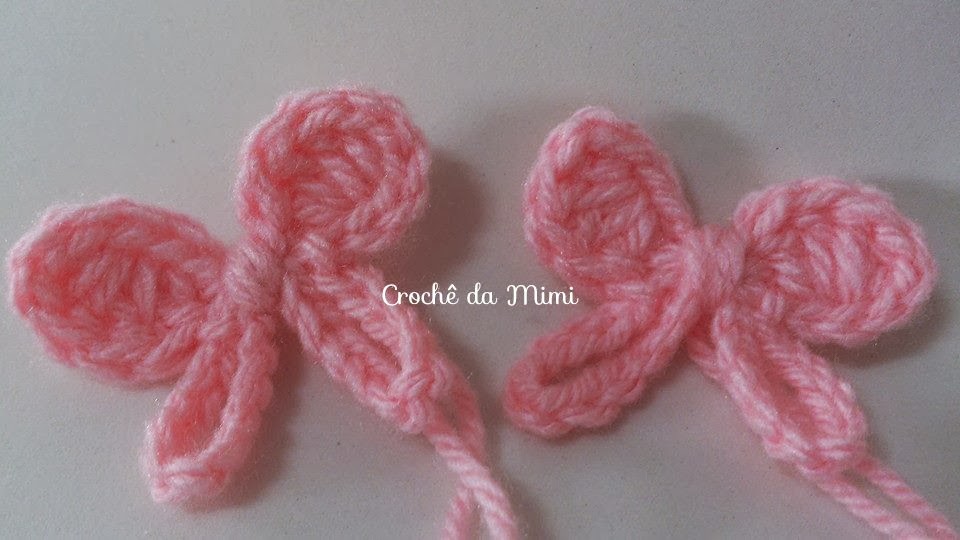
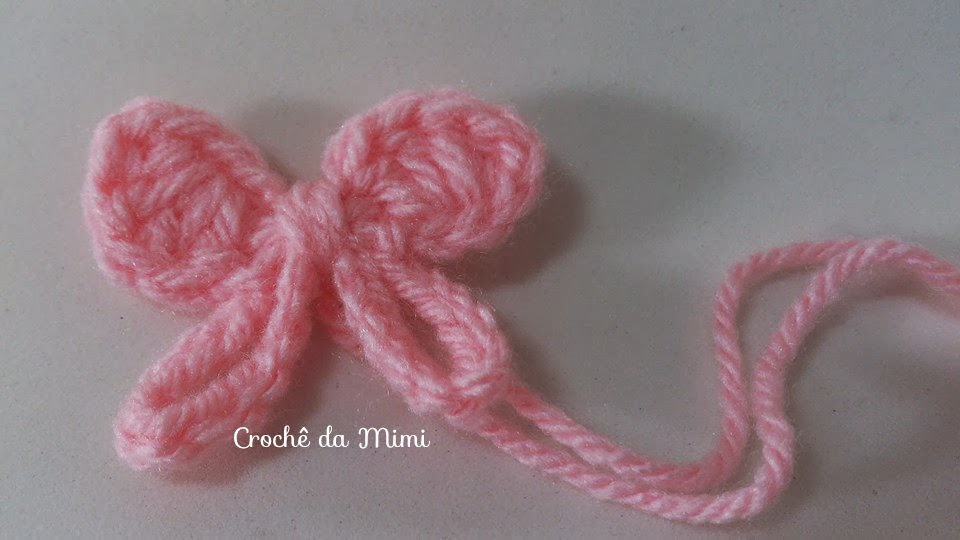
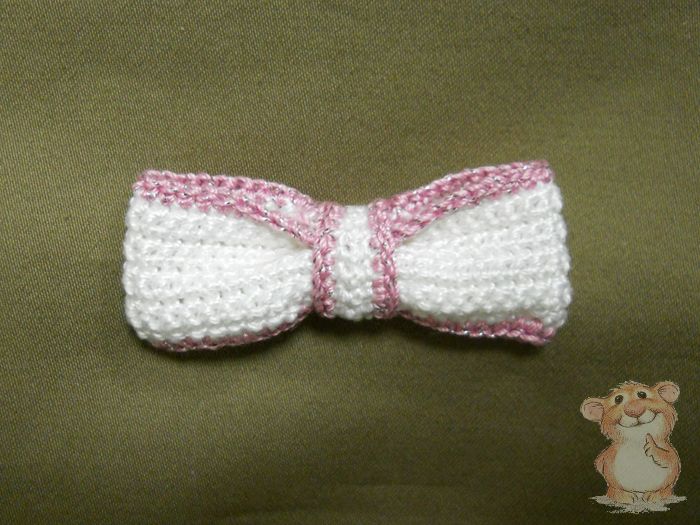
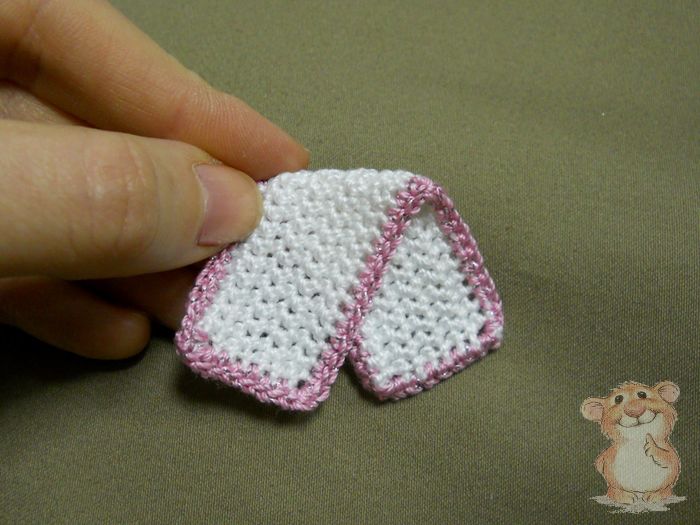
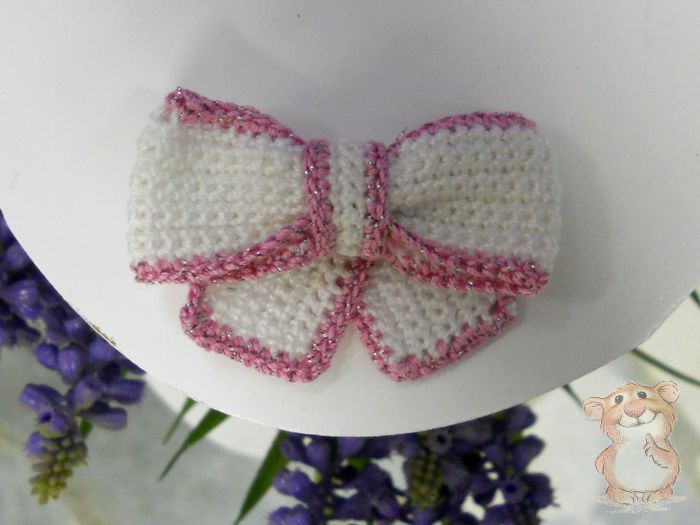
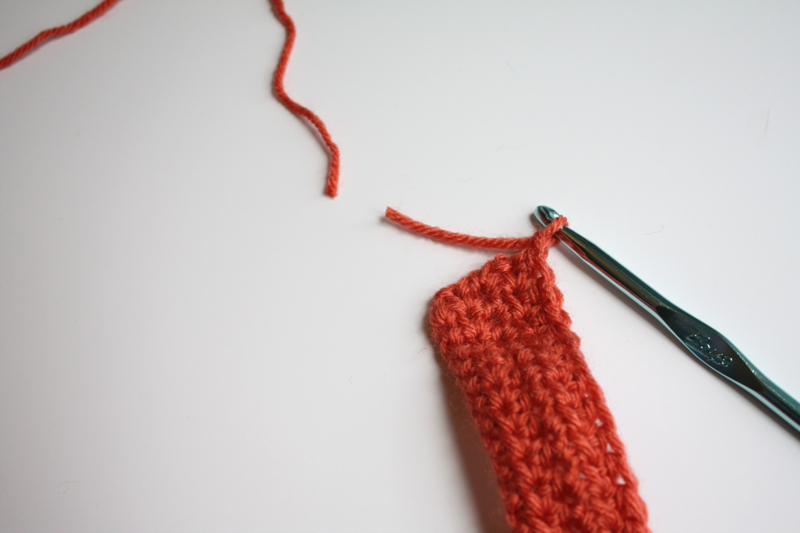
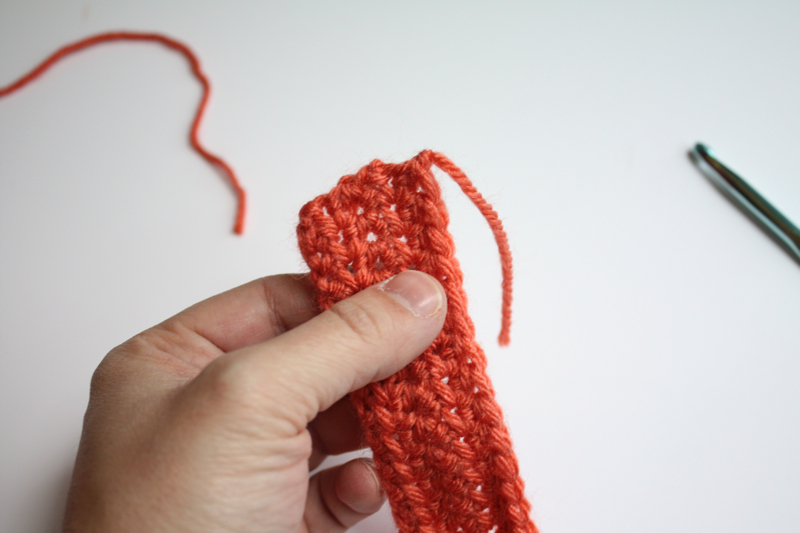
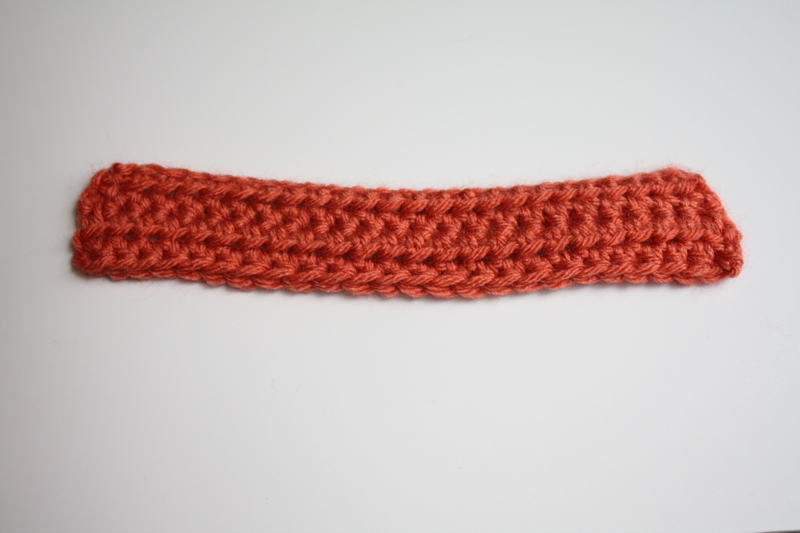
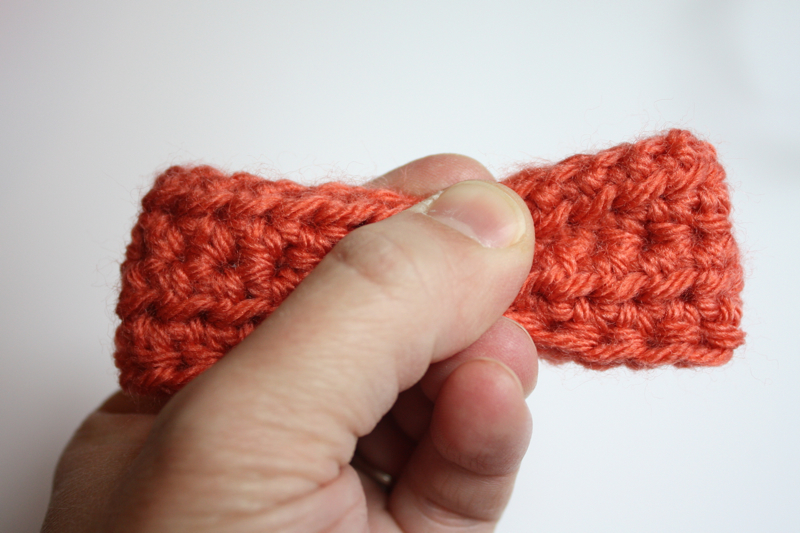
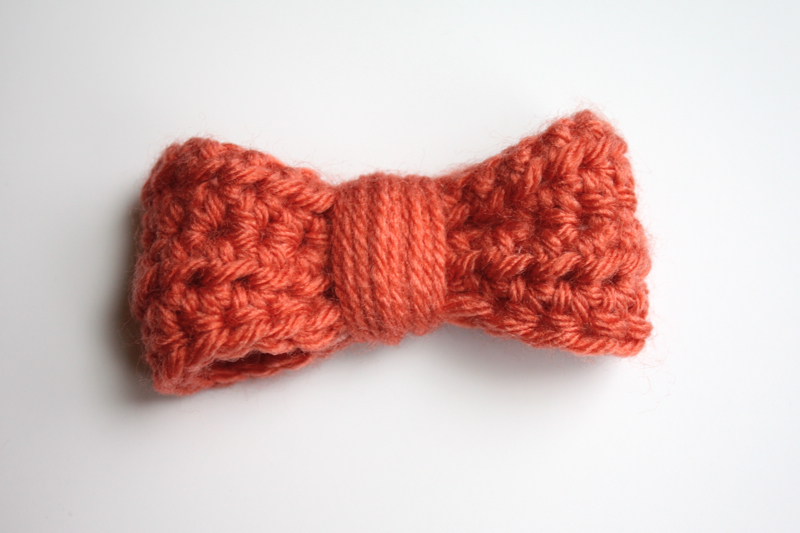
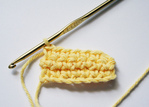
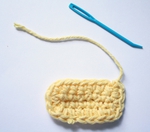
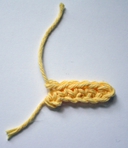
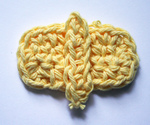
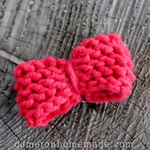
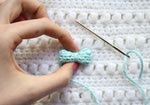
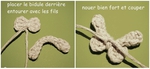
Для начала наберите цепочку из воздушных петель. В примере было набрано 10 воздушных петель и одна для подъема. Чем больше будет цепочка из петель, тем больше будет бантик, поэтому Вы сами решаете, сколько именно будет петелек в начальной цепочке. После этого необходимо провязать один ряд столбиками без накида. Для провязки берем передний столбик, который «смотрит» на Вас. Далее необходимо перевернуть работу, сделать воздушную петельку для подъема и провязываем еще один рядок. На этом этапе нам необходимо провязывать петлю, захватывая обе стороны (то есть опускать крючок под петельку и провязывать ее насквозь). Переворачиваем работу и вяжем дальше по такой же схеме. От количества рядков будет зависеть ширина бантика. В примере было провязано шесть рядков. Для того чтобы бантик получился аккуратным, его необходимо обвязать. Обвязывать бантик можно ниткой, которой Вы вязали сам бантик, не отрывая ее от Вашей работы или закончить вязку и обвязать ободок ниткой другого цвета. Для обвязки Вам необходимо по контуру провязать столбик без накида. По бокам, где нет петелек, необходимо осуществлять захват за свободные места. Особое внимание уделите уголкам своего бантика. Это наиболее проблемная зона, которая требует осторожности. Если Вы правильно обвяжете уголки, они станут более аккуратными, а сами края сгладятся и станут овальными. В конечном итоге такой бантик будет намного красивее. Теперь мы можем начать формировать наш бантик. Для этого нужно взяться за края и согнуть их. После этого у Вас получится бантик. Закрепить его следует той же пряжей, которой Вы вязали сам бантик. Вы можете для этих целей взять пряжу другого цвета. Для закрепления бантика нужно пряжей обмотать основание бантика.
Объемный бантик крючком http://www.homyak55.ru/publ/master_klassy/vyazanie...-obemnyy-bantik-kryuchkom.html
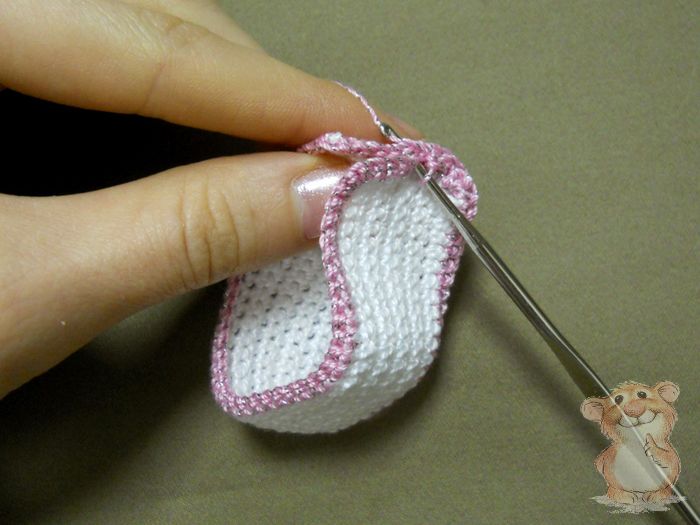
Объемный бантик, связанный крючком – это красивый элемент для украшения пинеток, варежек и многих других детских вещей. Также пригодится и для мелочей: декора чехлов для планшетов, смартфонов; дамских сумочек. Хоть и выглядит он так, как будто требует навыка и опыта в вязании, на деле всё просто: единственное умение, которое требуется – это вязать прямое полотно. Новички, не пугайтесь и смело беритесь за дело!

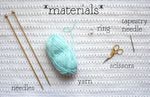
Выберите два цвета пряжи, сочетающиеся между собой. Всего потребуется меньше 20 грамм, так что можно пустить в ход остатки от других вещей. На фото тонкий 100% хлопок белого цвета и хлопок с люрексом фиолетового цвета. Если брать толстые нити (акрил, шерсть или хлопок в несколько сложений), получится довольно грубо, так как полотно крючком само по себе плотное.
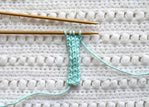
Свяжите длинную узкую полоску основного цвета. Я набирала 45 воздушных петель, затем вязала взад-вперед простыми столбиками без накида. При таком количестве петель достаточно девяти рядов.

Теперь обвязываем по краю другой пряжей. Из каждой петли по одному столбику, а на углах по три. Получаем ровный прямоугольник. Нить сейчас обрезать не нужно, ещё продолжим вязание.

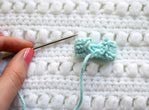
Соединяем концы полосы и провязываем вместе, по линии, полустолбиками. Вышло колечко. Перемещаем шов на середину.
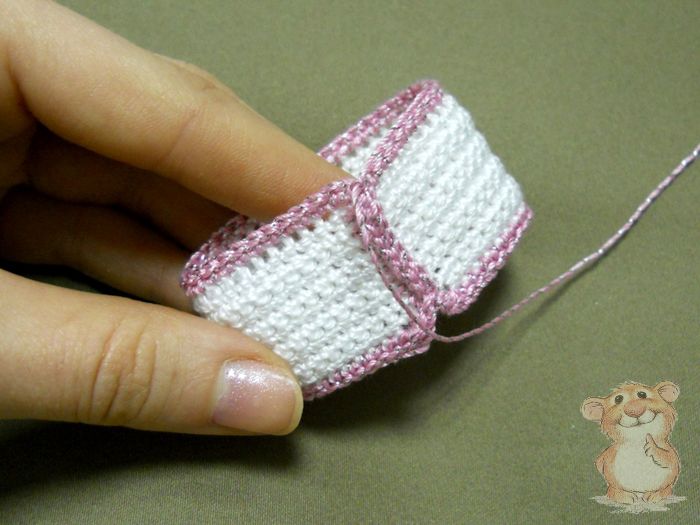
По такому же принципу вяжем небольшую перемычку, которая расположится в центре бантика и стянет его. Шов основы закроется этой перемычкой.

Обворачиваем первую деталь второй, замыкаем перемычку как будто в кольцо. Получаем бантик.

Теперь осталось сделать хвостики, если это необходимо. Банты с хвостиками, связанные крючком, лучше выглядят на шляпках, панамах. Опять делаем полоску такой же ширины, как сам бант, и сгибаем посередине так, как на фото, чуть-чуть раздвигая концы.
Сшиваем ниткой с иголкой эту деталь с основной деталью. В результате из трех прямоугольников самой простой вязки мы получили объемный бантик!
Бантики крючком. МК
Схема вязания бантика крючком:
Условные обозначения:
 [300x187]
Описание:
http://uroki-vyazaniya.ru/kak-svyazat-bantik-kryuchkom-master-klass.html
Так же смотрите видео о том, как связать такой бантик крючком.
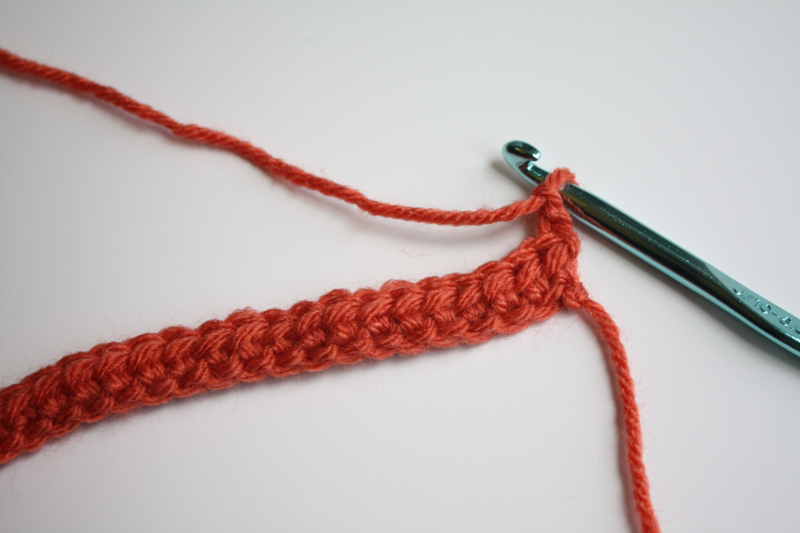
Bow:
Chain 25, half double crochet in third chain from hook, and in each chain across.
For rows 2-4 Chain 2, half double crochet in closest stitch and in each all the way across, turn.
When you get to the last stitch, single crochet, then cut yarn, pull it through and tight, and weave in both ends. Fold over both short ends to the middle, glue together and squeeze in the center to form a bow, then wrap yarn around center and glue the end down.

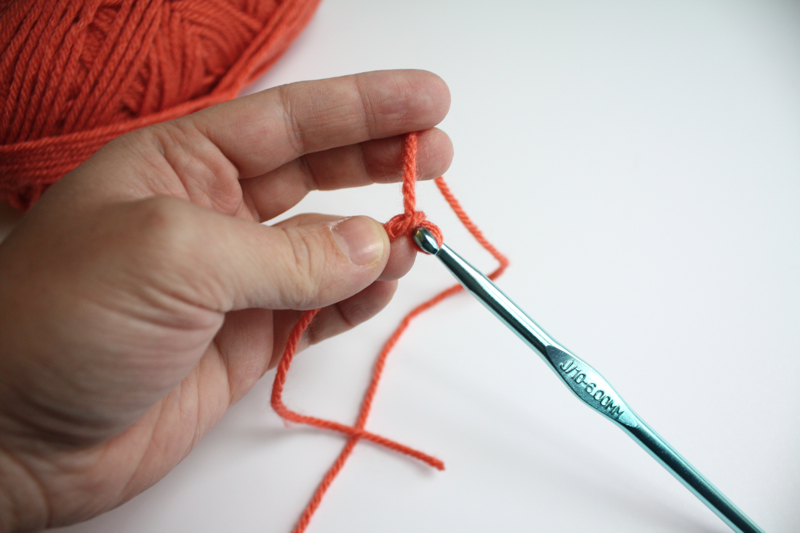
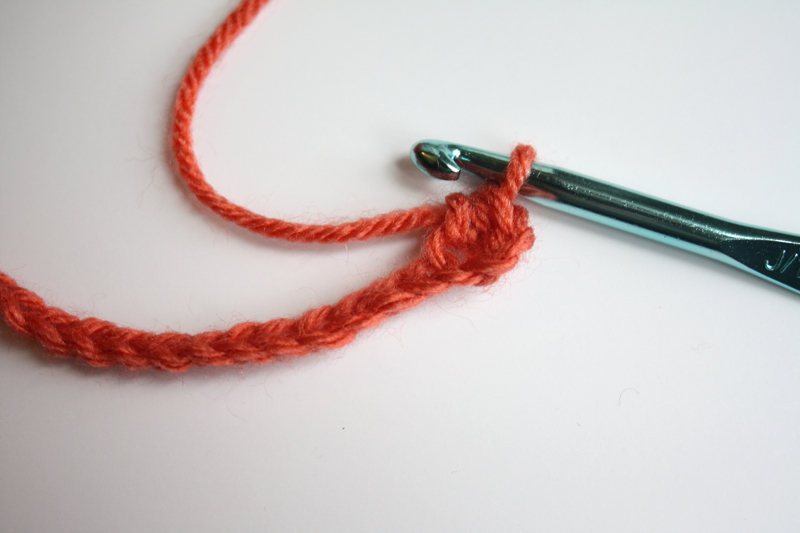
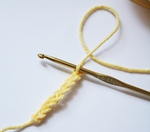
Start with some yarn…duh. and a crochet hook. Mine is a J/10-6.00mm, whatever that means. (told you…beginner!) My yarn is an acrylic-cotton blend (I had to have the color!), but all-cotton yarns are really nice to crochet with.

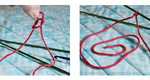
This is how you do a slipknot-which starts every crochet project. Left to right: Loop the yarn around in a circle like so. Then take the end of the yarn and pull it through the loop. Put your hook in the loop and pull it so it’s snug.
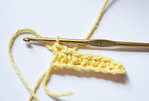
Now start your chain! You do this by grabbing some yarn around the hook (also called “yarn over” or YO) and pulling it through the loop you just made.
Like so! (also called a chain)
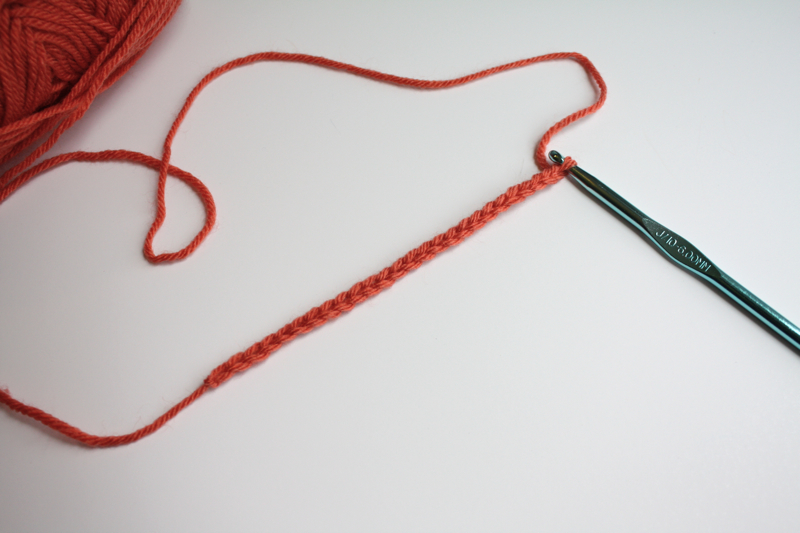
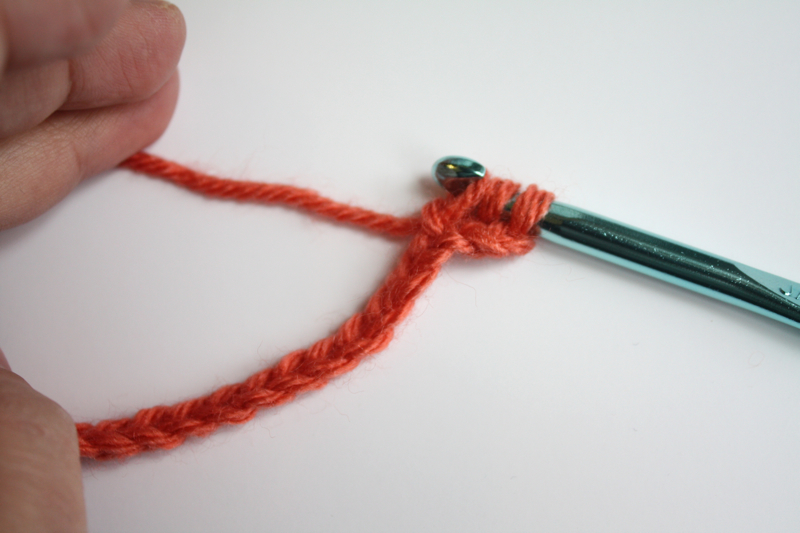
Continue making a chain-I did 25 for this size bow…you could easily make the bow larger or smaller by lengthening or shortening the chain.
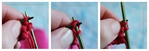
At the end of the chain, yarn over (YO) and then do a half double crochet in the third loop from the end. Have no idea what a half double crochet is? (HDC) I didn’t either. I’ll do my best to show ya!
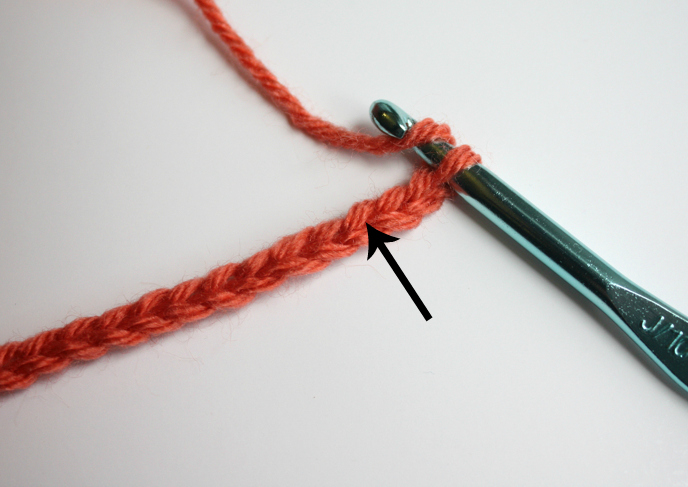

It will look like this! (pic above)

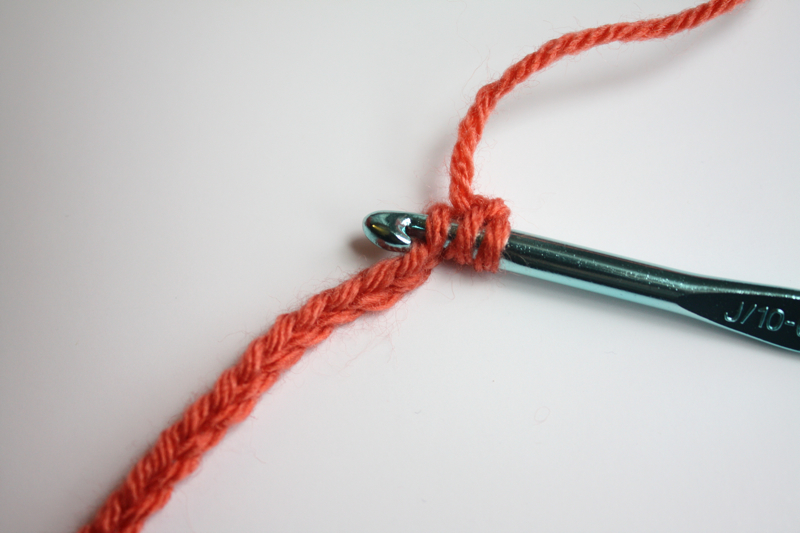
YO again and pull through all three loops! You did a HDC! (ok, so bear with me….I was really excited when I figured it out the first time.)
I pull the yarn snug after each stitch.
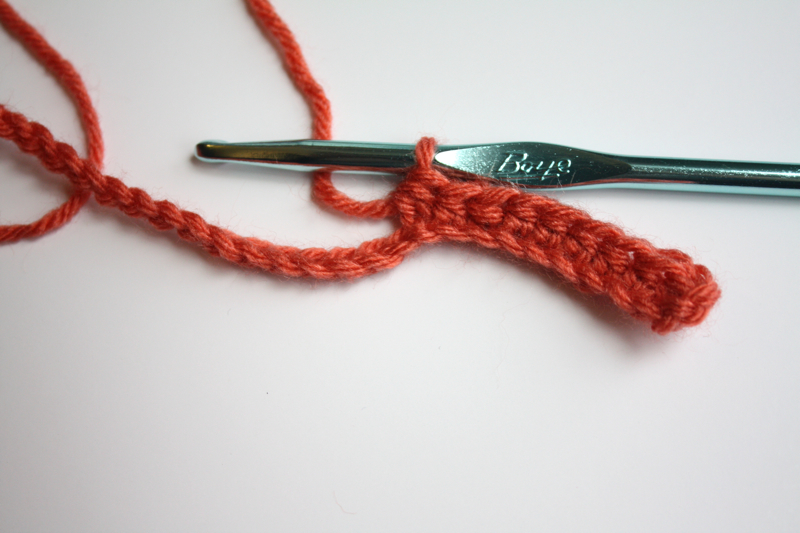
Then keep doing HDCs going down the chain you made!
After you do the last HDC, chain 2.
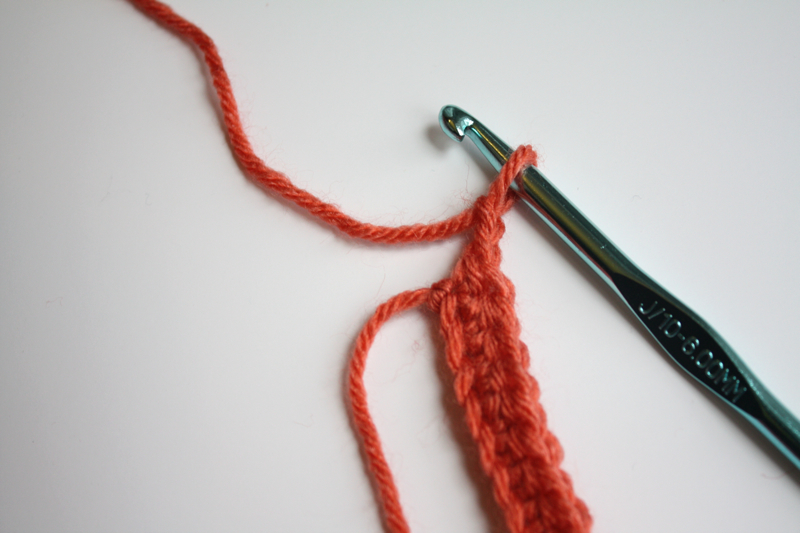
Then flip your row to the other side, and continue doing HDCs down the first row you did. Go into the first loop though, no skipping loops at the beginning of the row this time!
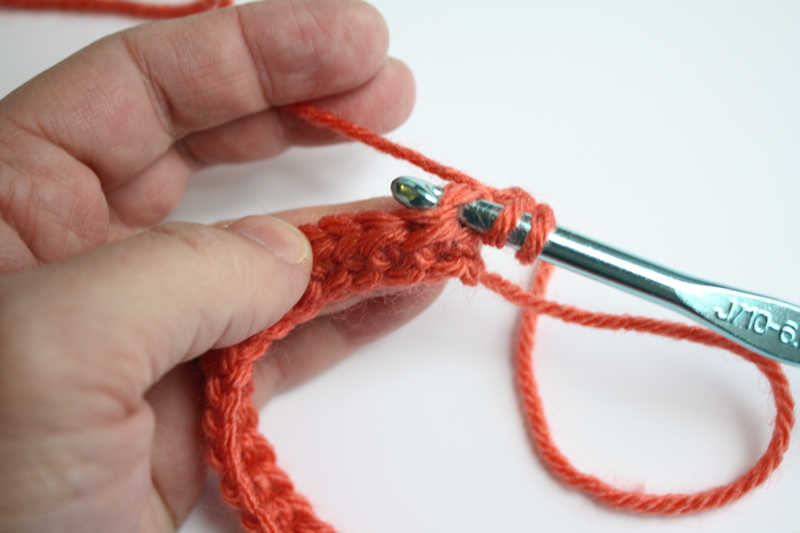
Make sure you catch both loops of yarn in the stitch!
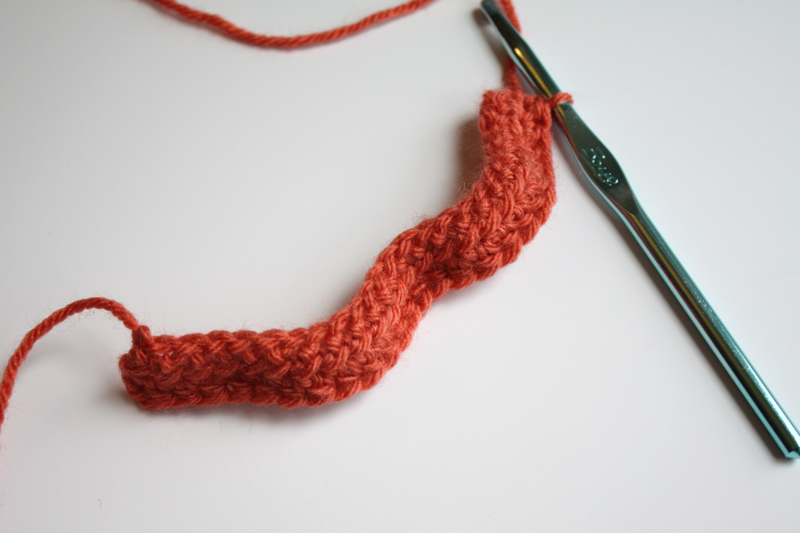
If your yarn gets wobbly and looks like bacon…go make a BLT. just kiddin’. Just gently pull the ends and it’ll straighten out.
THEN go make a BLT.
When you get to the end of the second row, chain 2 and do HDCs back down the other way. Like I said, you can make it larger or smaller depending on how many you chain in the beginning, and how many rows you do.
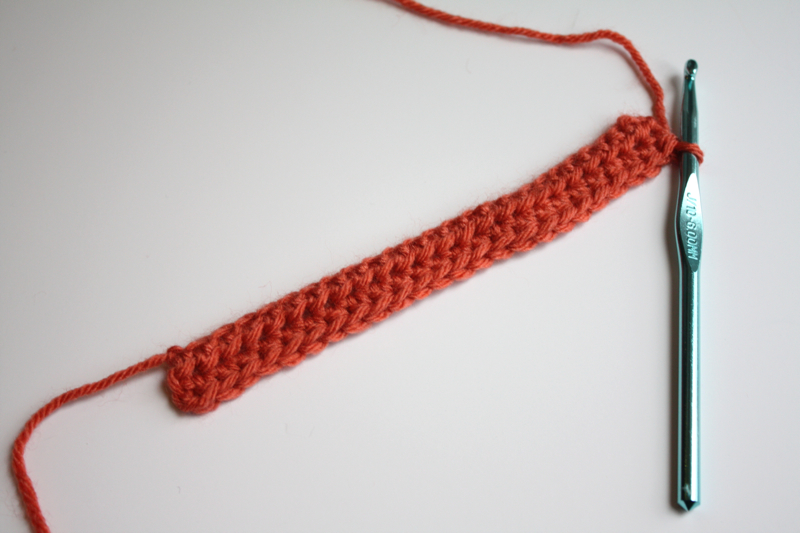
At the end of your last row, chain one, then cut the yarn.
Pull the end through the loop and pull tightly to make a knot.

Weave in the ends and clip off any extra, or tie the ends together and then clip.
Tada! You have crocheted a piece of bacon.

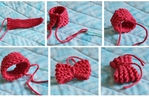
Find the center of your bacon bow piece, then fold in both sides to the center.

Hot glue the ends to the back of the bow, let cool a little bit, but while the glue is still warm and pliable, squeeze the middle to make it look bow-ish. (pic below)
Dab a little glue on the back, stick the end of the yarn in the glue, then wrap around the center until you’re happy with the width. Cut the yarn then glue the end underneath another piece so it’s hidden.

Tada! Attach a clippie by sliding it underneath the yarn and gluing under the clip.
You did it! I hope you are super proud of yourself if you’ve never crocheted before. Even if you have, you still made a super duper cute bow, so that’s something.

For an even quicker bow, Chain 15 or so, then HDC the rows like the other bow until you have 4-6 rows. (you can even HDC every other stitch to make some cool hole patterns in the bow.) Wrap yarn around the middle and glue just like the other bow! Pretty easy and quick, though the edges can curl a bit.
Hope you enjoyed this, and could figure it out!
http://www.craftinessisnotoptional.com/2013/01/easy-crochet-bow-tutorialpattern.html
Easy crochet: Flowers & bows
ch= chain
tr= triple crochet
sl st= slip stitch
Begin with a magic circle
[ Chain 2, work 6 tr, ch 3. sl st into the ring]
Repeat sequence in
Pull yarn tail to tighten the loop, end off. weave in ends, Voila!!!
For the flower centers, I decided to use buttons, I usually use something else.


Begin with a magic circle
[ Chain 2, work 6 tr, ch 3. sl st into the ring]
Repeat sequence.
Pull yarn tail to tighten the loop, leave enough yarn to wrap around the center of the bow.End off. Weave in loose ends. Bravo!! Your bow is complete!!!

http://kntart.blogspot.com/2013/03/easy-crochet-flowers-bows.html?m=0


 [601x700]
Внутри - это капелька горячего клея
 [700x561]

Просто, правда?
А вот такие простые работы мы сегодня с вами и рассматриваем:)
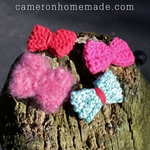
Итак, следующий мастер-класс - это бант вязаный спицами - от мастерицы Камерон (cameronhomemade.com)


Похожим образом сделано и вот такое милое колечко с бантиком от Мередит (onesheepishgirl.blogspot.com). Очень приятная работа!


Милый быстрый бантик крючком от Жедан (gedane.over-blog.com)


И еще один простой вариант изготовления миниатюрного бантика крючком от Эммы, автора ресурса Eskimo&Rose (eskimorose.blogspot.ru)
 [600x439]
http://otstavanie.ru/vyazanye-banty-i-bantiki-prostye-modeli-idei-master-klassy.html
Симпатичный и простой бантик крючком
Доброго дня, рукодельницы! Сегодня хочу поделиться с вами мастер-классом по изготовлению простого бантика, который можно использовать как элемент декора на одежде, сумках или еще где-нибудь. Также такой бантик хорошо смотрится, если с его помощью сделать резинку или брошку. Экспериментируйте с размерами крючков и различными видами пряжи!
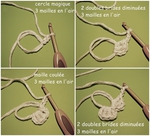
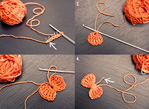
Вязание бантика начинаем с кольца амигуруми и провязывания 4 воздушных петель в него.
Затем в кольцо вяжем 4 столбика с двумя накидами. Можете попробовать связать больше столбиков, чтобы бантик получился более пышным.
Далее - цепочка из трех воздушных петель.
И соединяем эту цепочку с кольцом с помощью полустолбика. Половинка бантика готова!
Вторая половина вяжется аналогично. Тем не менее покажу вам весь процесс, ничего не опуская. Итак, вяжем цепочку из 4 воздушных петель.
Затем - 4 столбика с двумя накидами. Также в кольцо.
Снова три воздушных петли и ..
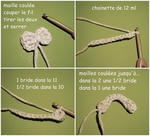
Соединяем с помощью полустолбика без накида. Обрезаем нить, ведущюю к мотку так, чтобы у нас остался длинный конец - хотя бы сантиметров 20 для первого раза. Далее уже разберетесь, какая длина вам нужна. Растягиваем петлю, в которой находится крючок для того, чтобы вытащить свободный конец нити.
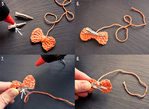
В итоге - у нас ест бантик с двумя свободными концами нити - длинным (вел к мотку) и коротким - часть кольца амигуруми.
Придерживая бантик одной рукой, тянем за короткий конец нити - серединка бантика стягивается.
Длинный конец нити обматываем вокруг серединки и можем связать вместе с коротки на обратной стороне бантика.
Вид спереди.
Ну вот! Коротенький и простой мастер-класс всегда выручит вас. Для маленьких девочек таких бантиков много не бывает, поэтому их можно навязать очень много и очень быстро:) Приятного творчества!
http://stranamasterov.ru/node/755152
Textured Bow Tie
Hope you aren’t sick of bow ties, because I have one more for you.

It is just crocheted blocks sewed together. Pretty easy and do-able even for the most beginner of crocheters. When you sew your pieces together, mistakes or inconsistencies become a little less visible so it’s a good first project!
I am not going to go to the very very basics of crochet, but here is what I did…
First hook size. This is what I used. I don’t think it matters too much. Just keep in mind that the smaller the hook the tighter the stitches will be and vice versa.

And now for the pattern…

Yarn: I used 4 ply worsted weight yarn in cotton and in acrylic. You can use a thinner weight if you want but you made need to increase the number of stitches to get the length you want.
First for the main bow tie piece…
Row 1: chain 34
Row 2: turn, and in the second stitch from the needle single crochet to the end {33 stitches}
Row 3: turn, chain 2, double crochet to the end {32 stitches – the 2 chain counts as one to equal 33}
Row 4: turn, chain 2, half double crochet to the end {32 stitches – the 2 chain counts as one to equal 33}
Row 5: turn, chain 2, double crochet to the end {32 stitches – the 2 chain counts as one to equal 33}
Row 6: turn, chain 2, single crochet to the end {32 stitches – the 2 chain counts as one to equal 33}
Tie off and weave in loose ends with a yarn needle. Whip stitch the two ends together by hand to form a loop.

Now for the remaining pieces.
First, the neck band.

Measure your intended wearers neck. Chain the length of that person’s neck circumference.

Turn, and in second chain from the needle double crochet to the end. Tie off and weave in ends with a yarn needle.
Note: I made mine too long. When you add the second row it stretches it a little. So chain just short of the neck circumference and you should be fine.
Now for the little piece that brings it all together.

#1: chain 13 stitches. Just enough so that it can squeeze over the bow tie and cinch everything nice and tight.
#2: Then turn, and single crochet in the second stitch from the needle to the end. {12 stitches}
Chain 2, single crochet to the end. {11 stitches not including the chain 2}
Repeat to desired width. I ended up with 4 rows.
#3: Tie off and weave loose ends in with a yarn needle. Then whip stitch the two ends together by hand.
Now turn sewn pieces right side out so you have two nice neat loops. Slide the smaller loop over the bow tie piece.

Before you slide the neck band through little loop too, hand stitch a cute little button to one end.

You don’t have to make a button hole on the other end because there are a plethora of crocheted holes already there. It makes sizing a cinch!

Just slide the button into any hole. That is why we used a double crochet stitch!
And I have to say I love the look of this teddy bear button, but in all honesty it is not that practical when it comes to actually buttoning it up. It works, but not very well. :)

You can really make the bow tie as long or as wide as you want. Play around with the rows and stitches. My pattern is just to give you an idea of what I did. And it’s my first attempt at a crochet pattern so if you see any errors, please let me know!

I personally like how nicely the texture pops out.
And I love Owen’s dorky smile here. I just love this kid.

I made a couple more. This time switching colors to make stripes.

It was fun playing around with the possibilities, but I think the solid color looks best.
Don’t you love that Kelly green cotton yarn though? I do. I was just telling someone how I hate Kelly green and then of course I saw this yarn and fell in love with the richness of its color. Whenever I form an opinion on something it often changes! :)

So that’s it! Three pieces, about 30 minutes to an hour {depending on how fast you can crochet}, and you have a spiffy, textured bow tie.
It’s actually starting to warm up here so I didn’t add any layers to his outfit, but I think the texture would pop nicely paired with a sweater or vest on top.

http://www.deliacreates.com/textured-bow-tie/
 [360x540] [360x540] |
|
My little girl modeling the bow on a headband. You should have seen the out-takes. She is not a very cooperative little model, lol. |
Materials:
- Worsted Weight Yarn (I used Hobby Lobby's "I Love This Yarn")
- Size "H" (5.00 mm) Hook
- Tapestry Needle for weaving in ends
Abbreviations:
- ch: Chain
- sc: single crochet
Gauge:
Not crucial for this project.Step One:
- Chain 15 sts. Sc in second stitch from hook and then continue with "Row 1".- Row 1: sc in each st, ch 1 at end and turn
- Repeat Row 1 three or four more times, depending on how thick/full you want your bow to look.
 [413x275] [413x275] |
| Row 1 was repeated three times in this example. To see an example of four rows scroll to the bottom and see the purple bow. |
Step Two:
- Make a sc border around your whole rectangle. (Just sc in each stitch around your whole piece.)- When you come to a corner sc once in the corner st, ch 2, and then sc again in the same stitch -- this will keep your piece looking more like a rectangle and less like an oval. (Feel free to skip this if you want the edges of your bow to be very rounded.)
- Weave in any ends you have so that they'll disappear under the center wrap when you finish your bow.

Step Three:
- Make sure that both edges are facing the same direction.
- Tie a small length of yarn around the center to keep it cinched.
- Trim the ends so they're easy to hide when you wrap the center of the bow in the next step.

Step Four:
- Tie off in the back and trim the ends so they'll be easy to hide when you attach your bow to whatever it is you choose.

Step Five:
 [413x275] [413x275] |
|
Row 1 was repeated three times in the pink bow and four times in the purple bow. You can see the slight difference in fullness between the two. |
http://demiknits.blogspot.com/2012/06/simple-crochet-bow-with-pictures.html
Attach to cushions or coats...
...or make some serious headpieces!
Chunky Crochet Bobble Bow - Pattern
This pattern is written in UK terms. Turning chains do not count as stitches. I've added a few photos below to show what the bow should look like as it's made up. This pattern is really simple but just mak