Это цитата сообщения nata5219 Оригинальное сообщение
Велосипед
http://zancrochet.blogspot.ru/2016/01/bicycle-vase.html

For Dutch version please click Driewieler
Please join my page on Facebook Zan Amigurumi and share your creation there.
Abbreviations:
sc: single crochet
ch: chain
inc : increase
dec: decrease
fpsc : front post single crochet
BLO: back loop only
st : stitch
CC: change color
F/O: fasten off
Materials:
Crochet hook (I use size 2mm)
Crochet yarn (I used light and sky blue)
Needle for sewing
Stuff
Scissor
Small wire
Milk carton (cut in round shape as big as vase base)
Note: work in continuous round
Front Wheel:
Use light blue
ch 45, join the chain to make ring
R1: sc around (45)
R2: sc, inc, rep around, sc in the last st (67)
R3-10: sc around
R11: sc, dec, rep around, sc in the last st (45)
F/O leave long tail for sewing
Front Hub (make 2):
Use light blue
R1: ch 2, starting from second chain from hook 6 sc
R2: inc, rep 6x (12)
R3: sc, inc, rep 6x (18)
F/O and leave long tail for sewing in one hub
Back Wheels (make 2):
Use light blue
ch 30, join the chain to make ring
R1: sc around (30)
R2: sc, inc, rep around (45)
R3-10: sc around
R11: sc, dec, rep around (30)
F/O leave long tail for sewing
Back Hub (make 4):
Use light blue
R1: ch 2, starting from second chain from hook 6 sc
R2: inc, rep 6x (12)
F/O
Bicycle Fender:
Use sky blue
ch 25
R1: sc in the second chain from the hook, sc in next 23 chain (24)
R2: ch1, turn, sc, inc, rep around (36)
R3: ch1, turn, sc around
R4-7: rep R3
R8: ch1, turn, sc, dec, rep around (24)
F/O
Head Tube:
Use light blue, before you start to make chain, leave long tail for sewing
ch 7, join the chain to make ring
R1-13: sc around (7)
Stuff little by little. Stuff every 5 or 6 rounds (use your scissor tip to help you to push stuff into the tube) then insert small wire into the tube.
F/O leave long tail for sewing (now we have long tail on both side of head tube)
Fork:
Use light blue
R1: ch 2, starting from second chain from hook 6 sc
R2-34: sc around (6)
Stuff little by little. Stuff every 5 or 6 rounds (use your scissor tip to help you to push stuff into the fork)
R35: dec until the round is closed
F/O leave long tail for sewing
Handle Bar:
R1: ch 2, starting from second chain from hook 5 sc
R2-21: sc around (5)
Stuff little by little. Stuff every 5 rounds (use your scissor tip to help you to push stuff into the handle bar)
F/O ( sew the open gap in handle bar)
Top Tube and Vase Tube:
Use light blue, before you start to make chain, leave long tail for sewing
ch 7, join the chain to make ring
R1-33: sc around
Stuff little by little. Stuff every 5 or 6 rounds (use your scissor tip to help you to push stuff into the tube) then insert small wire into the tube.
R34: ch1, turn, 3sc (3)
R35-38: repeat R34
F/O leave long tail for sewing
Bottom Tube:
Use light blue, before you start to make chain, leave long tail for sewing
ch 6, join the chain to make ring
R1-20: sc around
Stuff little by little. Stuff every 5 or 6 rounds (use your scissor tip to help you to push stuff into the tube) then insert small wire into the tube.
F/O leave long tail for sewing
Vase/Pot:
Use light blue, then sky blue
R1: ch 2, starting from second chain from hook 6 sc
R2: inc, rep 6x (12)
R3: sc, inc, rep 6x (18)
R4: 2sc, inc, rep 6x (24)
R5: 3sc, inc, rep 6x (30)
R6: 4sc, inc, rep 6x (36)
R7: 5sc, inc, rep 6x (42)
R8: 6sc, inc, rep 6x (48)
R9: 7sc, inc, rep 6x (54)
R10: 8sc, inc, rep 6x (60)
R11: BLO sc around
R12-17: sc around (60)
R18: 9sc, inc, rep 6x (66)
R19-24: sc around
CC to sky blue
R25-26: sc around
R27: fpsc around (66)
F/O
Vase Base:
Use light blue
R1: ch 2, starting from second chain from hook 6 sc
R2: inc, rep 6x (12)
R3: sc, inc, rep 6x (18)
R4: 2sc, inc, rep 6x (24)
R5: 3sc, inc, rep 6x (30)
R6: 4sc, inc, rep 6x (36)
R7: 5sc, inc, rep 6x (42)
R8: 6sc, inc, rep 6x (48)
R9: 7sc, inc, rep 6x (54)
R10: 8sc, inc, rep 6x (60)
F/O leave long tail
Finishing:
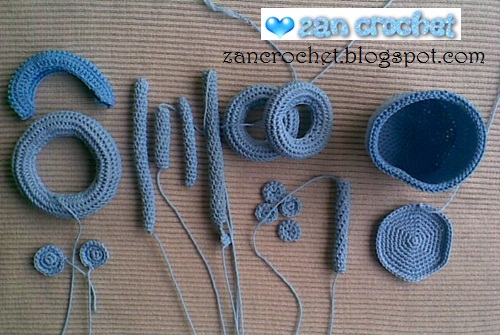
- Sew and stuff all wheels.
- Sew the front hub become one circle. (This step is only for front hub)
- Sew spoke using the rest of yarn in the wheel, and put the hub in the middle of the wheel. Use the picture bellow as a guide to sew the spoke. For back wheel, take only one hub to sew in the middle of wheel.

Here is a "step by step" picture to guide you in joining the bicycle vase parts.
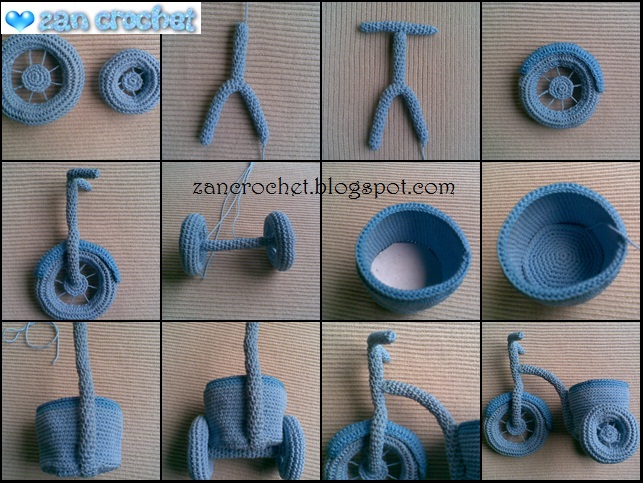
- Bend the fork part then sew the head tube on the fork.
- Sew the handle bar on the head tube.
- Sew the bicycle fender on the front wheel and between the fork.
- Sew both side of the fork to the wheel.
- Take one back hub and then sew it to bottom tube, do the same thing on another side of tube.
- Sew the hub that you've joined to bottom tube to the hub in the wheel.
- Put the milk carton into the vase/pot. And then put the base vase to cover the milk carton. Sew it.
- Sew R34-38 of "top tube and vase tube" to the bottom of the vase/pot. Then sew R21-33 to the side of vase/pot.
- Put the vase on the bottom tube, then sew it, so the vase won't fall. Sew also the top side of wheel to the vase to make a strong foundation.
- Bend the top tube, then sew to R4-5 side of head tube.
- Bend the handle bar.
- Finish. Your amigurumi bicycle vase has done now.
- If you want to make this vase to be a pencil or your crochet stuff holder, you can add some round of the pot to make it higher.
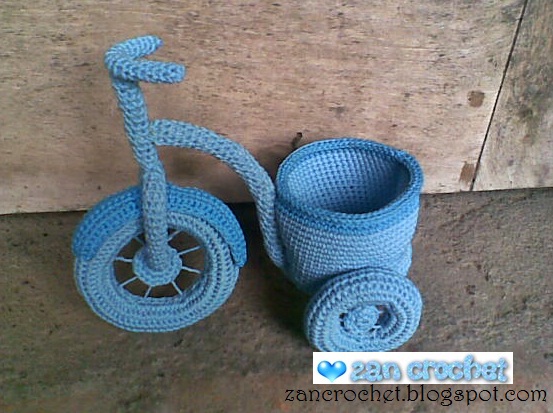
Now You can add some flower on the vase.

This pattern is made by me, Zan Merry. Don’t reprint it in any sites or blogs. You can sale the ami that you’ve made from this pattern but not the pattern. Thanks. If you want to post the ami that you used from this pattern to your blog, please credit me as the designer and link it to my blog. Thanks.