 /stitchesandsupper.files.wordpress.com/2015/07/img_20150719_163633.jpg?w=113" target="_blank">https://stitchesandsupper.files.wordpress.com/2015/07/img_20150719_163633.jpg?w=113 113w, https://stitchesandsupper.files.wordpress.com/2015/07/img_20150719_163633.jpg?w=225 225w, https://stitchesandsupper.files.wordpress.com/2015/07/img_20150719_163633.jpg?w=768 768w, https://stitchesandsupper.files.wordpress.com/2015/07/img_20150719_163633.jpg 1536w" width="1400" />
I wanted some new place mats for my kitchentable and searched the internet for a pattern but I couldn’t find one I liked. But in the search I stumbled upon this pattern, Little Spring Mandala, and fell in love!
I decided to try go grow it into place mats and I have to say I am really pleased with the result, being the first time I try to grow a pattern. So I desided to share the pattern with you guys!


In all honestythey I should tell you that they did flare a bit at the edge when done, but that was easily blocked out. I used anothere round placemat as a “template” when blocking to get mine round and it worked like a charm!
I used 4 colours of Catania, a cotton yarn with a nice shine. Yarn weight Sport; and texture5 ply, 12 wpi. Yarn length 137 yds by 1.75 oz, or 125 m by 50 gr. Using crochet hook no E 4, or 3.5 european style, the diameter will be about 14.5 inches, or 37 cm.
You can choose as many or few colours as you want. I can’t wait to see what you make of it, please, please, please post a pic on Stitches and Suppers Facebookpage when done!
Sadly I forgot to take note on how many balls of yarn I used but 1 ball of each colour should be enough for at least 2 place mats. Anyone making these, please take note of how much yarn is needed and let me know so I can update the pattern!
Try to start each round in a different place around your work as to not get all the ends wowen in at the same place on the back. There will be quite a few ends to weave in since we change colour for every row
And to make these look really good the pattern requires standing single crochets and standing double crochets. There are links to tutorials on these stitches below.
The pattern follows the pattern for Little Spring Mandala for 7 rounds so you will need that pattern for these rounds. Link below. It is free and in english.
Here is a link to this pattern on Ravelry. Feel free to add it to your favourites and queue so you won’t loose it And post a pic of your finished project to show it off to other Ravelrers!
Oh, and if you find any errors or that something doesn’t make sense, please let me know so I can fix it!
Lets go!
Pattern for Placemats Mandalastyle
Colours:
A: Aqua 397
B: Charcoal 393
C: Silver 172
D: Grey 242
Hook size
3.5 or E
Size
14.5 inches (or 37 cm) in diameter
Special stitches:
Tutorial for standing single crochet
Tutorial for standing double crochet and standing 3dctog
Update: Here is a tutorial for an easier version of standing double crochet
3 double crochets together (3dctog):
Yarn over, insert hook in indicated stitch (or chain space), yarn over, pull through, yarn over, pull strough 2 loops (2 loops on hook), yarn over, insert hook in indicated stitch, yarn over, pull through, yarn over, pull through 2 loops on hook (3 loops on hook), yarn over, insert hook in indicated stitch, yarn over, pull through, yarn over, pull through 2 loops on hook (4 loops on hook), yarn over, pull throuhg all loops on hook. Done!
 /stitchesandsupper.files.wordpress.com/2015/07/20150720_064959.jpg?w=168" target="_blank">https://stitchesandsupper.files.wordpress.com/2015/07/20150720_064959.jpg?w=168 168w" style="box-sizing: border-box; border: 0px; font-family: inherit; line-height: 1; margin: 0px auto; padding: 0px; text-align: left; height: auto; max-width: 100%;" width="84" />
 /stitchesandsupper.files.wordpress.com/2015/07/20150720_065034.jpg?w=168" target="_blank">https://stitchesandsupper.files.wordpress.com/2015/07/20150720_065034.jpg?w=168 168w" style="box-sizing: border-box; border: 0px; font-family: inherit; line-height: 1; margin: 0px auto; padding: 0px; text-align: left; height: auto; max-width: 100%;" width="84" />
 /stitchesandsupper.files.wordpress.com/2015/07/20150720_065112.jpg?w=168" target="_blank">https://stitchesandsupper.files.wordpress.com/2015/07/20150720_065112.jpg?w=168 168w" style="box-sizing: border-box; border: 0px; font-family: inherit; line-height: 1; margin: 0px auto; padding: 0px; text-align: left; height: auto; max-width: 100%;" width="84" />
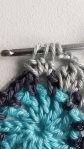 /stitchesandsupper.files.wordpress.com/2015/07/20150720_065135.jpg?w=168" target="_blank">https://stitchesandsupper.files.wordpress.com/2015/07/20150720_065135.jpg?w=168 168w" style="box-sizing: border-box; border: 0px; font-family: inherit; line-height: 1; margin: 0px auto; padding: 0px; text-align: left; height: auto; max-width: 100%;" width="84" />
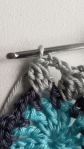 /stitchesandsupper.files.wordpress.com/2015/07/20150720_065153.jpg?w=168" target="_blank">https://stitchesandsupper.files.wordpress.com/2015/07/20150720_065153.jpg?w=168 168w" style="box-sizing: border-box; border: 0px; font-family: inherit; line-height: 1; margin: 0px auto; padding: 0px; text-align: left; height: auto; max-width: 100%;" width="84" />
If you click the pics they will show bigger.
Rounds:
For round 1-7 follow this pattern, Little Spring Mandala, with colour changes as indicated below.
R 1: Colour A
 /stitchesandsupper.files.wordpress.com/2015/07/20150720_061917.jpg?w=168" target="_blank">https://stitchesandsupper.files.wordpress.com/2015/07/20150720_061917.jpg?w=168 168w" style="box-sizing: border-box; border: 0px; font-family: inherit; line-height: 1; margin: 0px auto; padding: 0px; text-align: left; height: auto; max-width: 100%;" width="84" />
R 2: Colour B
 /stitchesandsupper.files.wordpress.com/2015/07/20150720_064659.jpg?w=168" target="_blank">https://stitchesandsupper.files.wordpress.com/2015/07/20150720_064659.jpg?w=168 168w" style="box-sizing: border-box; border: 0px; font-family: inherit; line-height: 1; margin: 0px auto; padding: 0px; text-align: left; height: auto; max-width: 100%;" width="84" />
R 3: Colour C
 /stitchesandsupper.files.wordpress.com/2015/07/20150720_065527.jpg?w=168" target="_blank">https://stitchesandsupper.files.wordpress.com/2015/07/20150720_065527.jpg?w=168 168w" style="box-sizing: border-box; border: 0px; font-family: inherit; line-height: 1; margin: 0px auto; padding: 0px; text-align: left; height: auto; max-width: 100%;" width="84" />
R 4: Colour B
 /stitchesandsupper.files.wordpress.com/2015/07/20150720_071104.jpg?w=168" target="_blank">https://stitchesandsupper.files.wordpress.com/2015/07/20150720_071104.jpg?w=168 168w" style="box-sizing: border-box; border: 0px; font-family: inherit; line-height: 1; margin: 0px auto; padding: 0px; text-align: left; height: auto; max-width: 100%;" width="84" />
R 5: Colour A
 /stitchesandsupper.files.wordpress.com/2015/07/20150720_072051.jpg?w=168" target="_blank">https://stitchesandsupper.files.wordpress.com/2015/07/20150720_072051.jpg?w=168 168w" style="box-sizing: border-box; border: 0px; font-family: inherit; line-height: 1; margin: 0px auto; padding: 0px; text-align: left; height: auto; max-width: 100%;" width="84" />
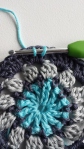 /stitchesandsupper.files.wordpress.com/2015/07/20150720_072118.jpg?w=168" target="_blank">https://stitchesandsupper.files.wordpress.com/2015/07/20150720_072118.jpg?w=168 168w" style="box-sizing: border-box; border: 0px; font-family: inherit; line-height: 1; margin: 0px auto; padding: 0px; text-align: left; height: auto; max-width: 100%;" width="84" />
 /stitchesandsupper.files.wordpress.com/2015/07/20150720_072148.jpg?w=168" target="_blank">https://stitchesandsupper.files.wordpress.com/2015/07/20150720_072148.jpg?w=168 168w" style="box-sizing: border-box; border: 0px; font-family: inherit; line-height: 1; margin: 0px auto; padding: 0px; text-align: left; height: auto; max-width: 100%;" width="84" />
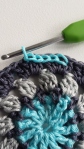 /stitchesandsupper.files.wordpress.com/2015/07/20150720_072219.jpg?w=168" target="_blank">https://stitchesandsupper.files.wordpress.com/2015/07/20150720_072219.jpg?w=168 168w" style="box-sizing: border-box; border: 0px; font-family: inherit; line-height: 1; margin: 0px auto; padding: 0px; text-align: left; height: auto; max-width: 100%;" width="84" />
You can leave the yarntail on front of the crochet, in the end of the pattern I will show you a way to make the join of this round invisible.
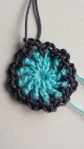
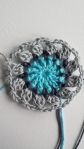
R 6:a: Colour D
R 6:b: Colour C
 /stitchesandsupper.files.wordpress.com/2015/07/20150720_073720.jpg?w=300" target="_blank">https://stitchesandsupper.files.wordpress.com/2015/07/20150720_073720.jpg?w=300 300w" style="box-sizing: border-box; border: 0px; font-family: inherit; line-height: 1; margin: 0px auto; padding: 0px; text-align: left; height: auto; max-width: 100%;" width="150" />
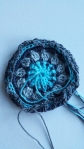 /stitchesandsupper.files.wordpress.com/2015/07/20150720_201929.jpg?w=168" target="_blank">https://stitchesandsupper.files.wordpress.com/2015/07/20150720_201929.jpg?w=168 168w" style="box-sizing: border-box; border: 0px; font-family: inherit; line-height: 1; margin: 0px auto; padding: 0px; text-align: left; height: auto; max-width: 100%;" width="84" />
 /stitchesandsupper.files.wordpress.com/2015/07/20150720_202636.jpg?w=168" target="_blank">https://stitchesandsupper.files.wordpress.com/2015/07/20150720_202636.jpg?w=168 168w" style="box-sizing: border-box; border: 0px; font-family: inherit; line-height: 1; margin: 0px auto; padding: 0px; text-align: left; height: auto; max-width: 100%;" width="84" />
 /stitchesandsupper.files.wordpress.com/2015/07/20150720_202656.jpg?w=300" target="_blank">https://stitchesandsupper.files.wordpress.com/2015/07/20150720_202656.jpg?w=300 300w" style="box-sizing: border-box; border: 0px; font-family: inherit; line-height: 1; margin: 0px auto; padding: 0px; text-align: left; height: auto; max-width: 100%;" width="150" />
Sorry for bad colour on 3 last pics and pic for row 7, they were taken in the evening and we are loosing light in Sweden For clearer pics of on how to make row 6:a and 6.b, se round 12:a and 12:b.
R 7: Colour A