Это цитата сообщения Stesha00 Оригинальное сообщение
костюм питера пена
http://www.makeit-loveit.com/2009/10/peter-pan-costume.html
I can’t even believe how big my little guy is getting…..and to see him as Peter Pan, just about dropped me to the floor. Oooooh, I just wanted to nibble those chubby cheeks and raspberry that round little belly…….and keep him nice and young. Yum.
(Do you think he’ll still be letting me munch on him in 5 years?)

.

.

 [показать]
.
Then cut a straight line up the back.
 [показать]
.
And attach velcro:
 [показать]
.
Then turn it back over to the front and cut out some sort of shape to the shirt, creating some sleeves…..but still leaving a good amount to the width, so that you’ll have some shirt to cinch up in the belt at the end.
 [показать]
.
Turn it inside out, sew up the sides along the new curves, and then turn it right side out again. Now, make diagonal cuts all along the bottom and sleeves.
 [показать]
That’s it. Nice and easy.
.
Now onto the belt. I used the tutorial here and made it out of felt about 1 3/4 inches wide. I just cut strips out of the those rectangle pieces of felt and sewed them together. I actually made the belt 2 layers thick…..and just sewed down the middle and sides to keep the 2 layers together.
 [показать]
.
Now time to make the knife for Peter’s belt. I cut out some shapes in felt to construct the knife. And each shape is 3 layers thick, except for the center one….it’s just 2 layers thick.
 [показать]
.
Then I stitched the blade layers in place and added some detail…..and did the same with the handle. Trim if necessary.
 [показать]
.
Sew the blade and the handle together.
 [показать]
.
Then lay the last section under and over where the blade and handle meet. Sew all the way around it, securing the knife together as one piece. Then I sewed a little loop onto the back of the handle, so that it could slide onto the belt.
 [показать]
.
Then I made some pants using the the tutorial here. However, I made the legs a lot more narrow, so that it would look more like leggings.
 [показать]
.
Okay, onto the hat. This may seem a bit confusing….because all I have are shapes to give you. But I cut out a triangular shape with the top of the triangle more towards the back………. and the bottom of the triangle a bit curved. Then I cut a bottom brim section like I did below. I cut two of the triangle section ant two of the brim section……they are stacked right on top of each other.
 [показать]
.
Then I sewed all along the larger triangles, leaving the bottom edges open. And I sewed along the left edges of the 2 brim pieces. (Click to enlarge.)
 [показать]
.
Then I turned the hat right side out while leaving the brim inside out and lined up the back seams. Place the brim edge underneath the hat edge and overlap about a 1/2 inch. pin all the way around the hat on both sides.
 [показать]
.
Then sew into place.
 [показать]
.
Then fold up the brim.
 [показать]
.
Then I tacked the back of the brim into place on the back. Just to keep it from unfolding.
 [показать]
.
Then I attached some elastic to keep the hat in place while on Peter Pan’s head!
 [показать]
.
And then added a feather.
 [показать]
.
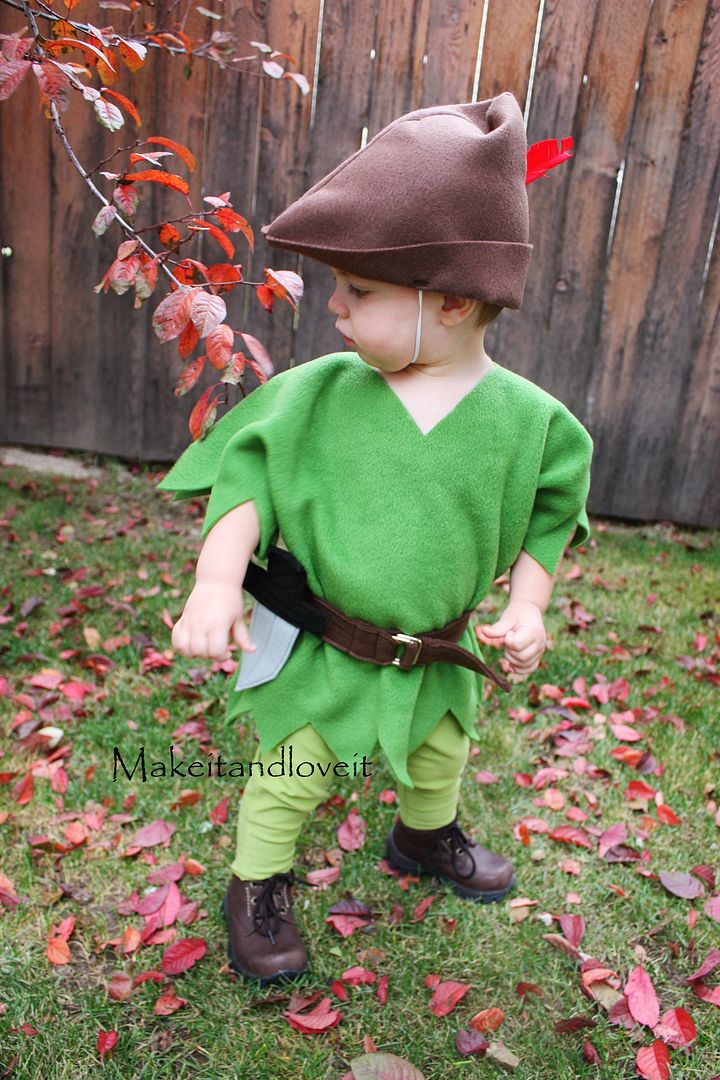
Now your whole ensemble is ready.
 [показать]
.
Now he’s ready to battle Hook.
.
Go get ‘em buddy.
