Poppy Boutonniere Tutorial and GIVEAWAY!!!!
03-03-2010 01:40
к комментариям - к полной версии
- понравилось!
 [показать]Well here it is, by request of you, the poppy tutorial!!!!
I had wanted to complete these last week but I came down with an awful sinus infection which really took the wind out of my sails.
However, my good friend Cheila of What's Goin Down Episode invited me over to her new home on Friday which gave us the perfect opportunity to spend an afternoon taking pictures and making poppies. I love spending the day with Cheila. She's a great cook AND loves to sew!
They just bought a new older home and it's lovely! Full of all those touches you can't find in brand new construction. Moulding, moulding, moulding, hardwood floors, wraparound staircase, wood windows and pocket doors.
 [показать]Lily and her daughter had fun dirtying their playroom with play dough and moon sand. Less fun when it came time to clean up. We had fun eating chicken salad on endive, lemon pastries with coffee and of course....making poppies!
They are a little different than the first one I made (for the better). Less work. More pretty.
 [показать]If you want a fuller flower just cut out more flowers and create more layers. If you want a smaller flower just eliminate the larger flowers and make fewer layers.
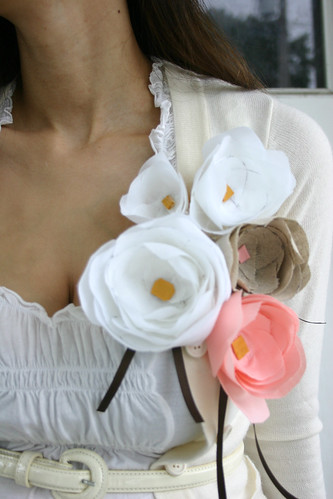
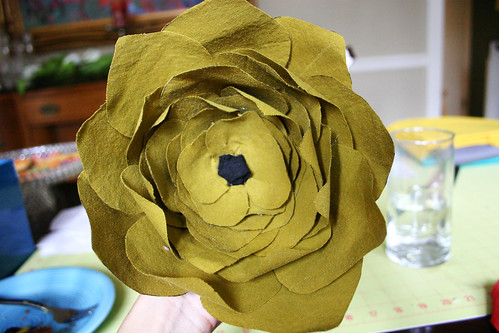
The giveaway is for the pea green poppy that is pictured on me at the top and the cluster of pink, white and beige poppies.
You might want also want to try cutting the tips of the flower patterns in a point to make peonies.
I might even suggest some embellishments like a hanging ribbon in the back. Or create several small ones of varying size and cluster them together to line one side of a vest or the neckline of a dress.
Here are some more ideas....here, here, here, or here. [показать]
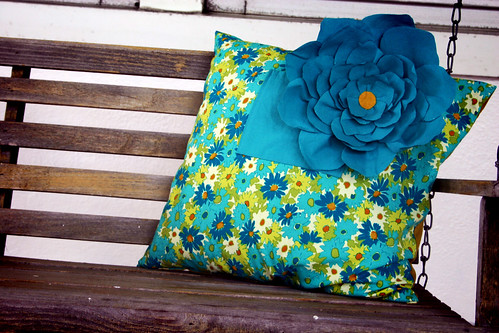
I made the above pea green poppy a little smaller than the original one on Lily. Cheila made thes full sized one in blue and had the brilliant idea to pin it to a pillow. It looked just like something in Anthropologie!
These flowers were an evolution of a pattern I found on Martha Stewart. She has some really FABULOUS paper flower tutorials. Check 'em out! [показать]
Materials:
1 yard of either Linen, Cotton or lightweight solid colored material
1-2 pin finding bars (I found mine at JoAnn fabric)
Fray Stop Spray (I found mine at Hancock fabric)
3"x3" felt
2"x2" piece of contrasting fabric for center
Thin tipped marker
iron
scissors
hot glue gun and glue
newspaper
Step 1. Print these patterns (in PDF):
Large Flower Left, Large Flower Right (for these patterns you have to print on two separate pieces of 8.5x11 paper. Cut them out and tape them together.)
Medium Large Flower
Medium Small Flower
Small and Smallest Flowers
 [показать]
St [показать]
 [показать]ep
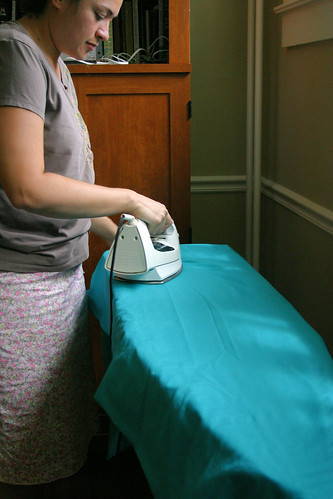
 [показать] 2. Iron your fabric
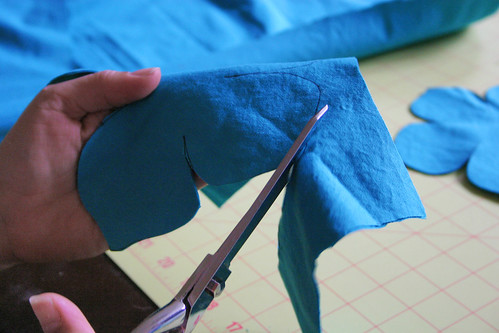
Step 3: Double up your fabric and trace each of the patterns so that you have two of each flower.
Step 4. Cut out the flowers.
Step 5. Spray your fabric with Fray Stop Spray on each side. I DEFINITELY recommend using a spray rather than a gel. It takes a FRACTION of the time. I bought mine at Hancock fabrics. But you can buy it online too. Surprisingly I could not find it at either JoAnn's or Michael's. You know, if you didn't have Fray Stop Spray perhaps some old fashioned hair spray might do the trick? After this step your flowers should be a little stiffer.
Step 6. Take the smallest flower and cut out each of the petals. Make each petal pointed at the bottom.
 [показать]
Step 7.
1. Once you have each petal cut....
2. Fold over the bottom half of the petal so that the petal cups up like a 'real' petal. I also recommend using the side that you did not trace on since a few of the marker edges can appear if you use that side up.
3. See how the fabric curves. The more you fold over the more curve you can achieve. If you wanted a look of a flower just barely opening you would make the petals almost fold inward on itself by making a very deep fold at the bottom. Experiment with this fold and see what you can achieve.
4. Hot glue the folded fabric in place. Do this for each of the petals.
5. Hot glue each of the petals together overlapping each until you use all the petals of the first smallest flower. It should look like a full circle of petals.
6. Do steps 1-6 for each flower hot gluing the next level of flowers underneath the previous level. See how it should look underneath in step 6.
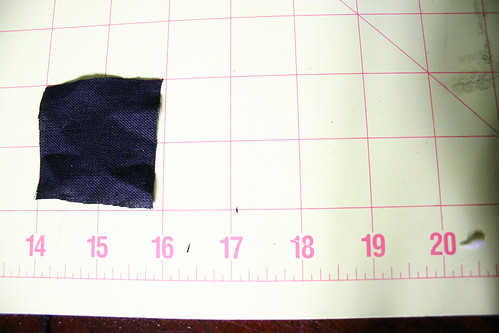
 [показать]Step 8. Cut a 2"x2" piece of contrasting fabric for the center of the flower.
 [показать]
Step 9. Hot glue the ends together and then glue the middle together to form a 't' shape. Cut the top of the 't' off and put a dab of hot glue on it.
If this step is too confusing you could just cut a very small circle of felt and hot glue it to the center of your flower.
I preferred the method I used in step 9 because it had a puffier ball-like look.
 [показать]
Step 10. Turn it over and press it into the middle of your flower trying to hide all the edges underneath the middle of the ball.
 [показать]
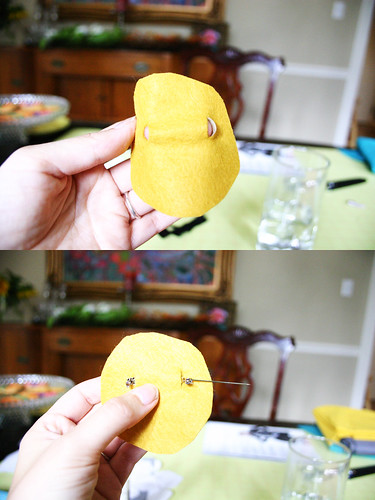
Step 11. Cut out a 3"x3" felt circle and make two slits near the top. Slide your pin through the two holes and hot glue it to the felt. Sometimes my flower droops a little when its pinned to my shirt so what you might want to do is try to either place the pin even higher on the circle or use two pins for extra support. Then take the circle and glue it to the back of your finished flower. VOILA! You're done.
As usual, if you would like a chance to win these poppies just link back to this post.
If you have any questions see the "questions and answers" link to the right. If you use blogger just use the "create a link" link at the bottom of this post. If you don't use blogger, that's fine too. Just create a link on your page as you normally would and I will see it using Technorati.
Create a Link
j.crew, j crew, jcrew, j.crew, j crew, jcrew, j.crew, j crew, jcrew, j.crew, j crew, jc
вверх^
к полной версии
понравилось!
в evernote
Poppy Boutonniere Tutorial and GIVEAWAY!!!! CLOSED.
 [показать]Well here it is, by request of you, the poppy tutorial!!!!
I had wanted to complete these last week but I came down with an awful sinus infection which really took the wind out of my sails.
However, my good friend Cheila of What's Goin Down Episode invited me over to her new home on Friday which gave us the perfect opportunity to spend an afternoon taking pictures and making poppies. I love spending the day with Cheila. She's a great cook AND loves to sew!
They just bought a new older home and it's lovely! Full of all those touches you can't find in brand new construction. Moulding, moulding, moulding, hardwood floors, wraparound staircase, wood windows and pocket doors.
 [показать]Lily and her daughter had fun dirtying their playroom with play dough and moon sand. Less fun when it came time to clean up. We had fun eating chicken salad on endive, lemon pastries with coffee and of course....making poppies!
They are a little different than the first one I made (for the better). Less work. More pretty.
 [показать]If you want a fuller flower just cut out more flowers and create more layers. If you want a smaller flower just eliminate the larger flowers and make fewer layers.
The giveaway is for the pea green poppy that is pictured on me at the top and the cluster of pink, white and beige poppies.
You might want also want to try cutting the tips of the flower patterns in a point to make peonies.
I might even suggest some embellishments like a hanging ribbon in the back. Or create several small ones of varying size and cluster them together to line one side of a vest or the neckline of a dress.
Here are some more ideas....here, here, here, or here.
 [показать]
I made the above pea green poppy a little smaller than the original one on Lily. Cheila made thes full sized one in blue and had the brilliant idea to pin it to a pillow. It looked just like something in Anthropologie!
These flowers were an evolution of a pattern I found on Martha Stewart. She has some really FABULOUS paper flower tutorials. Check 'em out!
 [показать]
Materials:
1 yard of either Linen, Cotton or lightweight solid colored material
1-2 pin finding bars (I found mine at JoAnn fabric)
Fray Stop Spray (I found mine at Hancock fabric)
3"x3" felt
2"x2" piece of contrasting fabric for center
Thin tipped marker
iron
scissors
hot glue gun and glue
newspaper
Step 1. Print these patterns (in PDF):
Large Flower Left, Large Flower Right (for these patterns you have to print on two separate pieces of 8.5x11 paper. Cut them out and tape them together.)
Medium Large Flower
Medium Small Flower
Small and Smallest Flowers
 [показать]
St
 [показать]
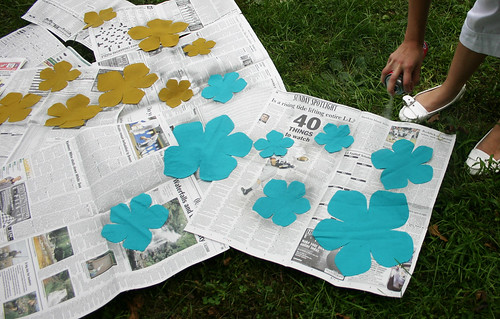 [показать]ep
 [показать] 2. Iron your fabric
Step 3: Double up your fabric and trace each of the patterns so that you have two of each flower.
Step 4. Cut out the flowers.
Step 5. Spray your fabric with Fray Stop Spray on each side. I DEFINITELY recommend using a spray rather than a gel. It takes a FRACTION of the time. I bought mine at Hancock fabrics. But you can buy it online too. Surprisingly I could not find it at either JoAnn's or Michael's. You know, if you didn't have Fray Stop Spray perhaps some old fashioned hair spray might do the trick? After this step your flowers should be a little stiffer.
Step 6. Take the smallest flower and cut out each of the petals. Make each petal pointed at the bottom.
 [показать]
Step 7.
1. Once you have each petal cut....
2. Fold over the bottom half of the petal so that the petal cups up like a 'real' petal. I also recommend using the side that you did not trace on since a few of the marker edges can appear if you use that side up.
3. See how the fabric curves. The more you fold over the more curve you can achieve. If you wanted a look of a flower just barely opening you would make the petals almost fold inward on itself by making a very deep fold at the bottom. Experiment with this fold and see what you can achieve.
4. Hot glue the folded fabric in place. Do this for each of the petals.
5. Hot glue each of the petals together overlapping each until you use all the petals of the first smallest flower. It should look like a full circle of petals.
6. Do steps 1-6 for each flower hot gluing the next level of flowers underneath the previous level. See how it should look underneath in step 6.
 [показать]Step 8. Cut a 2"x2" piece of contrasting fabric for the center of the flower.
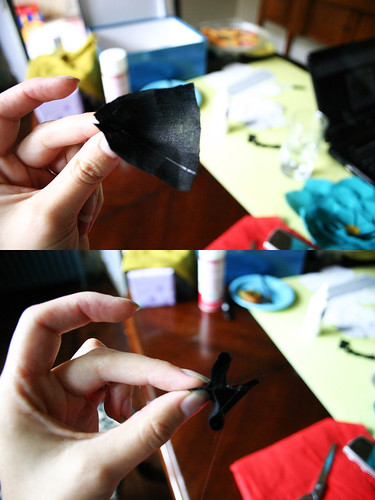 [показать]
Step 9. Hot glue the ends together and then glue the middle together to form a 't' shape. Cut the top of the 't' off and put a dab of hot glue on it.
If this step is too confusing you could just cut a very small circle of felt and hot glue it to the center of your flower.
I preferred the method I used in step 9 because it had a puffier ball-like look.
 [показать]
Step 10. Turn it over and press it into the middle of your flower trying to hide all the edges underneath the middle of the ball.
 [показать]
Step 11. Cut out a 3"x3" felt circle and make two slits near the top. Slide your pin through the two holes and hot glue it to the felt. Sometimes my flower droops a little when its pinned to my shirt so what you might want to do is try to either place the pin even higher on the circle or use two pins for extra support. Then take the circle and glue it to the back of your finished flower. VOILA! You're done.
As usual, if you would like a chance to win these poppies just link back to this post.
If you have any questions see the "questions and answers" link to the right. If you use blogger just use the "create a link" link at the bottom of this post. If you don't use blogger, that's fine too. Just create a link on your page as you normally would and I will see it using Technorati.
Create a Link
j.crew, j crew, jcrew, j.crew, j crew, jcrew, j.crew, j crew, jcrew, j.crew, j crew, jc
Вы сейчас не можете прокомментировать это сообщение.
Дневник Poppy Boutonniere Tutorial and GIVEAWAY!!!! | Zheniya86 - Дневник Zheniya86 |
Лента друзей Zheniya86
/ Полная версия
Добавить в друзья
Страницы:
раньше»