Это цитата сообщения Maruselka Оригинальное сообщение
Шапочка из флиса
http://www.fleecefun.com/basic-hat-with-ribbon-how-to.html
 [185x279]
Это цитата сообщения Марриэтта Оригинальное сообщение
Украшения для наших девочек. Цветочки-бабочки
Украшения для наших девочек. Цветочки-бабочки
 [600x450]
Это цитата сообщения Маленький-Рыжий Оригинальное сообщение
Позитивно-наивные рисунки:
Вот откапались такие рисуночки:


Turkey? Check!
Stuffing? Check!
Mashed Potatoes? Check!
Pilgrim and Indian hats?
What? No hats?
Well, then, today is your lucky day!
If your kids like to dress up as much as mine do, they’ll love these Thanksgiving hats!
We have made Pilgrim hats and Indian headbands in the past with construction paper.
They’re fun to make and fun to wear, but they rarely make it through the day.
This year I thought it might be a good idea to make the hats out of fabric so they’ll last longer.
I’m going to show you how to make 3 different styles of Thanksgiving hats;
an Indian Headband, a Pilgrim Bonnet, and a Pilgrim Hat.
Fabric American Indian Headband
Supplies:
Fabric in a variety of colors (I used Bella Solids Earth, Bella Solids Yellow, Essential Dots Christmas Red, Essential Dots Tangerine, Essential Dots Christmas Green)
Pellon 20″ Heavy Weight Stabilizer
1 1/2 ” piece of Velcro
Needle
Thread
Pins
Embroidery Floss (optional)
Buttons (optional)
Scissors
Pinking Shears
Rotary Cutter
Cutting Mat
Quilter’s Ruler
Iron
Measuring Tape
Fabric Marker
The first thing you need to do is measure your child’s head with measuring tape.
Using your measurement you’ll need to make patterns for your headband.
Simply cut a strip of paper to match your measurement.
I used manila file folders, because they are sturdy and easy to cut around.
Maggie’s head measures 21″ around.
So, I drew and cut out a 23″ x 3″ strip from my file folder, just to give myself a little leeway.
Trace the 23″ x 3″ piece onto your brown fabric and then cut.
Trace and cut your Pellon slightly smaller than your fabric.
You’ll also need a template for the feathers.
I just drew a feather/leaf shape and cut it out.
I’m sure you could google a feather or leaf shape if you’re nervous about drawing it freehand.
After you’ve drawn and cut out your pattern, fold the Pellon stabilizer so you have 10 layers.
This way you only have to cut once instead of 10 times.
Trace the feather template with your fabric marker onto the top layer of the Pellon stabilizer
and cut through all 10 layers of it.
Cut it slightly smaller than the feather pattern you traced.
Next trace a feather on your colored fabrics.
Это цитата сообщения принцеска_1 Оригинальное сообщение
МК по пошиву снеговичка Бррр
Материалы: флис, рибана хлопковая.
Начнем.
1.Выкраиваем детали. Шапка и рукавицы из трикотажа. Донышко из осн. ткани и из жесткого дублерина.
 [показать]
2. Дублируем флизелином переднюю половинку тушки. Для того, чтобы нам было легче вышивать мордочку и буквы.
[показать]
3. Пишем исчезающим маркером буквы
[показать]
4.Вышиваем нитками мулине (в 3 нитки) швом "назад иголку"
[показать]<<
Это цитата сообщения zabava_21 Оригинальное сообщение
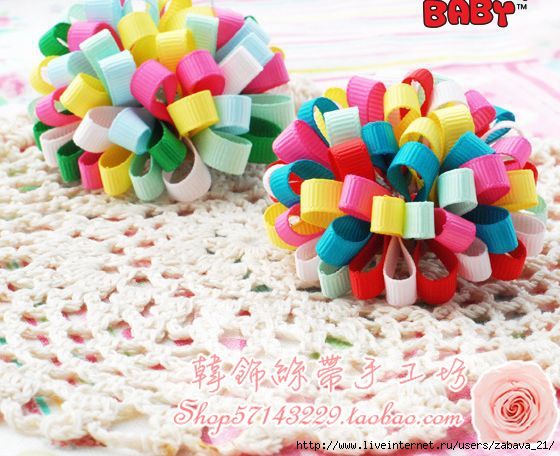
=Пушистики= заколки из лент.
1.
 [507x290]
 2.
 [570x593]
 3.
 [578x409]
 4.
 [560x456]
 5.
 [456x360]
 6.
 [450x300]
 7.
 [460x346]
 Это цитата сообщения maranafa Оригинальное сообщение
бантики
1) Возьмите капроновую ленту шириной 7 см.,длиной 1 м.
Это цитата сообщения Diadema Оригинальное сообщение
Шьем шапку из свитера
[показать] [показать] Читать далее
Серия сообщений "Переделки":
Часть 1 - ИЗ ФУТБОЛОК
Часть 2 - Комбинезон из муж. сорочки
...
Часть 10 - Туника\платье из майки для девочки
Часть 11 - Платье из свитера для девочки
Часть 12 - Шьем шапку из свитера
Часть 13 - Майки и воланы
Часть 14 - Еще идеи комбинированных вещей
...
Часть 32 - Шапочка из платка
Часть 33 - Сумки из футболки
Часть 34 - Маечка для девочки (из футболки)
Это цитата сообщения Оригинальное сообщение
Красивая осанка
Правильная осанка важна для поддержания здоровья, но ее не так легко достичь.
Осанка танцоров балета кажется нам безукоризненной. Но, оказывается, даже гигантских балетных нагрузок бывает недостаточно, чтобы мышечный корсет стал «железным». И танцоры балета нуждаются в помощи специалистов.
Признанным специалистом по части осанки является английский физиотерапевт Джеки Пелли. Джеки знает все о том, как надо правильно стоять, сидеть или ходить. Последние пять лет она консультирует в Королевской академии танца в Лондоне, и многим звездам балета помогла укрепить мышцы и улучшить осанку. Для обычных людей Джеки Пелли также разработала программу улучшения осанки и представила ее на страницах Домашнего очага. Это серия простых упражнений, которые может сделать каждый. Независимо от возраста, комплекции и уровня физической подготовки.
Упражнения выполняются на полу, на мягком коврике или полотенце. Начинать надо с одного-четырех повторов и довести их до десяти. В первый день занятие должно продолжаться не более пяти минут. Выполнение всей программы занимает примерно 20 минут. Заниматься надо регулярно, через день — и так до тех пор, пока не почувствуете, что обрели хорошую осанку. С этого момента занимайтесь, как только почувствуете, что спина возвращается к «плохим привычкам».
Джеки Пелли исходит из того, что хорошую осанку обеспечивают не только сильные мышцы спины. Огромное значение играют мышцы нижнего пресса, которые также являются «корсетом», поддерживая нижнюю часть позвоночника. Поэтому каждое упражнение выполняется с напряжением мышц нижней части живота. Если делать эти нехитрые упражнения регулярно, они помогут предотвратить проблемы со спиной, шеей и плечами благодаря тому, что они учат втягивать рыхлые мышцы живота и расслаблять сгорбленные плечи.
ПЕРВЫЙ ДЕНЬ
Укрепляем мышцы пресса
Первым делом нужно почувствовать, где расположены мышцы нижнего пресса, а затем укрепить их. Сильные мышцы нижнего пресса помогут держать тело вертикально. Лягте на пол, согнув ноги в коленях. Ступни полностью поставьте на пол, бедра слегка разведите. Спину чуть-чуть прогните, чтобы между поясницей и полом образовалась невысокая «арка». Сохраняйте ее, выполняя упражнение. Подбородок немного втяните. Представьте, что между подбородком и шеей вы удерживаете персик среднего размера.
Пальцами рук нащупайте выступающие тазовые кости. Переместите пальцы на 2 см внутрь и 2 см вниз от них. Держите пальцы на этих точках. Сделайте глубокий вдох. На выдохе напрягите мышцы нижнего пресса и держите их в напряжении пять секунд. Постепенно увеличивайте время до десяти секунд. Пальцами вы должны чувствовать, как напряглись мышцы. Когда научитесь удерживать мышцы нижнего пресса в напряжении, постарайтесь поочередно расслаблять и напрягать мышцы живота, разбив один длинный выдох на пять коротких выдохов.
Укрепите мышцы шеи
Мышцы, лежащие по бокам шеи, удерживают голову. Сильные мышцы шеи помогают держать голову высоко поднятой. А регулярные упражнения еще и удлиняют позвоночник. Займите то же исходное положение, что и в предыдущем упражнении. Прижмите язык к верхнему небу и осторожно поднимите голову — сделайте кивок. Задержитесь в этом положении на несколько секунд и вернитесь в удобную позицию. Упражнение повторите не более пяти раз.
ВТОРОЙ ДЕНЬ
Контролируем бедра
Исследования установили, что большинство людей сидит слишком глубоко. Это упражнение научит вас находить удобную «сидячую» позицию, которая автоматически поможет держаться прямо, когда вы сидите. Лягте на пол с согнутыми в коленях ногами, расположите ступни на полу. Подбородок слегка втяните. Бедра удобно уложите на пол. Сделайте глубокий вдох. На выдохе выровняйте и расслабьте мышцы живота и ягодиц, а под конец выдоха «вталкивайте» низ спины и ягодицы в пол, на мгновение напрягая мышцы живота. Частоту повторов увеличивайте с пяти до десяти.
ТРЕТИЙ ДЕНЬ
Растягиваем спину
Упражнение уменьшает напряжение в мышцах спины, помогает держать плечи расслабленными, а позвоночник — вытянутым. Лягте на пол. Под голову и спину (там, где застегивается бюстгальтер) положите свернутое полотенце. Сделайте глубокий вдох, а затем, выдыхая через рот, тяните плечи вниз, расслабляя их. Задержитесь в этом положении на три минуты. Такое положение может быть некомфортным, но не должно быть болезненным.
ЧЕТВЕРТЫЙ ДЕНЬ
Укрепляем мышцы лопаток
Расположенные на лопатках мышцы держат плечи развернутыми и не позволяют сутулиться. Упражнение помогает укрепить эти мышцы, а, значит, и улучшить осанку. Лягте на живот, под лоб положите свернутое полотенце, руки вытяните вдоль тела, ноги слегка разведите. Сделайте глубокий вдох. На выдохе напрягите мышцы нижнего пресса и тяните лопатки вниз одновременно сводя их. Представьте, что на них стоят две тарелки, которые должны «встретиться» в середине спины. По мере того как вы тянете лопатки, вы должны чувствовать напряжение в мышцах под ними.
Когда максимально сведете лопатки, вытяните
Year after year as the weather turns cold, knitted and crocheted hand warmers start popping up all over the city and on the Purl Bee. After years of feeling a little left out, I decided that it was time for us sewists to get in on the action, and so these soft and cozy Felted Wool Wrist Warmers were born!
[показать]Mary Flanagan Felted Wool is the ideal fabric for gorgeous winter accessories. It’s lovely, rustic, and oh-so-warm. In addition to this soft oatmeal color, it comes in a glorious hand-dyed rainbow of colors, from bright turquoise to deep pumpkin orange. For a festive holiday touch, I also used brightly colored cotton embroidery floss accented by a shimmer of metallic thread.
[показать]These are beyond quick to sew, making them an even more last-minute holiday gift than the more traditional knitted and crocheted versions (score one for the sewists!). In fact, if you skipped the embroidery you could make a pair in under 20 minutes. Even with the embroidery you’ll clock in under an hour! These Wrist Warmers are beautiful worn on their own, or wear them over gloves for an extra layer of warmth and style.
Happy Holiday Sewing!-- Molly
Materials
[показать]
To make two 11-inch long women's wrist warmers:
- Two pieces of Mary Flanagan felted wool in Oatmeal
- A ball of DMC pearl cotton thread in color 606
- Metallic Embroidery Floss in Silver
- 100% cotton thread to match the felted wool, I used color 1240
- A Felted Wool Wrist Warmer template, available for free download here, printed, cut out, and taped together as directed.
Cutting and Sewing
Press one of the wool pieces in half lengthwise. Cut the template shape from the wool as directed on the template.
Unfold the cut piece. Fold over and pin the top and bottom edges a 1/2-inch towards the wrong side. (The wool itself does not have a right or a wrong side you are making this the wrong side by folding the raw edges onto it.)
Edge stitch the folds down using the matching cotton thread.
Fold the hemmed piece back in half lengthwise with the wrong side facing out. Pin it together along the long side marking the thumb gap from the template. Make sure to keep in mind that you have hemmed the top and bottom of the wrist warmer so to mark the thumb gap you will be measuring from inside the dashed hem lines of the template.
[показать]Sew the pinned side together with a 1/2-inch seam allowance in two sections, before and after the thumb gap. Do not sew the thumb gap closed. Make sure to back stitch at the
Avant d'utiliser les données de ce blog, merci de lire les conditions d'utilisation
L'année file avec son lot de rituels ! Concevoir un sac pour la récolte de Pâques en fait partie... Mais cette fois, mes petits doigts se sont activés pour les enfants de La Chipie.
Un sac alliant feutre, feutrine et tissu aux couleurs contrastées.
Facile à réaliser, il nécessite peu de moyens et de technique.
Si la machine fait défaut, les coutures peuvent être faites à la main et les anses, réalisées en feutre.


Fournitures :
- 2 plaques de feutre 30x30cm en 1.5mm ou 2mm d'épaisseur couleur turquoise/chocolat.
- chute de feutrine melon ou chair/bleu ciel et marron
- 20cm de ruban satin bleu ciel et marron.
- tissus coordonnés
- Fil à coudre
- Fil coton à canevas.
- Fil coton à broder.
Gabarits :
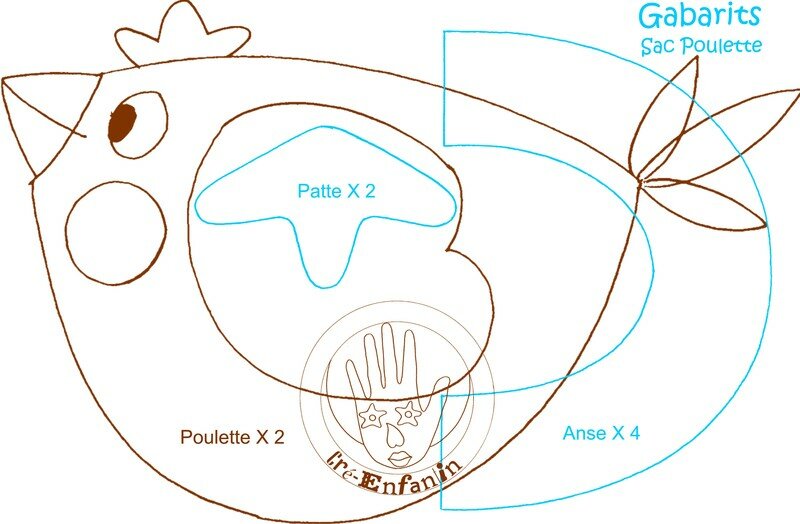 Gabarits
Rappel :
Enregistrer l'image ou le fichier sur le bureau et lancer l'impression via l'assistant pour avoir les gabarits au bon format.
Réaliser les 2 faces Poule :

Découper les pièces pour chaque face selon le gabarit et positionner chaque élément à sa place.
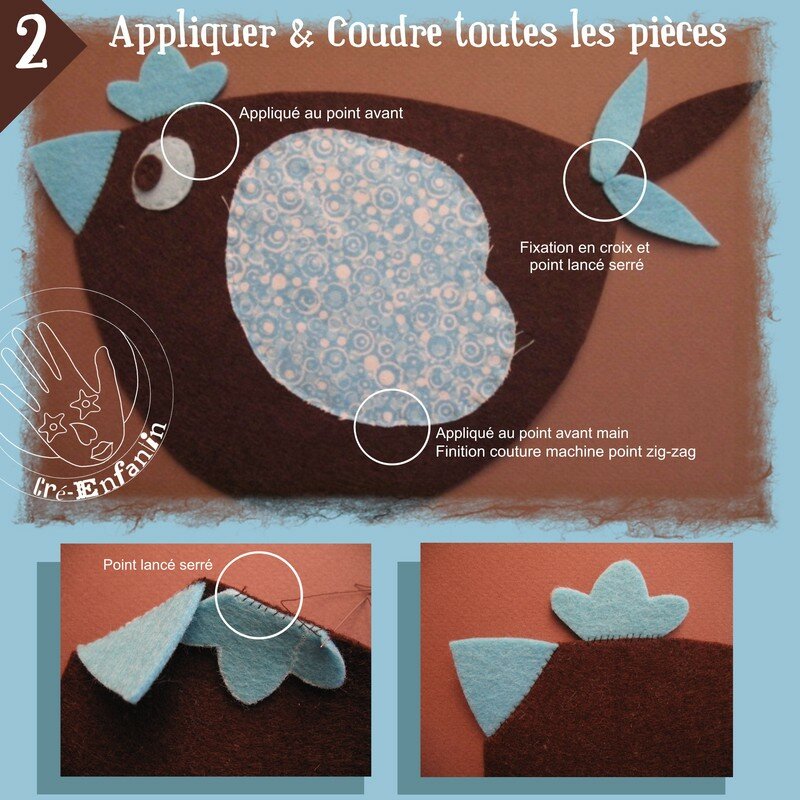
Coudre le bec et la crête au point lancé serré.
Appliquer l'aile au point avant, puis clarifier son contour à la machine au point zigzag.
Réduire la largeur du point et dessiner l'ouverture du bec.

Coudre la pupille à l'oeil par un point en croix, puis appliquer l'ensemble sur le corps au point avant.
Assembler les 3 plumes de la queue et les fixer au corps.
Dessiner les contours de chaque poule au fil coton à canevas de la couleur contrastante.
Fixer les pattes au ruban de satin. Dessiner leur contour au point avant , puis coudre l'ensemble au corps.
Confection et assemblage du fond :

Это цитата сообщения Dushka_li Оригинальное сообщение
Делаем сами: открытка "Мужской смокинг и галстук". Мастер-класс
[показать]Автор: Rеnata Далее ее слова:
Немного истории этих открыток: Изначально такую открытку предполагалось превратить в пригласительную открытку в преддверии юбилея моего супруга 30-лет. Такое можно было заказать, но желание сделать своими руками и сделать приятное юбиляру и приглашенным гостям, такого дорогого стоит. Количество пригласительных было 55 штук и затраты были минимальны, а настроение и удовольствие было огромное.
Однако думаю, что такая открыточка на 23 февраля станет приятным подарком любому мужчине!
Это цитата сообщения KonVeda Оригинальное сообщение
Задержите осень) Поделки из листьев)
http://stranamasterov.ru/node/213837
Небольшой фото-МК как можно сделать двухъярусную кроватку небольшим игрушкам- куколкам или пупсикам.
Всё просто. Нам понадобятся:
-коробочный картон
-бумага для шаблонов
-клей "Момент" и ПВА
-проволока
-ножницы
-карандаш
-линейка
-ткань для постельки
-палочки от мороженого 2шт
-спички 7-8шт
Начнём с приготовления до неприличия простых шаблонов :) Два прямоугольника 9 на 5см и 7 на 5см.
Размеры, конечно же, могут быть любые, а у меня вот такие, так как кроватку делаю для своих любимых пупсиков :)
Вырезаем по шаблонам из коробочного картона 4 больших детали и 8 маленьких.
Если вы делаете кровать бОльшего размера, то деталей нужно сделать немного больше.
А в это время отрезаем 4 кусочка проволоки (да-да, не две, как на фото, а четыре:) длиной 15 сантиметров.
Сверху на проволоку аккуратно прикладываем ещё одну деталь "ложе", прижимаем и поправляем ровно проволоку. Ставим под пресс.

Это цитата сообщения likmiass Оригинальное сообщение
КАК Я ДЕЛАЮ БУМАГУ. МК
Многие делают бумагу при помощи наклеивания салфеток. Я покажу способ как это сделать совсем без проблем. Сразу оговорюсь, что способ с пищевой пленкой мне не нравится. Будем делать листы формата А4
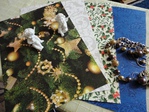 [518x389]
Нам понадобятся:

-салфетки,
- бумага для акварели, можно картон и если надо тоненький листочек, то и офисная бумага сгодится,
- ножницы,
- утюг,
- клеевая паутинка ( про нее смотрим здесьhttp://www.narodko.ru/article/tkach/dublerin/pautinka.htm ) Это та самая паутинка, которую мы привыкли видеть в виде узких полосочек, применяемых для подгибки наза юбок, брюк. Но эта широкая, ширина 1,2 м. Стоит 90 р. за метр.

Это цитата сообщения Лана_Берг Оригинальное сообщение
Забавные фартучки для девочек...
Забавные фартучки для девочек...
Нашла здесь... http://www.etсy.com/shop/wildgsdresses?ref=seller_info
1.
 [570x476]
Это цитата сообщения Лилия_Бобейка Оригинальное сообщение
Сценарий к Дню рождения дочки!
Это цитата сообщения Dushka_li Оригинальное сообщение
Делаем сами: снежный шар...
[показать]Никакая другая игрушка не ассоциируется с Новым годом так, как эта. Это снежный сувенир. Перевернул и наблюдаешь как снег осыпает содержимое, обычно это дом или сказочный персонаж.
Внутрь можно поместить все, что угодно: от елочного украшения до ключа или бижутерии. Конечно, драгоценности мы туда помещать не будем. А на барахолке можно найти какую-нибудь необычную вещицу, которая прекрасно подойдет для изготовления шара со снегом. Если вы будете использовать для «начинки» металлические предметы, рекомендуем вам обработать их перед этим средством для защиты от коррозии.
Итак, давайте сами сделаем это!