Это цитата сообщения РИМИДАЛ Оригинальное сообщение
Granny Rectangle


I have been unsatisfied with how I was doing granny rectangles. I didn’t like how the center start didn’t match the rest of the fabric, where the clusters align instead of alternating and the starting chain is obvious. I thought of a different approach, I think I like how it turned out. This is my first tutorial, I hope it makes sense. if something isn’t clear please leave a comment and I’ll see if I can make it make sense : )
To Start
Make a sliding ring. Draw up a loop and ch 6(counts as dc, ch3), 3dc, ch3, dc in the ring.
 /crochetagain.files.wordpress.com/2012/05/crochetrectanglestart.jpg?w=150" target="_blank">https://crochetagain.files.wordpress.com/2012/05/crochetrectanglestart.jpg?w=150 150w, https://crochetagain.files.wordpress.com/2012/05/crochetrectanglestart.jpg?w=300 300w" title="CrochetRectangleStart" />
Tighten up the ring and chain 3.
 /crochetagain.files.wordpress.com/2012/05/grannyrectangletigthenring.jpg?w=150" target="_blank">https://crochetagain.files.wordpress.com/2012/05/grannyrectangletigthenring.jpg?w=150 150w, https://crochetagain.files.wordpress.com/2012/05/grannyrectangletigthenring.jpg?w=300 300w" title="GrannyRectangleTigthenRing" />
Rows
Turn, and work as a row on the bottom side with 2dc in the first ch space and 3dc in the next ch3 space. Ch3 and turn.
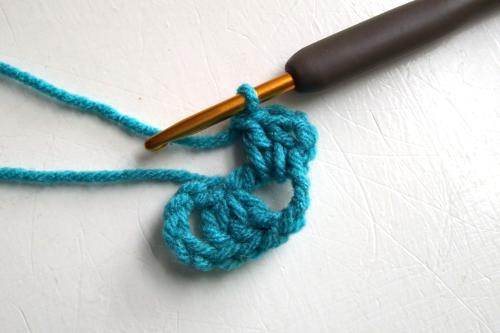 /crochetagain.files.wordpress.com/2012/05/grannyrectanglerow2.jpg?w=150" target="_blank">https://crochetagain.files.wordpress.com/2012/05/grannyrectanglerow2.jpg?w=150 150w, https://crochetagain.files.wordpress.com/2012/05/grannyrectanglerow2.jpg?w=300 300w" title="GrannyRectangleRow2" />
Make 3dc in the space between the 2 groups of 3dc of the previous row, and 1dc in the top of the ch3 of the previous row. Ch 3 and turn.
 /crochetagain.files.wordpress.com/2012/05/grannyrectanglerow3.jpg?w=150" target="_blank">https://crochetagain.files.wordpress.com/2012/05/grannyrectanglerow3.jpg?w=150 150w, https://crochetagain.files.wordpress.com/2012/05/grannyrectanglerow3.jpg?w=300 300w" title="GrannyRectangleRow3" />
Continue working as rows, alternating with ch3, 3dc in next space, dc in the top of the ch3 of the previous row for 1 row and ch3, 2dc in the ch space, 3dc in the next ch space for the next row. Make however many rows you want, but you want to end with a row that has a center 3dc and a ch3/dc at each end.
 /crochetagain.files.wordpress.com/2012/05/grannyrectanglerows.jpg?w=150" target="_blank">https://crochetagain.files.wordpress.com/2012/05/grannyrectanglerows.jpg?w=150 150w, https://crochetagain.files.wordpress.com/2012/05/grannyrectanglerows.jpg?w=300 300w" title="GrannyRectangleRows" />
I am going to change colors, so I am ending with a ch3 instead of a dc. That gives a consistent ch3 for each “corner” of my rectangle. If I was going to keep on with the same color, I would just do a dc, ch 3 for the round instead.
 /crochetagain.files.wordpress.com/2012/05/grannyrectangleendingchain.jpg?w=150" target="_blank">https://crochetagain.files.wordpress.com/2012/05/grannyrectangleendingchain.jpg?w=150 150w, https://crochetagain.files.wordpress.com/2012/05/grannyrectangleendingchain.jpg?w=300 300w" title="GrannyRectangleEndingChain" />
Slip stitch to the top of the ch3 of the previous row. End off. You now have a narrow rectangle of rows, with corner spaces.
 /crochetagain.files.wordpress.com/2012/05/grannyrectangleslipstitch.jpg?w=150" target="_blank">https://crochetagain.files.wordpress.com/2012/05/grannyrectangleslipstitch.jpg?w=150 150w, https://crochetagain.files.wordpress.com/2012/05/grannyrectangleslipstitch.jpg?w=300 300w" title="GrannyRectangleSlipStitch" />
Rounds
Attach a new color in a corner space with a dc (or slpst, ch3). 2dc, ch3, 3dc.
 /crochetagain.files.wordpress.com/2012/05/grannyrectanglenewcolor.jpg?w=150" target="_blank">https://crochetagain.files.wordpress.com/2012/05/grannyrectanglenewcolor.jpg?w=150 150w, https://crochetagain.files.wordpress.com/2012/05/grannyrectanglenewcolor.jpg?w=300 300w" title="GrannyRectangleNewColor" />
Continue around, doing 3dc along the side in the space between the 3dc’s of the rows and 3dc, ch3, 3dc in each corner space.
 /crochetagain.files.wordpress.com/2012/05/grannyrectanglecontinuearound.jpg?w=150" target="_blank">https://crochetagain.files.wordpress.com/2012/05/g...tanglecontinuearound.jpg?w=150 150w, https://crochetagain.files.wordpress.com/2012/05/g...tanglecontinuearound.jpg?w=300 300w" title="GrannyRectangleContinueAround" />
And there you have it, a crocheted granny rectangle.
 /crochetagain.files.wordpress.com/2012/05/finishedcrochetgrannyrectangle.jpg?w=150" target="_blank">https://crochetagain.files.wordpress.com/2012/05/f...ochetgrannyrectangle.jpg?w=150 150w, https://crochetagain.files.wordpress.com/2012/05/f...ochetgrannyrectangle.jpg?w=300 300w" title="FinishedCrochetGrannyRectangle" />