Это цитата сообщения Georgina23 Оригинальное сообщение
Шарики из бисера МК
http://handmade-jewelry-club.com/tag/bead-tutorial

Beaded balls or beads are fun to make! I usually make beaded balls during Holiday Season and use as Christmas ornaments. You can make them as colorful as they can be. 3D Beading.com [показать]
Use as charms, pendants or earrings. You can even string them together to make a bracelets and necklaces.
[400x281]
Now let’s start to play ball with a Beginner Beaded Ball or Bead Tutorial. In this tutorial we used 2 colors of bicones so you can clearly see how layers are created. The threads are represented as “R” for right thread and “L” for left thread.Step 1:
Cut an arm span of thread and thread both ends into a needle. String 5 bicones and position at the center of the thread. You have your L and R.
 [показать]
Step 2:
Going to your left, pass the R into a bicone.
 [показать]
Pull the thread. You now have a circle of beads.
 [показать]
Step 3:
On your L slide in a bicone and your R with 3 bicones.
 [показать]
Going to your left pass R into the nearest 2 bicones shown in brackets.
 [показать]
Pull the thread and you will have 2 circles of beads side by side.
 [показать]
Step 4:
Position your beadwork like so and slide in a bicone on your L and 2 bicones on your R.
 [показать]
Going to your left pass R into the nearest 2 bicones shown in brackets.
 [показать]
Pull the thread and you’ll have 3 circle of beads. Repeat Step 4 twice going around your beadwork.
 [показать]
Step 5:
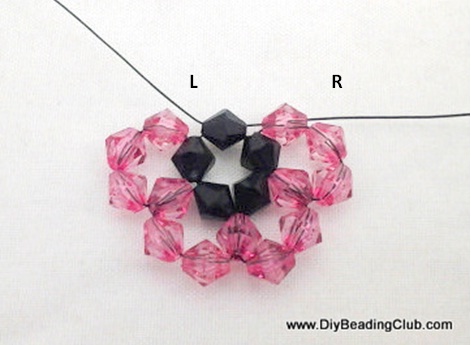
After repeating Step 4 twice you will arrive at this stage of your beadwork. Your L is coming out of a bicone from the 1st layer while your R is coming a last bicone from the 2nd layer. You also need 1 more bicone to complete the 2nd layer.
 [показать]
Going left pass L into the nearest bicone.
 [показать]
Step 6:
Then slide in 1 bicone on your L and R.
 [показать]
Going left pass R into the nearest bicones shown in brackets.
 [показать]
Pull the thread. As you pull you would notice the beadwork starts to have the dome shape.
 [показать]
Step 7:
Flip your beadwork like so and slide in a bicone on your L and 2 bicones on your R.
 [показать]
Going left pass R into the nearest 3 bicones shown in brackets.
 [показать]
Pull the thread.
 [показать]
Step 8:
Continue by sliding in a bicone on your L and a bicone on your R.
 [показать]
Going left pass R into the nearest 3 bicones shown in brackets and pull. Repeat Step 8 twice, going around the bead.
 [показать]
 [показать]
Step 9:
After Step 8 you will now arrive at this stage of your beadwork, with only 1 bicone needed to fill the space.
 [показать]
Your thread is now coming out of a bicone from the 2nd layer, which is shown in red arrow. Pass L into the nearest bicone from the 3rd layer shown in black arrow.
 [показать]
Step 10:
Your threads are now both coming out a bicone from the 3rd layer. At this point, you can prefer to slide in a large bead or leave it as is and continue to complete your 3rd layer.
 [показать]
To complete the 3rd layer and close your beaded bead cross both threads into a bicone.
 [показать]
Pull tight to close the circle. Pass the threads back thru the 3rd layer of beads and have them meet again. Tie a knot, cut excess threads.
 [показать]
You’re done!
 [показать]
Here’s something you can do with a Beaded Ball, a Beaded Ball Ring!
 [показать]
Ciao!
Read more at http://handmade-jewelry-club.com/tag/bead-tutorial#HHypMrJgWKAecsSj.99