• Авторизация


Сумочка для кукольного домика 04-02-2016 01:23


http://caseymini.blogspot.ru/2008/03/barrel-bag-tutorial.html

Barrel Bag Tutorial

 
OK. You asked for it. For now I am just going to give you the simplest bag to make. [показать]

This is a barrel bag or duffel, depending on what size you make it.

I am doing one made from the outside of a size small Tampax tube. You need Tampax brand regular, not any of the fancy ones. They are the ones that have cardboard tubes. Maybe I should start with a list of supplies.

Tools: small sharp scissors, white glue(I use Elmer's white in a needle nose bottle) , and exacto knife to cut the tube. It is helpful to have a needle nosed glue bottle if you have one.
lined index card. Also 1/4" graph paper for measuring if desired.

1. I generally buy one of the Tampax boxes that has 3 sizes in one. That will give you a LOT of different sized bags.

2. A 6"square piece of natural fabric. Use cotton, silk or linen. Polyester and polyester blends just give you a headache. They don't glue well at all.

3. A 7" long piece of ribbon or trim. This is for the handle and can be longer if you want a shoulder type bag.

4. A piece of metallic trim for the zipper. It should be a little longer than the purse. You will have to put glue on the ends and cut through to keep it from fraying.

5. Four metal rings. The ones in the photo are from an old necklace that I tore apart.

6. One piece of a finding for the zipper pull if you want one.
[показать]
The first thing you do is either with a piece of graph paper (1/4" squares) or a lined index card(they are lined in 1/4"), make a mark on the tube 1 1/4" from the end all the way around. I find it easiest to use the graph paper because you can cut a strip 1 1/4" wide, wrap it around the tube and mark it.


Next you cut a piece of the index card that is the same width. In this case,it's 1 1/4" wide. Then cut it to exactly fit around the tube. [показать]

Then you cut a and glue a piece of fabric to the outside. Miter the corners. Fold to the inside and glue.


Cut two circles of fabric about 1/8" bigger than the end of the tube. Run a fine line of glue around the very edge of the tube and stick one circle to each end. Let them dry a little and then cut little "V"s in the fabric all around the edge of the circles.


Glue down the clipped part of the circles to the body of the bag. [показать] It should look like this. Now take a scrap of fabric about 1/4"wide and not quite as long as the purse and glue it where you want to put the zipper. This is in case the zipper doesn't cover the gap when you wrap the outside around the bag.

You can find different metallic trims that work for zippers.
Читать далее...
комментарии: 0 понравилось! вверх^ к полной версии
Сумочка для кукольного домика 04-02-2016 00:43


http://mijbilcreatures.blogspot.se/2012/11/diy-miniature-felt-satchel-bag.html


DIY miniature felt satchel bag


Как сшить
комментарии: 0 понравилось! вверх^ к полной версии

Сумочка 04-02-2016 00:40


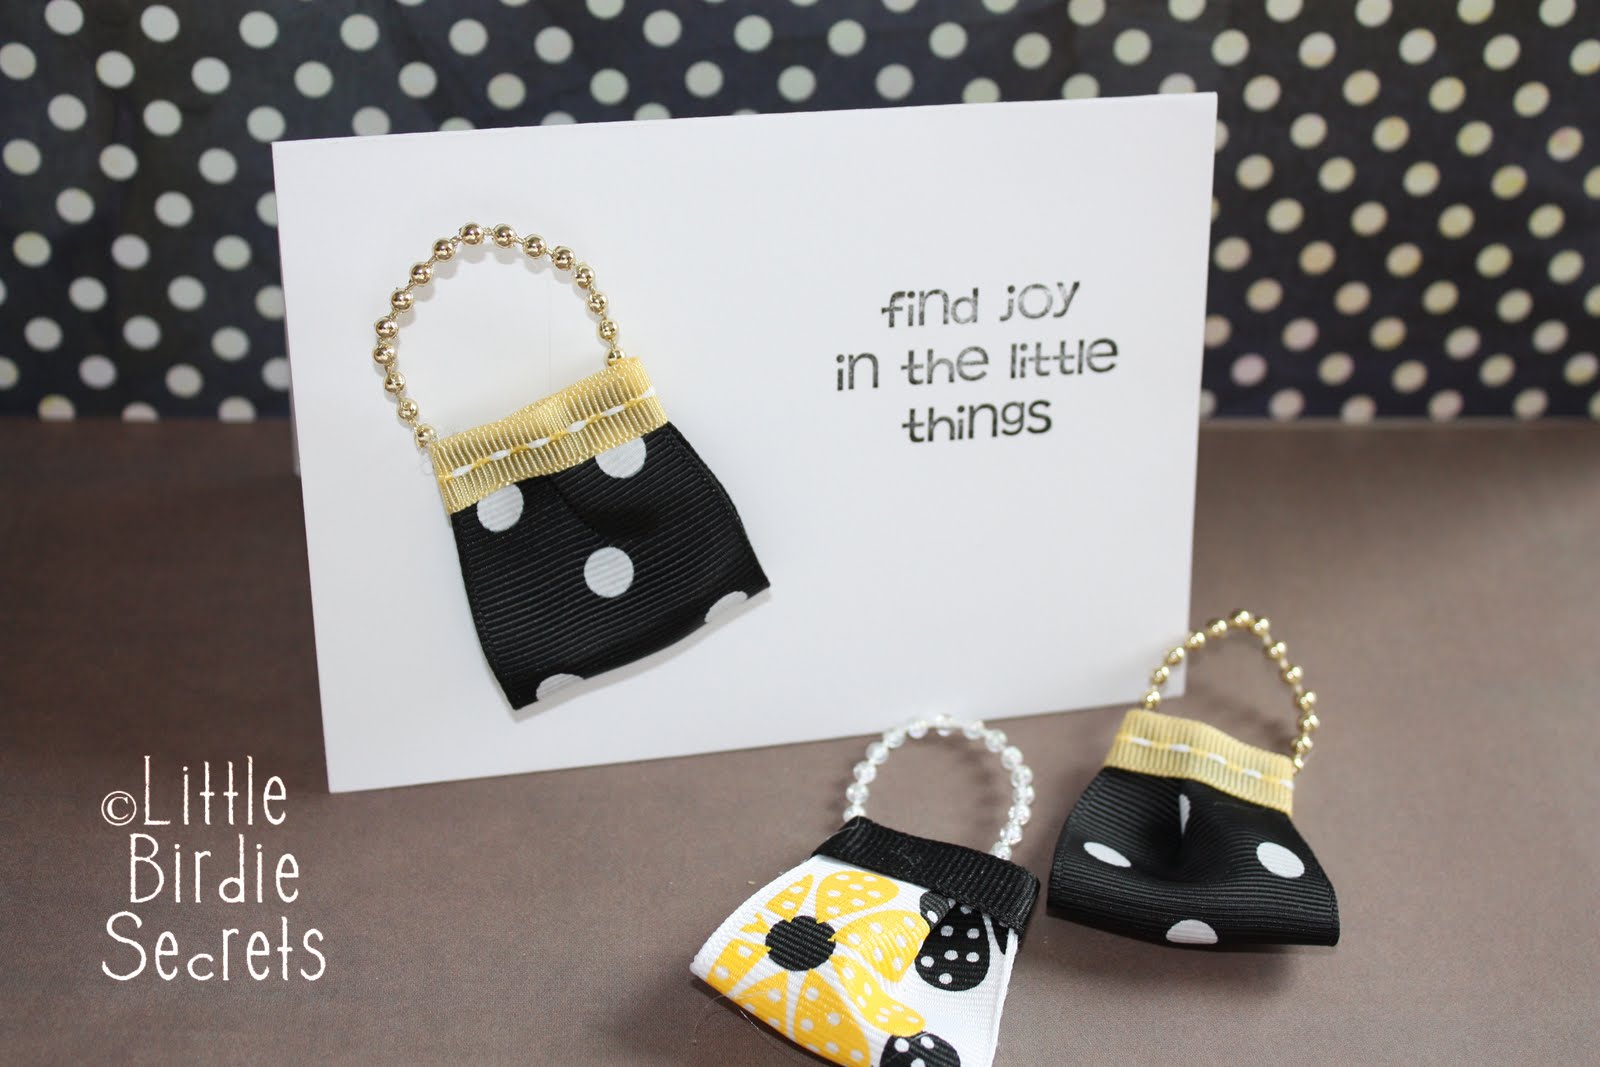
http://littlebirdiesecrets.blogspot.fr/2010/04/cards-with-pursenality.html

CARDS WITH "PURSE"NALITY!

[показать]

Here is a tutorial for a simple purse that can be used on almost anything. 

[показать]

You will need:

Ribbon
Glue
Sewing Machine (optional)
String of beads--not sure what this is really called. You can find it at craft stores or cake decorating stores and it is sold by the yard

[показать]

Fold your purse ribbon in half and then make a pleat at the top.

Sew it in place. If you don't have a sewing machine you can either hand sew it or try gluing it.

[показать]

Next, glue on your coordinating ribbon and then the purse "handles".

[показать]

Now add this to your card, scrapbook page, or gift tag!

[показать]


комментарии: 0 понравилось! вверх^ к полной версии
Сумочка 04-02-2016 00:33


http://liimanappi.vuodatus.net/lue/2008/10/salkun-kaava-omasta-paasta


Tässäpä vähän kaavaa tuohon yksinkertaiseen salkkuun, joita lauantaina värkkäilimme.

[показать]

Toteutushan menee niin, että: 1. sivukappaleet liimataan kiinni pohjaan ja etu- ja takakappaleiden sivuihin. 2. Tasku liimataan etukapaleeseen. 3. kantokahva liimataan paikalleen. 4. viimeistellään nahkasuikaleilla ja soljilla.

[показать]

[показать]

Kaavaa muokkaamalla salkun ulkoasua on helppo muuttaa. Esim leikkaamalla sivukappaleet ylhäältä kapeammiksi. Läpän muotoa voi myös vaihdella. Taskujakin voisi olla vaikka kaksi, ja niissä vielä jotain koristusta...

комментарии: 0 понравилось! вверх^ к полной версии
Сумочка 04-02-2016 00:12


Источник: http://lasminisdeeden.blogspot.ru/2007/12/tutorial-bolso-de-viaje.html

TUTORIAL BOLSO DE VIAJE

 
HOY PONGO ESTE TUTORIAL , ESPERO QUE OS GUSTE
SE NECESITA TELA DE TAPICERIA O LONETA O ALGUNA QUE SEA FUERTE
UN RECTANGULO DE 7X5 Y DOS RECTANGULOS DE 1X2,5

SI PICAIS EN LAS FOTOS SE VEN MAS GRANDES
[показать]
SE COLOCAN COMO SE VE EN LA FOTO Y SE EMPIZA A COSER POR EL REVES ESTANDO LAS TELAS DERCHO CON DERECHOAQUI YA SE VEN COSIDAS LAS BASES
[показать]

[показать]
AHORA VAMOS COSIENDO LAS RESTANTES COSTURAS UNA DE CADA LADO

[показать]


HASTA QUE TENGAMOS ESTA ESPECIE DE SACO
[показать]


HACEMOS UN PEQUEÑO PLIEGUE EN LOS LATERALES ARRIBA PARA DARLE UN POCO DE FORMA, Y QUE QUEDE MAS ESTRECHO DE ARRIBA QUE DE ABAJO
[показать]


LE DAMOS LA VUELTA Y YA TENEMOS EL BOLSO FORMADO
[показать]


YO HE USADO TROCITOS DE ANTE DE UN COLOR CONTRASTADO , PERO ESTOY SEGURA QUE IRIA MEJOR ANTELINA QUE ES UN GENERO MAS FINO
LE VAMOS PEGANDO TIRAS
ESTA ESTA PEGADADA LA MITAD POR DENTRO Y LA MITAD POR FUERA PARA TENER EL BORDE DEL BOLSO DENTRO
[показать]

CON ALAMBRE DORADO SE HACEN UNAS ARANDELAS DEL TAMAÑO DE UN PALILLO DE BROCHETA
Читать далее...
комментарии: 0 понравилось! вверх^ к полной версии
Ёлочка 04-02-2016 00:05


комментарии: 0 понравилось! вверх^ к полной версии
МАДАМ ДАНО И ЕЕ ЛЮБОВЬ СКАЗКИ ЭЛЬФИКИ 03-02-2016 11:39

Это цитата сообщения оля-душка Оригинальное сообщение


Мадам Дано была очень, очень серьезной дамой и убежденно всем доказывала, что жизнь трудна, а счастье недостижимо. Кстати, она носила совсем другую фамилию, а «мадам Дано» ее прозвали за то, что все ее фразы неизменно начинались со слов: «Да, но…». Например, на слова «хорошая нынче погодка!» она тут же отвечала: «Да, но уже к вечеру она может испортиться», на сообщение о чьей-то свадьбе, поджав губы, говорила: «Да, но сейчас молодые семьи так часто распадаются…», на пожелание доброго здоровья – «Да, но кто застрахован от болезней, ведь может и кирпич на голову упасть?».

Читать далее...
комментарии: 0 понравилось! вверх^ к полной версии
Самокат 03-02-2016 01:02


http://home.planet.nl/~helm0269/workshops/workshop_step.htm


Workshop kinderstep

Materiaal

  1. Stukje dun hout (2mm) van 45 x 12 mm       
  2. Stukje lat 3x3 mm 10 mm lang (staat niet op de foto)                 
  3. Rondhout doorsnee 4 mm, 35 mm lang 
  4. Rondhout doorsnee 3 mm, 30 mm lang
  5. 3 plakjes rondhout doorsnee 10 mm, dik 2 mm
  6. 3 rubberen ringetjes (van de loodgieter)
  7. Spijkertjes  doorsnee 0,5 mm
  8. Stukje buis doorsnee 1,5 mm  3 mm lang  
  9. Bandijzer 0,5 mm dik, 3 mm breed, 14 mm lang
  10. Bandijzer 0,5 mm dik, 3 mm breed, 22 mm lang
  11. Bandijzer 0,5 mm dik, 3 mm breed, 8 mm lang


[298x246]

[296x280]

Gereedschap

  • Figuurzaag
  • X-acto zaag en verstekbakje of cirkelzaag
  • Boormachientje met boortje 1 mm en cirkelzaagje
  • Soldeerbout met soldeer
  • Naaldvijlen
  • Schuurpapier
  • Platbektangetje
  • Rondbektangetje


[270x227]
   

Werkwijze

Zaag of schuur deel a in de gewenste vorm, rond aan de voorkant, ronde hoeken aan de achterkant. Schuur deel b en boor aan beide kopse kanten een gaatje van 1 mm doorsnee

Schuur de wielen e en boor in t midden een gaatje van doorsnee 1 mm en duw het rubberen ringetje eromheen.

Plak deel b onderop deel a ong 3 mm vanaf de achterkant.

Duw een spijkertje door een wieltje en lijm het uiterste puntje vast in de kopse kant van deel b. (beide kanten natuurlijk).


[169x242]

Schuur de stuurstang c en boor aan de kopse kant een gaatje van 1 mm. Schuur in de andere kopse kant een deuk met de ronde naaldvijl waar het stuur in past (zie tekeningetje 2)

Schuur het stuurtje d en boor precies in het midden een gaatje van 1 mm. Duw een spijkertje erdoorheen en lijm dit vast in de deuk van de stuurstang.

Buig deel k tot een c-vorm (je kun beter eerst de c-vorm buigen en deel k dan pas afknippen !)  totdat hij soepel over de stuurstang kan glijden. Soldeer het stukje buis h tussen de uiteinden. (lijmen zou ook kunnen)

Let op dat het buisje open blijft zodat een spijkertje er vrij in kan ronddraaien.

Schuif het geheel om de stuurstang.


[363x308]

Boor in deel i gaatjes van 1 mm doorsnee op de afstanden 1 mm en 13 mm. Buig het stukje zoals op tekening 3 met de platbektang. Duw 1 spijkertje in 1 gaatje en soldeer deze vast.

Zet dit vast op deel a met een spijkertje en soldeer daarna

Читать далее...
комментарии: 0 понравилось! вверх^ к полной версии
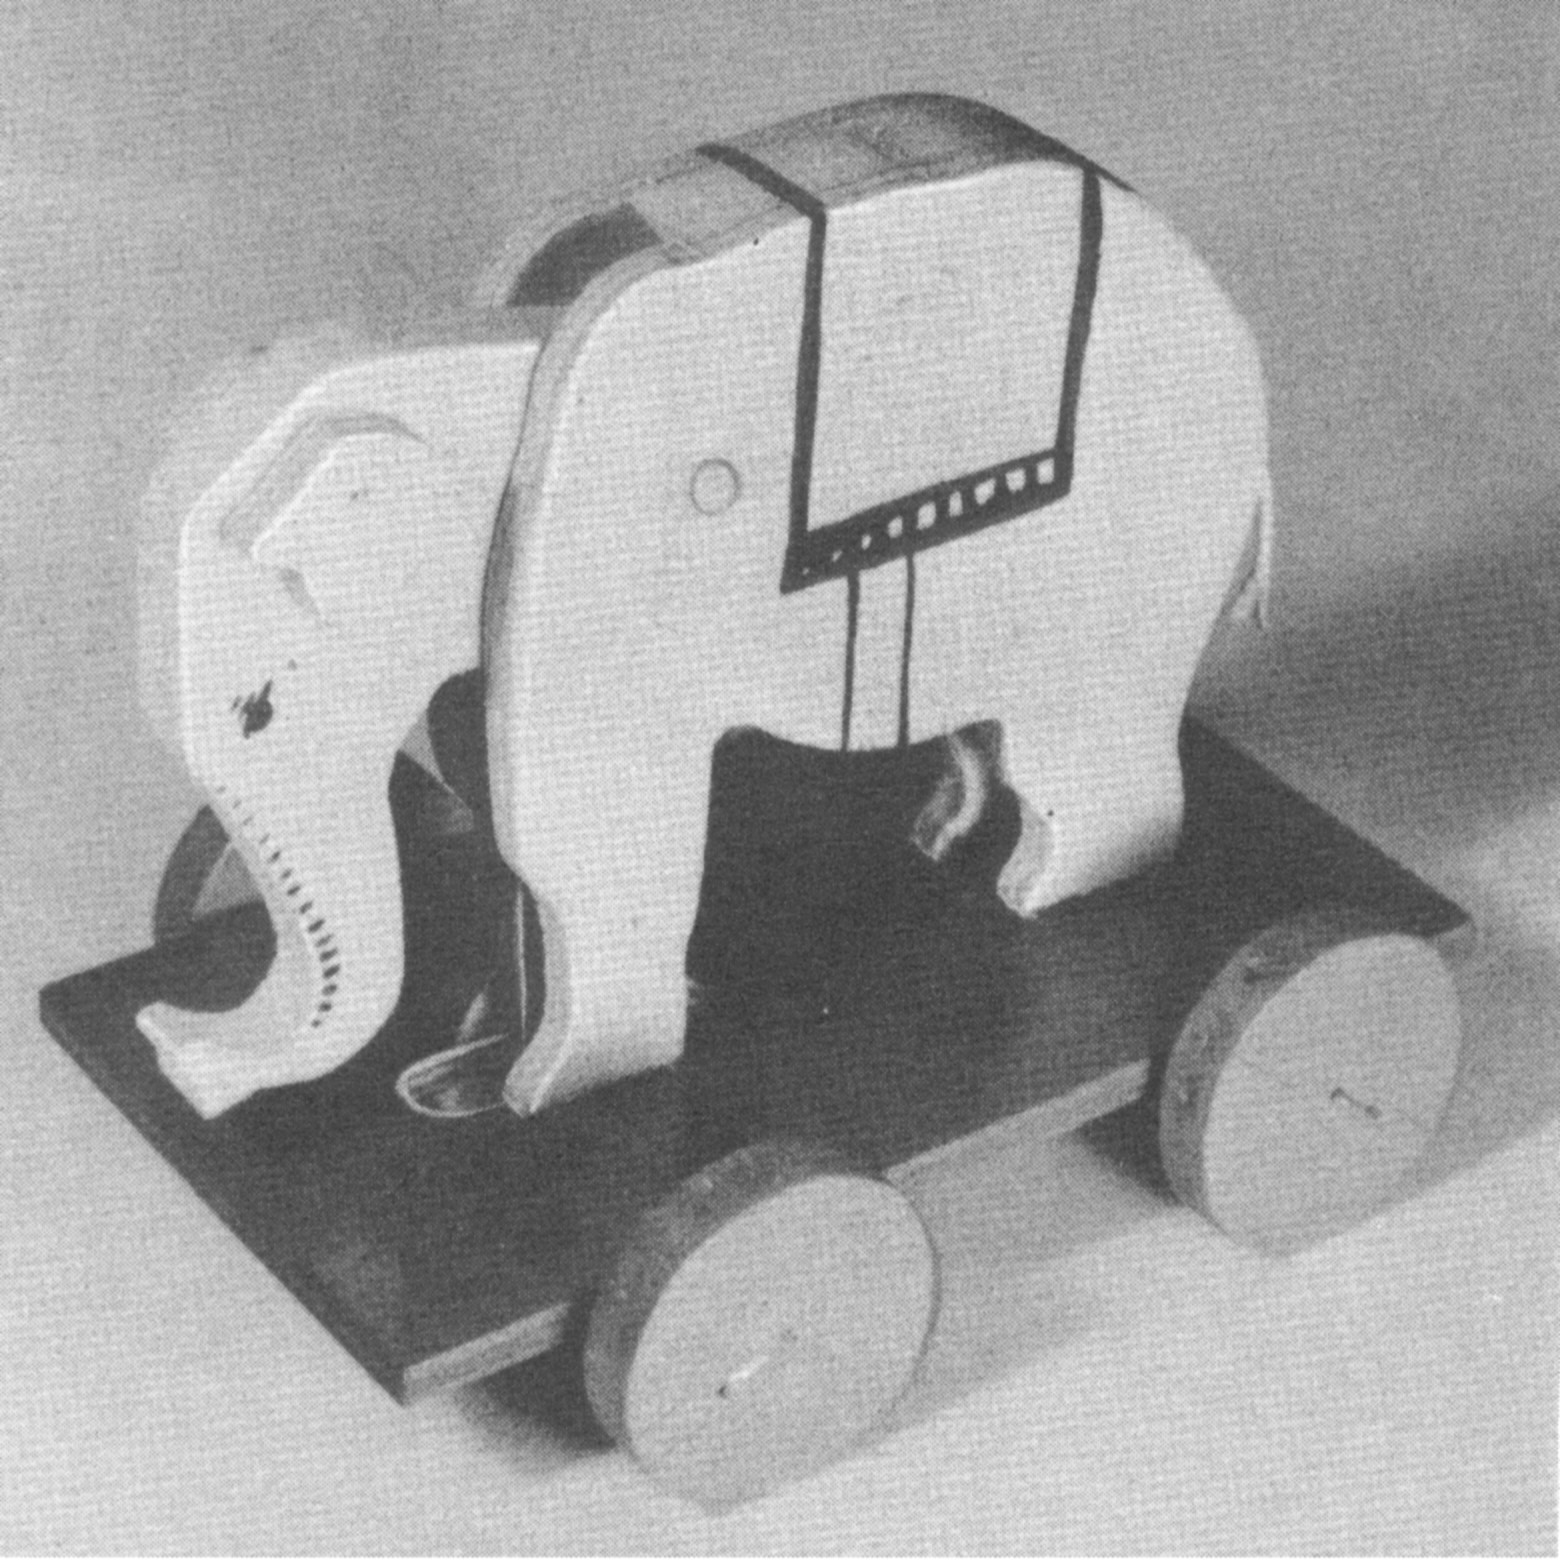
Слоник на колесиках 03-02-2016 00:55


http://www.thewoodcrafter.net/proj/elptoy.php


Heres is the first project I finished for the CD.


Detailed Instructions
*********** WARNING***********
Read my page on safety before building this item.

Click on any picture (above) to open the project details in Adobe Acrobat.  

Materials needed:
1/2" thick clear pine 6" x 16" or 12" x 8"
1/4" thick clear pine 6" x 12"
1/4" wooden dowel 2" long.
Three wire coat hangers.
Two small eyehooks.
Four thin small flat washers (1/2" to 3/4")
Wood sealer & paints (if a colorful finish is desired).
Clear wood finish (if a natural finish is desired).

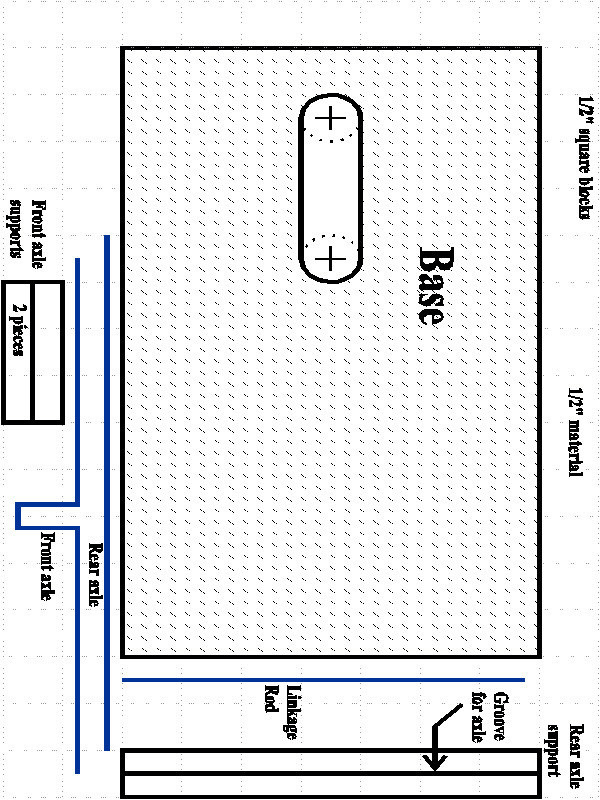
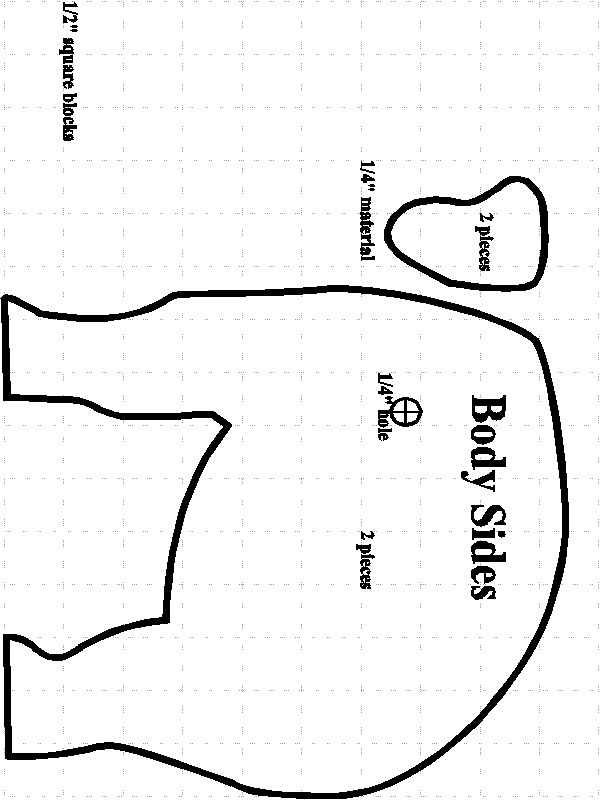
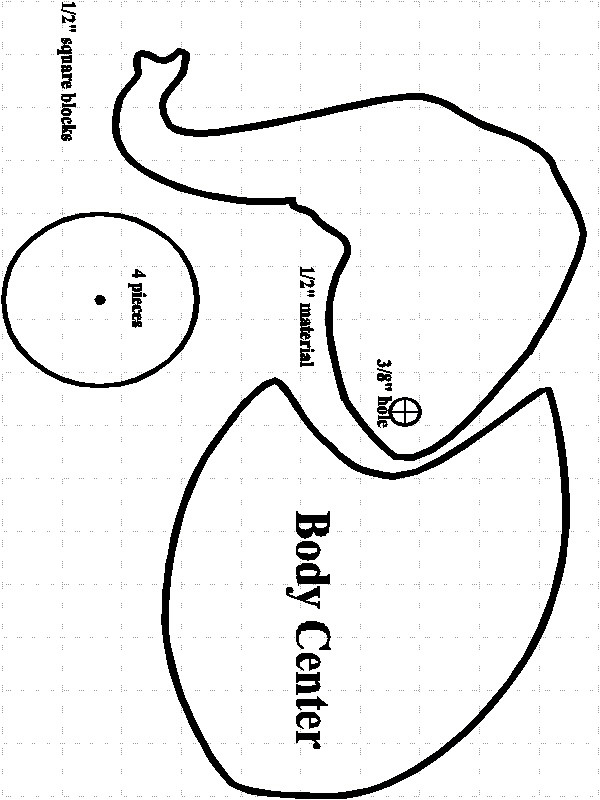
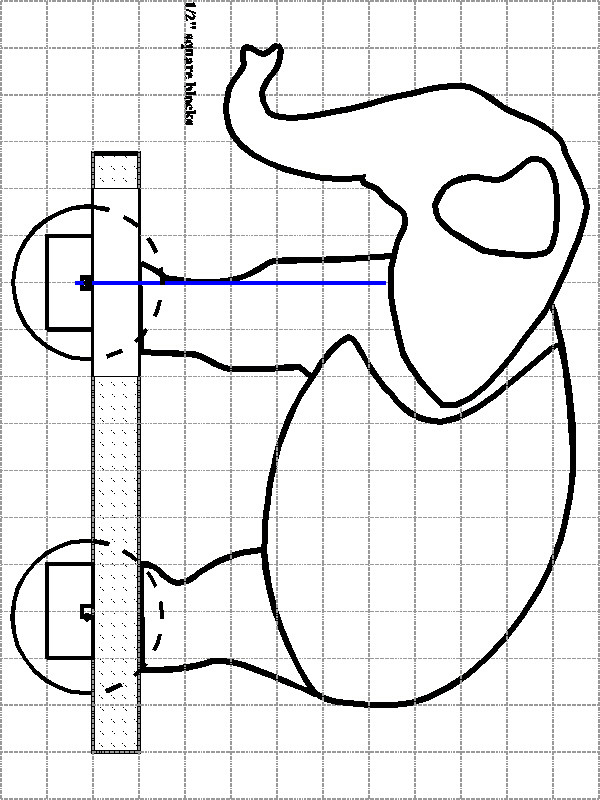
There are four scale drawings of the pieces. The first has the base(1), the wheel blocks(3) and the axle wires(2). The second contains the parts to be cut from 1/4 inch material and includes the wheels (4), the body side pieces (2) and the ear pieces (2). The third contains the parts to be cut from 1/2 inch material and includes the head (1) and the body center piece (1). The last page is a cutaway view of the assembled item.

Construction is very simple:
1. Print out the drawings in scale. The dotted blocks on the drawings should be 1/2 inch by 1/2 inch unless you wish to change the size of the finished project.
2. Use the drawings to cut out all the parts. A band saw works best but a scroll or saber saw will suffice.
3. Sand all edges smooth. Take care with this step as it will show the love and care you put into the final toy. Do not sand the front wheel edges to a completely smooth surface as some traction is needed.
4. Locate and drill the axle holes in the wheels. These should fit the axle very snugly.
5. Locate the centers of the two holes for the slot in the base. Drill pilot holes with a small bit (1/16"). Drill the final holes with a 1/2" bit.
6. Using a saber or coping saw, cut out the slot in the base.
7. Cut a groove in each axle support piece deep enough to receive the coat hanger wire loosely enough to allow the axle to

Читать далее...
комментарии: 0 понравилось! вверх^ к полной версии