Это цитата сообщения Sonya_kot Оригинальное сообщение
Нежный жакет
Нежный жакет своими руками. Классная идея для рукодельницы:
1. [392x606]

Это цитата сообщения tatMel Оригинальное сообщение
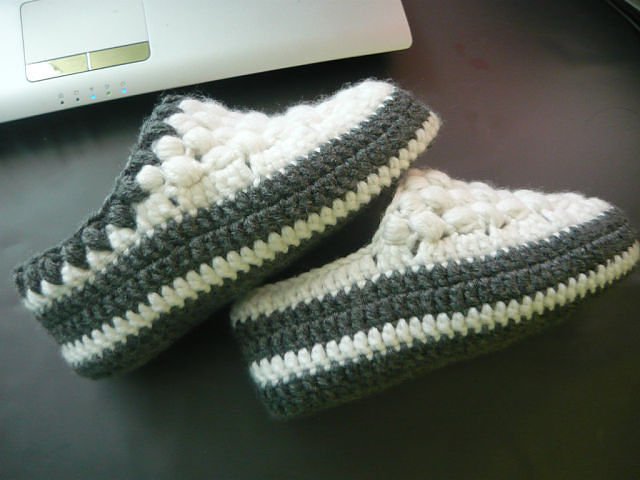
Одноклассники.Тапочки.
Мастер-класс вязания тапочек из интернета.
http://www.odnoklassniki.ru/profile/523417862039/album/466247332503
Это цитата сообщения Климуша Оригинальное сообщение
Найдено на сайте Mila Стиль
Вывязывание сложных контуров
1. Вывязывание горловины ЧВ (совет астры) http://lubodelo.getbb.ru/viewtopic.php?f=2&t=268&st=0&sk=t&sd=a
2.Вывязываем пройму http://lubodelo.getbb.ru/viewtopic.php?f=79&t=...amp;sk=t&sd=a&start=10
3. Обработка и сборка деталей
1. Обработка низа изделия
а) крючком - рачьий шаг http://lubodelo.getbb.ru/viewtopic.php?f=79&t=186&st=0&sk=t&sd=a
б) зигзагом (закрутка) http://lubodelo.getbb.ru/viewtopic.php?f=79&t=...amp;sk=t&sd=a&start=20
в)разные зубчики http://www.broidery.ru/forum/viewtopic.php?f=106&t=1485
http://www.broidery.ru/forum/viewtopic.php?f=106&t=4520
2. Обработка края кетлевки http://lubodelo.getbb.ru/viewtopic.php?f=79&t=...amp;sk=t&sd=a&start=10
3 Обработка проймы http://lubodelo.getbb.ru/viewtopic.php?f=2&t=40&st=0&sk=t&sd=a
4.Вшиваем молнию http://lubodelo.getbb.ru/viewtopic.php?f=79&t=...amp;sk=t&sd=a&start=20
5. Вшиваем рукав http://lubodelo.getbb.ru/viewtopic.php?f=79&t=...amp;sk=t&sd=a&start=30
6. Кетлевка http://lubodelo.getbb.ru/viewtopic.php?f=2&t=199
7. Планки http://masterica.org/viewtopic.php?f=144&t=307
8. Горизонтальный шов петля в петлю http://masterica-knit.narod.ru/make/3001.htm
9. Вертикальный шов петля в петлю http://masterica-knit.narod.ru/make/3002.htm
10. Косичка для соединения 2х дет http://www.broidery.ru/forum/viewtopic.php?f=106&t=2062
Маленькие хитрости
1. Как быстро поготовить нитки, снятие пряжи с бобины http://smotri.com/video/view/?id=v10722431fdb
Постоянно этим пользуюсь, очень экономит время
2.Как укоротить связанное изделие (Знакомство с горизонтальным трикотажным швом) p://smotri.com/video/view/?id=v10810001de1
3.Способ вдевания шерстяной нити в иголку http://smotri.com/video/view/?id=v63543831a
4 Как спрятать концы нити http://smotri.com/video/view/?id=v781660d63
Детали одежды
1. Воротник-хомут http://masterica-knit.narod.ru/basis/element/3140.htm
2. Английский воротник http://club.osinka.ru/topic-63077
3.Круглая кокетка на машине http://lubodelo.getbb.ru/viewtopic.php?f=79&t=...amp;sk=t&sd=a&start=30
2. Козырек http://masterica.org/viewtopic.php?f=144&t=803
3. Карман накладной http://lubodelo.getbb.ru/viewtopic.php?f=79&t=...amp;sk=t&sd=a&start=10
Необходимые детальки
1. Цветок розочка на машинке http://www.lubo-delo.ru/masterflowers.html
2. Цветок http://lubodelo.getbb.ru/viewtopic.php?f=79&t=...amp;sk=t&sd=a&start=70
http://www.broidery.ru/forum/viewtopic.php?f=105&t=3844
3. Цветок необычный крючком http://homepage3.nifty.com/papillon/kouza/ko-index.html
Петли теория http://masterica.org/viewtopic.php?f=144&t=145
3. Петельки и пуговки, ручейковые бейки, рюши http://lubodelo.getbb.ru/viewtopic.php?f=79&t=186&st=0&sk=t&sd=a
4. Рюш, волан http://masterica-knit.narod.ru/basis/element/3400.htm
http://masterica.org/viewtopic.php?f=144&t=125
4. Шнурок http://masterica.org/viewtopic.php?f=144&t=635
http://www.broidery.ru/forum/viewtopic.php?f=106&t=2244
5. Пояс http://masterica.org/viewtopic.php?f=144&t=545
6. Шишечки http://www.liveinternet.ru/users/3286910/post114219584/
7.Буфы http://www.broidery.ru/forum/viewtopic.php?f=105&t=5836
Это цитата сообщения Лада_Германовна Оригинальное сообщение
Снуд (Cowboy Cowl).
 [700x700]
Читать далее
Это цитата сообщения Сима_Пекер Оригинальное сообщение
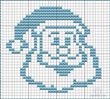
Меня давно привлекает эта интересная техника.Искала,где только могла-данных не так много.И,если они есть,то описания какие-то путанные,расплывчатые,для меня не очень понятные.И вот просветление,поняла её суть.Вот немного схем ,которые можно использовать для вязания в этой технике.
 [532x480]
 [479x480]
 [194x224]
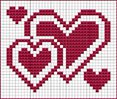 [640x543]
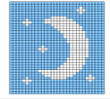 [451x407]
 [441x405]
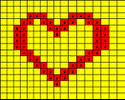 [262x209]
 При теневом вязании обычно используют 2 цвета нитей-для фона и для узора.Я поняла,что рисунок виден четче,если вязать довольно плотно .Пряжа лучше потолще,а спицы потоньше.Каждые 2 ряда чередуем цвет нити.А внутри рядов цвет не меняется.В работе применяются только лиц. и изн. петли.
Начинаем работу нитью фона и провязываем неск. рядов плат. вязкой-все ряды лицевые петли.Например,провязали 4 ряда.Присоединяем нить рисунка,провязываем весь ряд лицевыми петлями.На схему не смотрим.Следующий ряд вяжем этой же ниткой.И вот теперь смотрим на схему.И вяжем так:считаем кол-во петель фона-вяжем их изн. петлями.Петли рисунка-лицевыми.И так чередуем весь ряд.
Переходим на нить фона,вяжем весь ряд лиц. петлями,не глядя на схему.В следующем ряду продолжаем вязать нитью фона и начинаем считать петли на схеме.Петли фона вяжем лицевыми петлями,а петли узора-изнаночными.
И так весь узор.Здесь главное-не запутаться.
Перечислю основные правила теневого вязания:
1- на схеме 1 клеточка-это 1 петля и 2 ряда.
2-цвет нити меняется каждые 2 ряда.
3.-первый ряд каждого цвета вяжем всегда лицевыми и на рисунок не смотрим.
4. -во втором ряду каждого цвета смотрим на схему и считаем петли,причем:
нить фона: петли фона -лицевые,рисунка-изнаночные
нить узора : петли фона-изнаночные,петли рисунка-лицевые.
Вот пара узоров из интернета.Эта техника интересна тем,что рисунок виден ,если смотреть на него под определенным углом.Поэтому при вязании его почти не видно.Трудно ориентироваться.
 [640x640]
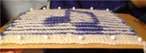 [640x230]
 [640x616]
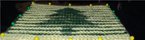 [640x174]
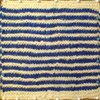
 А это уже я пробовала в этой технике вязать.Как-будто получилось. Образец только со спиц,даже и не отпарила.Кстати,лучше просто накрыть на пару часов мокрым полотном,утюжить не нужно.Иначе примнутся выпуклые бороздочки узора.
 [520x406]
Если смотреть прямо-рисунок не виден
 [700x525]
 Меняем угол просмотра
 [700x525]
 А здесь еще больший угол
 [700x525]
 И последнее.Удобней,конечно,считать петли справа налево. В этом случае в готовом полотне вывязанный узор будет зеркальным нарисованному.Как вышло и у меня.Чтобы рисунок имел такое же положение,как на схеме,можно клеточки считать слева направо.Или,что легче,на листочек в клетку перенести узор зеркально.
Иллюзорное вязание
Иллюзорное вязание
Проба новой техники вязания. Полотно с иллюзорным вязанием, если смотреть на него прямо, выглядит так:
Сбоку же, в данном случае снизу:
Это цитата сообщения Шика13 Оригинальное сообщение
Компьютер в помощь вязальщице
Компьютер в помощь вязальщице
Облегчить работу вязальщицы помогут специальные программы для вязания: расчет петель, построение выкроек, подбор цветов и т.д. Здесь показаны бесплатные действующие версии.
В случае обнаружения битых ссылок – пишите в СЮДА
ТОП 200 лучших сайтов по рукоделию:
ТОП 200 лучших сайтов по рукоделию:

Это цитата сообщения NATAROZENKO Оригинальное сообщение
сарафан для девочки
1.
 [399x600]
 Это цитата сообщения Lyudmila2807 Оригинальное сообщение
Повязки на голову спицами
 [222x335]
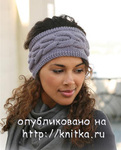 [271x335]
 [227x335]
 [244x350]
 [252x350]
 [226x350]
Для тех, кто не так уже часто бывает на морозном воздухе и совершенно не хочет портить свою прическу теплой шапкой, даже самой модной, существует отличный вариант.
Модные повязки на голову завоевали уже не одно женское сердечко и тому есть свои причины. Вернувшись к нам из далеких шестидесятых, повязки стали актуальным трендом, без которого не обошелся ни один модный показ.
Во время перехода с осени в зиму всегда существует такой временной промежуток, в котором и не слишком тепло, чтобы не носить головной убор, и слишком жарко, чтобы ходить в шапках.
Дальше
Серия сообщений "Головные уборы спицами":
Часть 1 - Голубая шапочка с помпоном от Ирины Дмитриевой
Часть 2 - Кепка спицами
...
Часть 30 - Повязки на голову спицами от Жариковой Екатерины с Осинки
Часть 31 - Энтерлак. Шапочка спицами
Часть 32 - Повязки на голову спицами
Часть 33 - Тёплые шапочки спицами
Часть 34 - Ах, шапочки, шапочки...
...
Часть 46 - Шапка с объёмными косами (автор Ток-Ра с Осинки)
Часть 47 - Как вязать капюшон спицами. "Азбука вязания" №12 2014
Часть 48 - Шапка узором из сот
Это цитата сообщения Jaluchik Оригинальное сообщение
Стильная повязка на голову
Стильная повязка на голову
Это цитата сообщения Valusha_Alex Оригинальное сообщение
МК – Шьем игру «Крестики-Нолики»
Вот, что делает с людьми шило в одном мести и простуда. Я вот никак не выздоровею, и близкие мне дают больше времени на отдых – ха-ха, так сказать, вот и результат – оформила МК по мягкой игре «Крестики-Нолики».
![]()
Если вам интересно усаживаемся поудобнее и читаем!
Это цитата сообщения Valusha_Alex Оригинальное сообщение
Коробки-плетенки для детской. Небольшой МК.
Как это было…

Это цитата сообщения James_york Оригинальное сообщение
Мастер класс изготовление игольниц
http://www.craftstylish.com/item/945/how-to-make-pretty-pincushions
Are you ready for “oohs” and “ahs” all around? At just 1-1/2 inches tall, these minute pincushions will be the darlings of any party and the apple of any craftster’s eye. They fit neatly into a sewing box and are extremely handy perched on a sewing machine (just add a Velcro dot).
And did I mention that these cushions use recycled materials? The base is a soda-bottle cap wrapped with craft felt. As you can see in the photo, the sky’s the limit in terms of design. Besides simple shapes reminiscent of cupcakes or candy, you can fashion a mini poinsettia, a crown, or even a beehive or cactus—cute, cuter, cutest!
What you'll need:
Plastic cap from a liter-size soda bottle
Chalk
Sharp scissors
Craft felt
Large-eye embroidery needle
Multicolored skeins of embroidery floss
Poly fiberfill
Step 1: Prepare the base
Lay the bottle cap on a small square of felt. Trace the shape with chalk. Then cut along the chalk line with sharp scissors.
 [430x287] [430x287] |
Trace a bottle cap on felt. Cut along chalk line with scissors to create the base of the pincushion. |
Step 2: Sew outer sleeve to the base
Cut a felt strip a bit wider than your cap’s height and long enough to wrap around the cap with some overlap. Wrap it around the cap. Then slipstitch along the overlap. Pop in the base circle, and slipstitch around it as shown. Don’t cut the floss!
| [430x287] |
Wrap outer sleeve around cap. Slipstitch along the overlap. |
| [430x287] |
Slipstitch around the base circle. Leave a tail of floss to complete the bottom of the pincushion. |
Step 3: Create the top
Cut a 3-inch square, and then round the corners. Baste around the circle’s outer edge. Pull the floss ends to gather. Stuff the pouch with polyfiberfill (until the ball is hard), and knot the floss ends. Press the ball into the base.
| [430x287] |
Cut a 3-inch square. Round the corners with scissors to create a circle. |
| [430x287] |
Baste around circle's outer edge. Pull the floss to gather. |
Это цитата сообщения RossNayward Оригинальное сообщение
Повязка на глову
Такая повязка может выполнять роль ободка для поддержания волос или стать заменой банданы. Шьется легко и просто. С таким справятся даже начинающие швеи.
Материалы:
прямоугольник из ткани 30х38 см,
прямоугольник из ткани 28х7,
17 см широкой резинки.
Изготовление:
Пусть Ангел взгляд не отводя Присмотрит за тобою! Пускай всю жизнь хранит Тебя, Прикрыв от бед собою! Звезда пусть сон твой бережёт, В ночной тиши сияя! А солнце по утрам встаёт, Мрак ночи разгоняя! Пусть ветер тучи разведёт, Что будут над тобою! И в дождик радуга взайдёт, Соединив с мечтою! Пусть будет милостив к тебе, Подарит жизнь такую, Где ты из тысячи дорог, Найдёшь свою,прямую!!!
Это цитата сообщения галина_соловьева Оригинальное сообщение
Симпатичная сумка. МК в картинках.
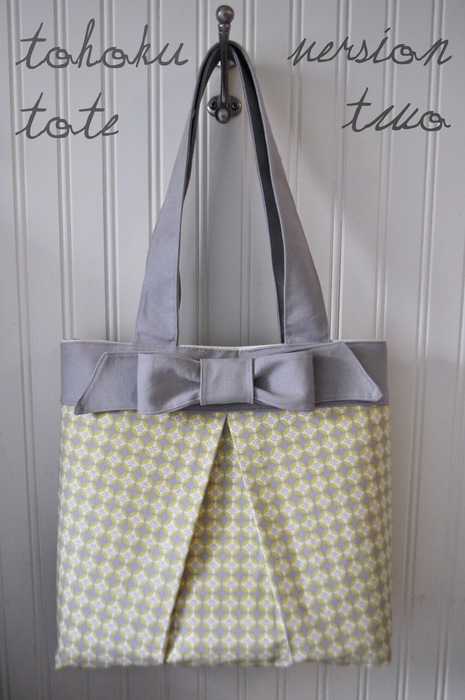 [465x700]
Это цитата сообщения Ульда Оригинальное сообщение
Вязаные прелести от Ксении( заколки, броши). ( с описанием и комментариями от автора))
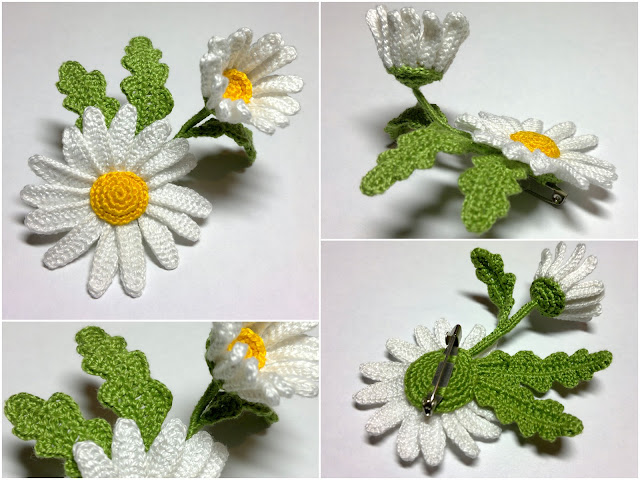

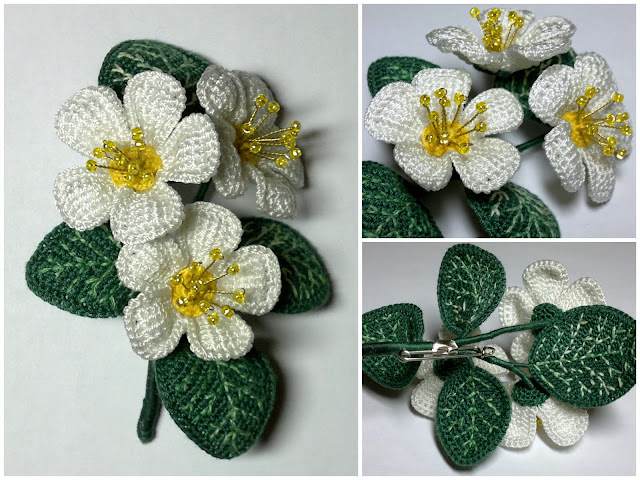
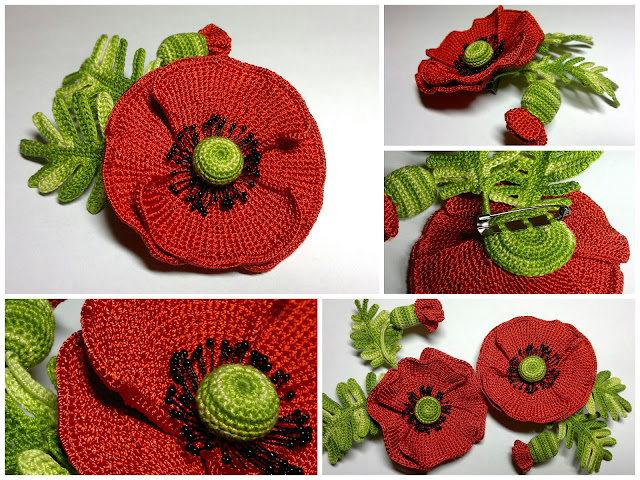
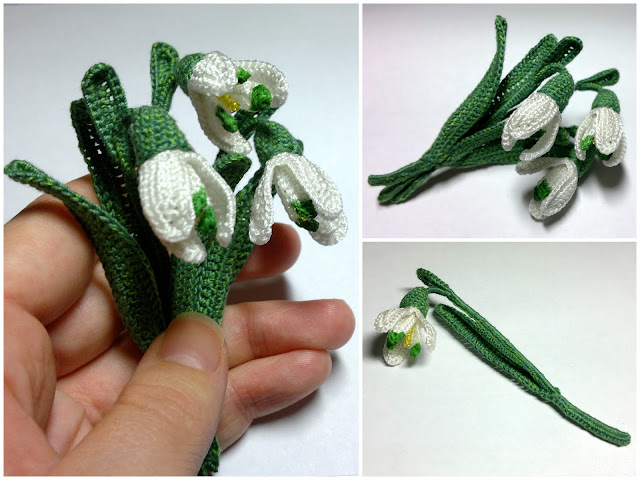
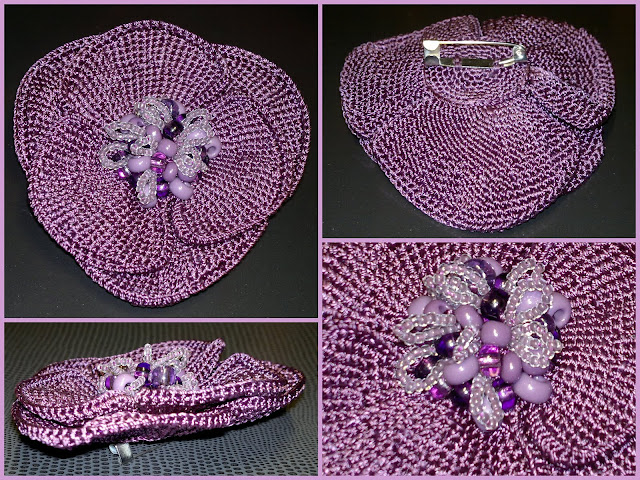
Много мастер- классов с описанием
Это цитата сообщения Галимый Оригинальное сообщение
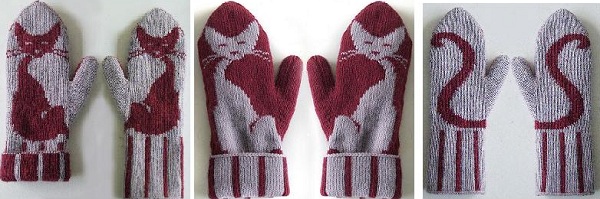
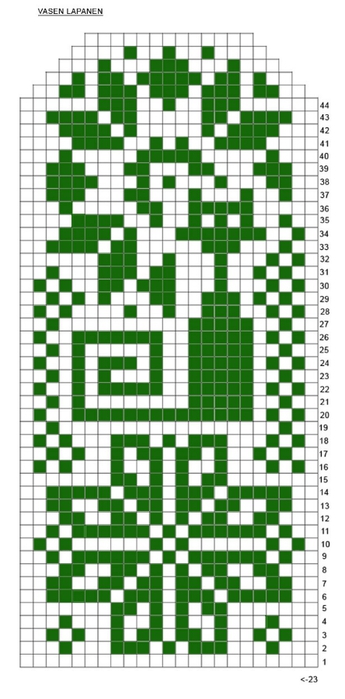
схемы вязания варежек с кошками