Продолжение 3
05-05-2012 12:06
к комментариям - к полной версии
- понравилось!
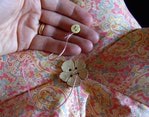
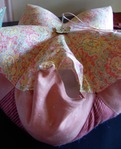
16) Once you have finished sewing the Top and Bottom/Sides together, turn the cushion out the right way through the gap. Use the wrong end of a paintbrush, or other similar tool to push all the edges out.
 [475x417]
17)Finger press back the 1/4″ seam allowance of the opening in the cushion, to get a nice clean edge (see above).

18) Start stuffing three of the “petals” furthermost from the opening. Pay particular attention to getting stuffing up into the points of the “petals”. Once half you cushion is firmly stuffed, put your cushion aside and locate you three buttons, embroidery thread and super-long needle.
 [475x406]
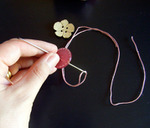
19) Thread your needle with the 30″length of 6 stranded embroidery thread. Knot the end. Take the large button you have chosen for the underside of the cushion, and bring the needle through one of the holes, from the back of the button to the front. *NB: If you are worried about the stress on the stranded cotton, you might like to use doubled, knotted dental floss if you have some*
 [475x366]
20) Near the knot, split the thread so that there are three stands on each side, and pass your needle through this gap.
 [475x365]
This will form a secure knot on your button.
 [475x428]
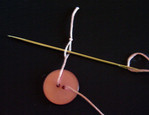
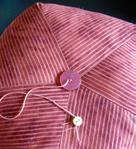
21) Turn your cushion face down on the table. Take the needle through a point just beside the 5 seam intersection, and draw it right through to the front of the cushion, bringing it up in the middle of the 5 seam intersection. While the cushion is only half stuffed, this should be easy enough to do.
 [475x372]
22) Thread the button you have chosen for the top onto the thread, and tie off your third temporary button, at the very end of the thread. This will prevent your thread from disappearing back inside the cushion while you continue stuffing.
 [475x585]
23) Keep stuffing the other half of the cushion. Before it gets too firm you will need to pass the needle back through the cushion to the back again. To do this just cut off the small temporary button, and take the needle back through another hole in the top button and out through to back button again.
 [475x522]
Take two more passes with the needle – back through to the top and again to the back. Don’t knot off the thread, just leave the long tail and tie that extra button on the end of the thread again.
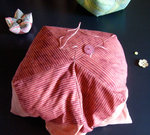
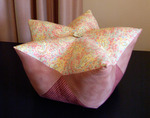
24) Keep Stuffing until the cushion gets really firm, remembering to stuff the “petal” points as firmly as possible.
 [475x317]
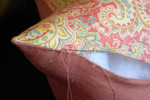
25) The last “petal” will be difficult until you start closing up the gap. Take a small needle and thread (polyester for strength) and start ladder stitching up the gap, starting from the pointy end of the “petal”. As you sew, stop every few stitches to stuff more of the “petal” point. Melly has a great tutorial for Ladder Stitch. Keep stuffing and sewing until your cushion is very firm and your gap is closed.
 [475x374]
вверх^
к полной версии
понравилось!
в evernote
[475x374]
вверх^
к полной версии
понравилось!
в evernote
16) Once you have finished sewing the Top and Bottom/Sides together, turn the cushion out the right way through the gap. Use the wrong end of a paintbrush, or other similar tool to push all the edges out.
[475x417]17)Finger press back the 1/4″ seam allowance of the opening in the cushion, to get a nice clean edge (see above).
18) Start stuffing three of the “petals” furthermost from the opening. Pay particular attention to getting stuffing up into the points of the “petals”. Once half you cushion is firmly stuffed, put your cushion aside and locate you three buttons, embroidery thread and super-long needle.
[475x406]19) Thread your needle with the 30″length of 6 stranded embroidery thread. Knot the end. Take the large button you have chosen for the underside of the cushion, and bring the needle through one of the holes, from the back of the button to the front. *NB: If you are worried about the stress on the stranded cotton, you might like to use doubled, knotted dental floss if you have some*
[475x366]20) Near the knot, split the thread so that there are three stands on each side, and pass your needle through this gap.
[475x365]This will form a secure knot on your button.
[475x428]21) Turn your cushion face down on the table. Take the needle through a point just beside the 5 seam intersection, and draw it right through to the front of the cushion, bringing it up in the middle of the 5 seam intersection. While the cushion is only half stuffed, this should be easy enough to do.
[475x372]22) Thread the button you have chosen for the top onto the thread, and tie off your third temporary button, at the very end of the thread. This will prevent your thread from disappearing back inside the cushion while you continue stuffing.
[475x585]23) Keep stuffing the other half of the cushion. Before it gets too firm you will need to pass the needle back through the cushion to the back again. To do this just cut off the small temporary button, and take the needle back through another hole in the top button and out through to back button again.
[475x522]Take two more passes with the needle – back through to the top and again to the back. Don’t knot off the thread, just leave the long tail and tie that extra button on the end of the thread again.
24) Keep Stuffing until the cushion gets really firm, remembering to stuff the “petal” points as firmly as possible.
[475x317]25) The last “petal” will be difficult until you start closing up the gap. Take a small needle and thread (polyester for strength) and start ladder stitching up the gap, starting from the pointy end of the “petal”. As you sew, stop every few stitches to stuff more of the “petal” point. Melly has a great tutorial for Ladder Stitch. Keep stuffing and sewing until your cushion is very firm and your gap is closed.
[475x374]
Вы сейчас не можете прокомментировать это сообщение.
Дневник Продолжение 3 | Joardana - Дневник Trois_couleurs_de_la_vie |
Лента друзей Joardana
/ Полная версия
Добавить в друзья
Страницы:
раньше»