Star Fruit Cushion Tutorial
05-05-2012 11:42
к комментариям - к полной версии
- понравилось!
 [475x448]
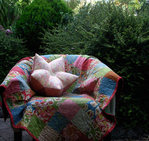
This cushion is really a large version of a Lotus Biscornu, and used May Britt’s Pincushion Tutorial as a starting point (with her permission). I thought it ended up looking like a cut piece of Star Fruit, hence the name. This cushion is about 14 3/4″ in diameter and about 7 1/2 ” high.
 [475x331]
You will need:
15 x 6″ squares, in three different colours (it looks great if the 3 colours are similar, but progressively darker). If you have fat quarters on hand, you will definitely get 5 x 6″ squares from each fat quarter.
Approx 1/2 kg of stuffing (enough for an middle sized cushion)
3 buttons – 2 Large ones for the top and the bottom, and a third one (of any size) that you will use temporarily to hold things in place. My large buttons measure approx. 3 1/4″ or 3cm.
30″ of 6 stranded embroidery floss (or 60″ of dental floss, doubled over)
A very long needle (such as those used for doll making or upholstery)
A Pencil
A quilting ruler with grids marked in 1/4 inches.
A Sewing machine with a quarter inch foot. Thread your machine with polyester thread which is stronger than cotton, the firm stuffing will put the seams under a fair bit of stress.
General sewing supplies.
 [475x419]
1) On the back of each square, in every corner, mark a dot 1/4″ in from each side. These dots will show you where to start and stop sewing.
 [475x547]
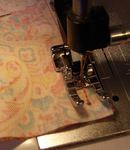
2) Locate the 5 squares of fabric you have chosen for the top of your cushion (if you are using fabric with stripes, read step 6 before continuing). Place 2 of the squares right sides together, and stitch along one side, between the dots, with a 1/4″ seam allowance. Make sure you back stitch about 5 stitches at the beginning and end, but do not go past the pencil dots.
 [475x391]
 [272x300]
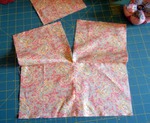
3) Sew 4 of the squares together with 3 seams, so they look like the photo above. Finger press each seam open as you go.
As you progress with this tutorial, sometimes you will need to hold other layers out of the way, as you stitch close to the starting and finishing dots.
You should be able to pull the other fabrics far enough out of the way, unless you have stitched past the dots.
 [475x374]
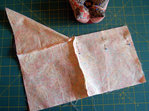
4) Pin the fifth square to one side of the gap in the other four, and sew together between
 [475x353]
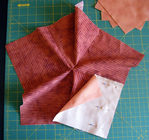
5) Pin this fifth square to the other side of the gap – it will help to fold the top as I have done above. Sew up this last seam and you top should end up looking like this below…
 [475x403]
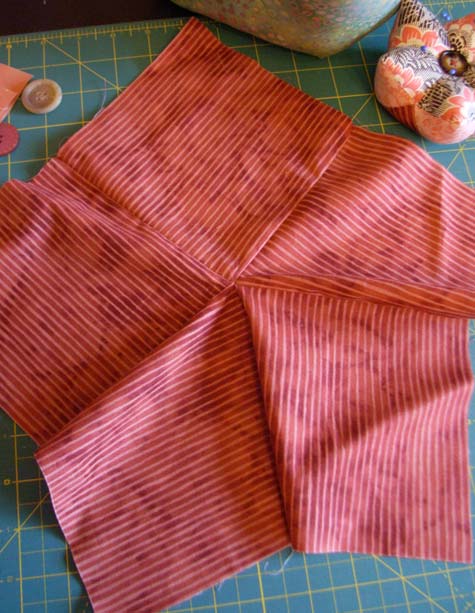
6) Now it is time to locate the five squares of fabric that you have chosen for your underside
 [475x613]
Repeat steps 1) to 5) with these pieces.
A Note About Stripes. I have used striped fabrics for the bottom of my cushion. If you are using them for the top or bottom of your cushion, a little attention to the stripe direction can make all the difference. As you sew the squares together, make sure that you orientate the stripes so that they run perpendicular to the stripes on the other square of that seam. e.g. If one side of the seam has horizontal stripes, turn your square so that the other side will have vertical stripes. If you do this for each of the first 4 seams, you will find that the final 5th seam works itself out, as you can see above.
 [475x445]
вверх^
к полной версии
понравилось!
в evernote
[475x445]
вверх^
к полной версии
понравилось!
в evernote
[475x448]This cushion is really a large version of a Lotus Biscornu, and used May Britt’s Pincushion Tutorial as a starting point (with her permission). I thought it ended up looking like a cut piece of Star Fruit, hence the name. This cushion is about 14 3/4″ in diameter and about 7 1/2 ” high.
[475x331]You will need:
15 x 6″ squares, in three different colours (it looks great if the 3 colours are similar, but progressively darker). If you have fat quarters on hand, you will definitely get 5 x 6″ squares from each fat quarter.
Approx 1/2 kg of stuffing (enough for an middle sized cushion)
3 buttons – 2 Large ones for the top and the bottom, and a third one (of any size) that you will use temporarily to hold things in place. My large buttons measure approx. 3 1/4″ or 3cm.
30″ of 6 stranded embroidery floss (or 60″ of dental floss, doubled over)
A very long needle (such as those used for doll making or upholstery)
A Pencil
A quilting ruler with grids marked in 1/4 inches.
A Sewing machine with a quarter inch foot. Thread your machine with polyester thread which is stronger than cotton, the firm stuffing will put the seams under a fair bit of stress.
General sewing supplies.
[475x419]1) On the back of each square, in every corner, mark a dot 1/4″ in from each side. These dots will show you where to start and stop sewing.
[475x547]2) Locate the 5 squares of fabric you have chosen for the top of your cushion (if you are using fabric with stripes, read step 6 before continuing). Place 2 of the squares right sides together, and stitch along one side, between the dots, with a 1/4″ seam allowance. Make sure you back stitch about 5 stitches at the beginning and end, but do not go past the pencil dots.
[475x391] [272x300]3) Sew 4 of the squares together with 3 seams, so they look like the photo above. Finger press each seam open as you go.
As you progress with this tutorial, sometimes you will need to hold other layers out of the way, as you stitch close to the starting and finishing dots.
You should be able to pull the other fabrics far enough out of the way, unless you have stitched past the dots.
[475x374]4) Pin the fifth square to one side of the gap in the other four, and sew together between
[475x353]5) Pin this fifth square to the other side of the gap – it will help to fold the top as I have done above. Sew up this last seam and you top should end up looking like this below…
[475x403]6) Now it is time to locate the five squares of fabric that you have chosen for your underside
 [475x613]
Repeat steps 1) to 5) with these pieces.
A Note About Stripes. I have used striped fabrics for the bottom of my cushion. If you are using them for the top or bottom of your cushion, a little attention to the stripe direction can make all the difference. As you sew the squares together, make sure that you orientate the stripes so that they run perpendicular to the stripes on the other square of that seam. e.g. If one side of the seam has horizontal stripes, turn your square so that the other side will have vertical stripes. If you do this for each of the first 4 seams, you will find that the final 5th seam works itself out, as you can see above.
[475x445]
Вы сейчас не можете прокомментировать это сообщение.
Дневник Star Fruit Cushion Tutorial | Joardana - Дневник Trois_couleurs_de_la_vie |
Лента друзей Joardana
/ Полная версия
Добавить в друзья
Страницы:
раньше»