Это цитата сообщения igolohka Оригинальное сообщение
Подсолнух

We are already halfway through in this Block of the Month quilt!?! This Spiked Dresden is the eighth of the sixteen blocks that will make up the Round the Year Quilt. The block is 18″ square with a 15″ inset circle, like the other blocks of this quilt,
When I was designing this quilt, I wanted to include all the blocks that I loved, but was too lazy to make a whole quilt with. One on that list was this Spiked Dresden that I encountered on pinterest. When drafting the block for the quilt, I modified it a bit, including the wedges on which the blade points rest. I also thought this was a great block to introduce you to foundation paper piecing with freezer paper. You can also piece it with regular foundation paper and even without a foundation paper piecing template. Complicated as it looks, this particular Dresden needs only as many seams as a regular Dresden! The blade, the spike and the wedge are all attached in one go. Those of you who are still apprehensive of attempting these blocks – this really is a piece of cake! This block was tested by fellow Desi Quilter Caroline Nagar and she had a lot of useful suggestions, which I have tried to incorporate here! Thanks, Caroline!
The downloadable Template files ( two this time) and the Instructions File can be found at the end of this post. So here we go!
Fabric requirement ( For Orange petalled Dresden)
| Fabric | Blades | Spikes | Outer Ring | Centre | Background** |
| #1 Dark grey | 11” x 13” | ||||
| #2 Light Grey | 11” x 13” | ||||
| #4,5,6,7 Blues | 4” x 10” each | 2” X 17” each | 8” square | ||
| #8,9,10,11 Yellow, gold, light orange, deep orange | 5” x 18” each | ||||
| **For background – Use 11” x 25” if using single fabric. | |||||
| You could also use a 19.5” square ( will be trimmed to 18.5″ after appliquéing circle). | |||||
Cut all fabric strips from width of fabric.
Step by Step Instructions

Templates and Printing
- Print the Instructions file.
- Print the two templates files at 100% or actual size in portrait mode on A4 size freezer paper.
For printing on freezer paper, refer to this link.
- Template File 1 :
For the Template A Circle, please add an additional ¼” seam allowance to make total of ½” seam allowance.
For the Template B (Pieced Dresden quadrant), cut exactly to size. Use a scale and score lines on the printed lines on the semi circular template with a paper knife or any sharp edged object, to get sharp creases at each seam. I used my trusted friend Jack (the Ripper) for this. Take care so that you do not tear the paper. Sobana of thequiltbug.blogspot.com recently used the freezer paper method for piecing the Dresdens in her quilt. She recommends needle punching the seam lines – I am quite happy with creases!

Important! We piece this Dresden using the freezer paper technique. If freezer paper is not available, regular foundation paper piecing may be done, in which case, you would need to print/trace the Template B to get 4 copies of it.
Template C (background) glue the two parts of the template on edge as indicated. You need four fabric pieces using this template.
Template File 2 –
Contains the templates D ( blade/ petal), E (spike) and F (outer ring piece).
Cutting Instructions
We cut:
6 petals/ blades from each of 4 fabric strips (5”x 18”) using Template D= Total 24
6 spikes from each of 4 fabric strips (4”x 10”) using Template E = Total 24
6 outer ring pieces (wedges at base of petal point ) from each of 4 fabric strips ( 2” x 17” ) using Template F= Total 24

Placing the freezer paper template to cut fabric…
I cut 4 layers of fabric using the rotary cutter. I pressed the freezer paper template to the top layer and cut the fabric so…

Cutting through four layers of fabric – 6 times to get 24 spikes
You could iron the freezer paper templates D, E, F (for the petal/ blade, spike and outer ring piece) on card / stiff paper and cut it out to make sturdier, reusable templates.

Glue or iron the template to thisk card paper.

Cut out the template accurately.
Or you could use template plastic to trace and make stencils!
For the Spikes
Use template E and cut like you did the petals. Press the pieces into half lengthwise, right side outside.
For the inner circle
A reminder! Cut a circle from the 8” square – use template A, add an additional ¼” allowance all around – the template gives only ¼” allowance and cut circle.

Template A – remember you need a 1/2″ seam allowance instead of the 1/4″ given here!
Background.
11” x 25” if using single fabric.
You could also use a 19.5” square ( will be trimmed to 18.5after appliquéing circle).
Piecing and Assembly
Preparing the Blades/ Petals
Here is a great tutorial I referred to – http://www.vanessachristenson.com/2013/02/v-and-co-how-to-make-dresden-plate.html. So if anything is unclear here, that is where I suggest you head!
- Fold the petals lengthwise, right side inside and sew ¼” seam along the top edge.

Fold into halfway and sew 1/4″ seam to form the pointed blade.
Remember to lock your stitch when you begin and end each seam, if your machine gives you the option, or you may end up with what happened here.

Unlocking equals unravelling!
If your machine does not have the locking option, reduce the stitch length. I do not recommend a back-stitch, as it adds bulk.

Reduce stitch length to prevent unravelling.
2. You can chain stitch all the petals at one go!

I chain stitched the blades/ petals…

…and garlanded my old Singer (circa 1935) with it!
- Clip apart the blades. Trim the seam to about 1/6” and clip the `pointy’ corner.

Clip seam and point to reduce bulk and turn inside out
- Turn inside out. Use a toothpick or even your embroidery scissors to get a nice point.


Use a toothpick to get a nice, neat `point’!
5. Now comes the last step in getting the blades ready for piecing. Press them to ‘centre the point’. Lightly crease the blade on the vertical centre line as shown and align the centre seam line with it. Press ( not iron). A bit of spray starch does great here.
Align the `point’ with the centre line.
Preparing the Spikes
Fold the spikes along the central vertical `spine’, right side outside, aligning the longer edges. I do not recommend using your iron, you do not want a crease down the centre.
Piecing with Freezer Paper Template B
- Arrange all the petals, spikes and wedges in a circle for an auditioning. I am sorry I forgot to take a picture of this stage!

Mirror Image of the block to aid in freezer paper piecing.
Any kind of foundation paper piecing can be confusing, as the final picture is a mirror image of what you began piecing with! I had this mirror image of my block to help me along the way!
Decide on a starting point, label the Blade#1, and start piecing anti-clockwise, if you are looking at the mirror image.
2. Now use the freezer paper template ( also used earlier) to piece the Dresden quarters. I find that using a template takes out the guesswork from piecing a Dresden – I needed sometimes 21 and at other times only 18 petals for a 20-petal Dresden, when I did not use paper piecing. The block lies flat and neat with this technique!
Remember we have to include the folded spike fabric at each seam, matching at the edge at the inner ( smaller) circle of the paper template. I used this turorial http://laren.blogspot.in/2012/04/tutorial-tuesday-spike-dresden-plate.html for adding the spikes.
3. Place the fabric pieces in this order on B1 section of the piecing template.
First – Template E #1 right side up at outer edge of template. Press down to freezer paper.
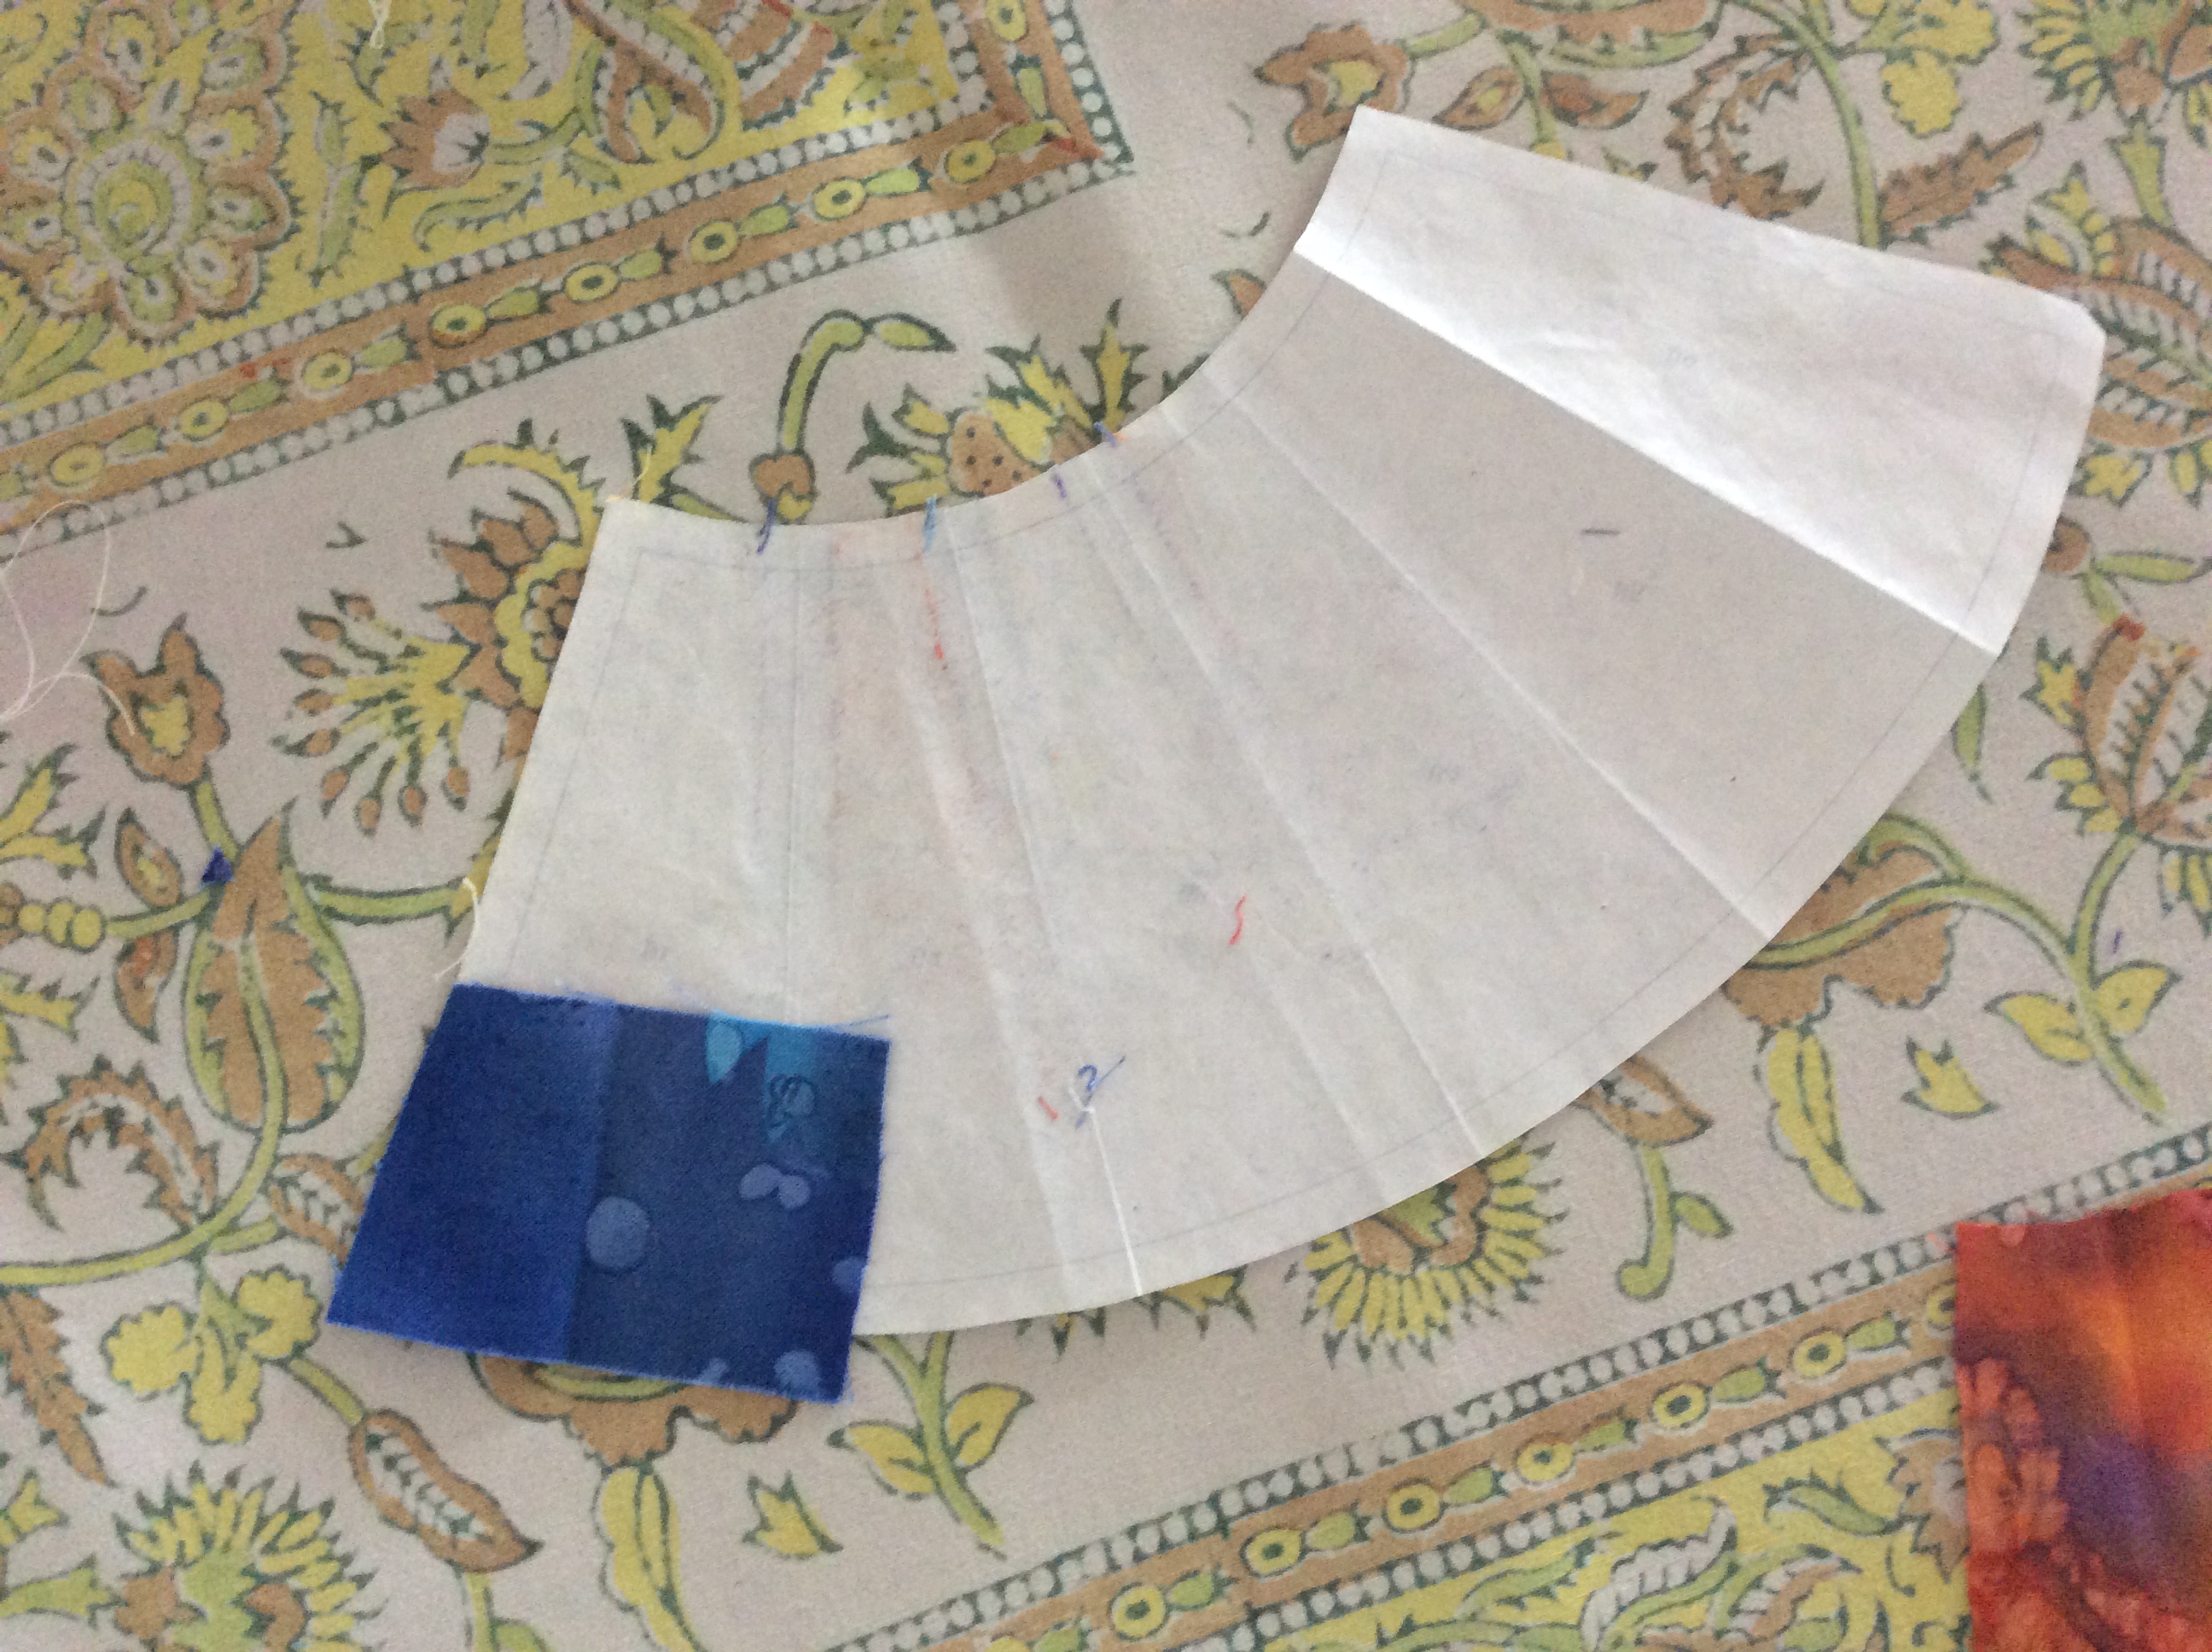
Press wedge piece #1 on outer edge of B1. I have used a rectangle – you will be using Template F to get the pieces
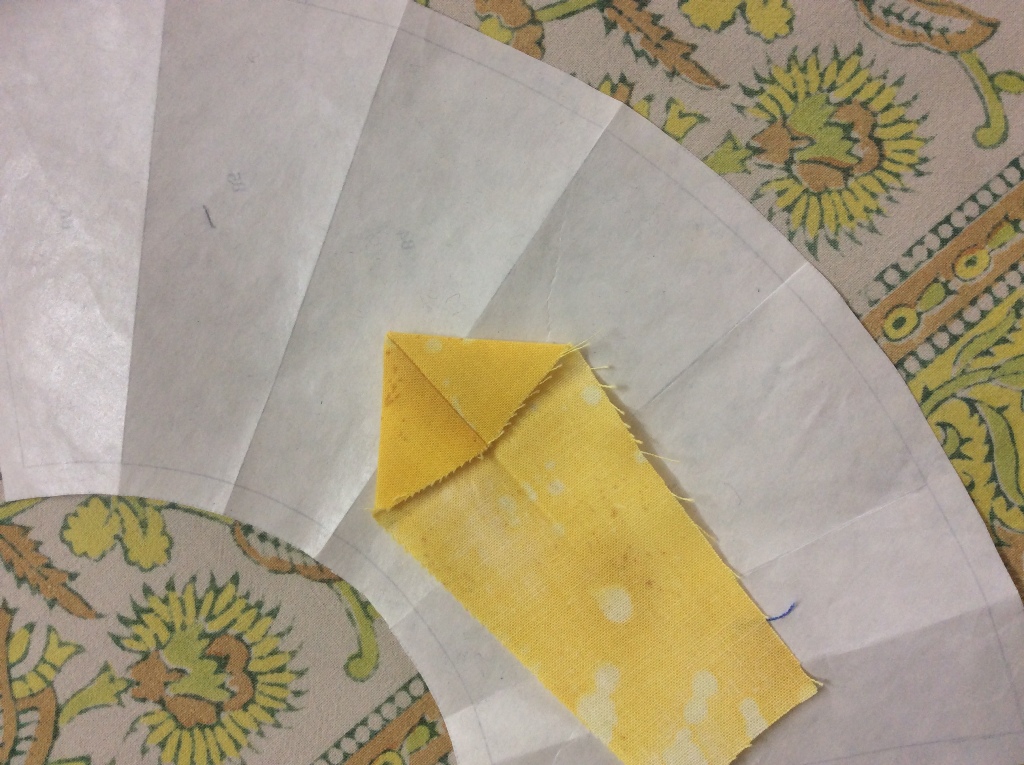
Second – Blade #1 right side up, aligned at inner edge of template. The blade point should be about ¼” inside the edge of paper, at the final seam line.
Press on to freezer paper.

Press Blade#1 on place on B1
Third– Spike#1. Aligned at inner edge of template. The spike will stick out beyond the paper edge by about a ¼”. Pin to hold in place temporarily.

Spike #1 in place on B1. The upper edge of the spike `sticks out’ beyond the paper edge about 1/4″
Fourth – Blade #2 face down, aligned over blade#1. Repin as shown.

Blade #2 comes next, wrong side up. You can see the blue spike sticking out from under the blade on the top.
Fifth – Wedge #2 comes face down, aligned over wedge #1.

Wedge #2 , wrong side up, aligned on Wedge#1 makes the fifth piece to line up on B1.
Pin to hold everything in place. Fold away the freezer paper at crease ( seam line beteen B1 and B2) line, turn over.
Repin from this side, if you like. You will have ¼” seam allowance visible beyond the paper.

Sew in 1/4″ seam allowance visible beyond folded freezer paper template.
Sew just along the edge of the paper, taking care not to stitch over the paper. Trim the seam to ¼”.

Trim the seam to 1/4″ (No, the fabric did not change colour – it is a different piece!)
.Peel away the freezer paper and press open the seam.
You would not be able to press open the seam if piecing with regular foundation paper; this is one of the advantages of freezer paper piecing that I love!

Peel away freezer paper and press open seam.
Now press the pieced portion back on to the freezer paper. Press the spike open, so that it is centred between the two blades as below.

We are now ready to add the next pieces.
Note: If not using freezer paper, just sew on seam line on printed side of paper, as usual (without creasing, folding away the template.)
4. Place Spike #2 in place – it has to stick out beyond edge of paper!

Pin spike#2 in place on Blade#2
… Follow with blade #3 aligned with blade #2. Pin in place…

Blade #3 aligned on top of Blade #2, right sides together.
…and finally wedge #3. Flip around and sew.

Sew along paper edge as for the first two blades.
Again trim and press open seam. Press down on freezer paper.
5. Join the next three pieces – Spike #3, Blade#4 and wedge #4.
6. Join 2 more sets, till Spike #5, Blade#6 and wedge #6.

Blades# 1 to 6 pieced and ready. Note there are only 5 spikes. Label nd put aside Spike#6.
7. Press and trim all sides to size, before you remove the freezer paper Template B totally.
8. Pin a post it note on Spike #6 with its name, and set it aside!
So one quadrant is pieced!
9. Now , we are ready to piece the 2nd quadrant. Proceed as for Quadrant 1. Before removing the freezer paper, sew Spike #6 in place between Quadrant 1 and Quadrant2, to get a semi circular ring. Put aside Spike #12
The freezer paper template is reusable. But if you are piecing with regular printer paper, you need fresh templates for each of the other three quadrants.

Halfway stage in piecing the Dresden. Note the two spikes set aside ( in centre). They will join quadrants 3-4 and 4-1 respectively.
10. Similarly piece Quadrants 3 and attach Spike# 12 between Seme-circle1-2 and Quadrant 3..
11. Finally piece Quadrant #4 and add spike #24 between the last blade (#24) and Blade#1 from the first quadrant to complete your ring!
Assembly
Applique the ring to your background.
Finally add the centre circle in place. The simplest way to do this is: Machine tack ( largest stitch setting) about 1/8 to 1/6” inside edge of the fabric circle, leaving a long length of thread on either side. Trim your template B to the seam line and iron it to the centre of the fabric. Now pull the thread to gather the fabric nicely over the paper circle. You have a perfect 7” circle. Pin in place over the centre of your block and appliqué by hand or machine. Trim away the background fabric behind the centre, and remove the freezer paper.
Here are the downloadable .pdf files with the instructions and templates. You need Adobe Reader (available for free online) on your computer, to be able to view these files.
1. Instructions Spiked Dresden Block08 of the Round the Year Quilt
2. Template File 1 Spiked Dresden Block08 of the Round the Year Quilt
3. Template File 2 Spiked Dresden Block08 of the Round the Year Quilt
You can access the links to the other blocks from this quilt here.
I am employing a method which uses one sided fusible webbing – this is slightly modified from what I learnt from a tute by Elizabeth Hartmann. It is a great technique for doing any pixelated quilt/ block!
Just in case you decide to piece your centre like mine, I am showing you how I did mine!
I have to piece a 7″ diameter block with 1/2″ ready squares. If I add a seam allowance of 1/2″ ( a larger seam allowance is always good when appliqueing circles) – I need an 8″ circle… Okay, I know not everyone loves the Maths like I do, so, without getting into too many calculations – let me show you what I did!
I started with:
4 shades of blue fabric – 6″ x 10″ each. I did need a few 2″ x 1″ strips more. You can add those as you need them.
Sheet of one-sided lightweight fusible webbing about 19″ square.
Fine permanent marker pen
18″x24″ cutting mat
6″x24″ ruler ( you can take any ruler 18″ or more in length)
Paper tape
Step 1. Draw a grid
The first step, is drawing an inch grid on the stabilizer sheet, and this is what I did a bit differently. I had planned to print the grid on the sheet, but my sheet had wrinkles. As I decided to draw lines manually, a brain wave struck! Why not use the inch grid on the mat as a guide to draw the grid ? then I don’t have to worry about getting the squares truly square!
Here is the story in pictures.
I placed the stabilizer sheet on the cutting mat. You can see how wrinkled it looks, and you can’t iron away those creases either. The sticky side is down.

I placed the fusible stabilizer sheet on the cutting mat…the inch grid is visible through the sheet.
Tape the sheet to the mat at the edges – smoothen as much as you can. The paper tears when you remove the tape, so I was glad I had the foresight to take a margin of an inch plus all around.

I taped the edges to the mat.
I used my long ruler to draw grid lines on the sheet, using the inch grid visible below the sheet as a guide. I drew lines on either side of the ruler before moving it to the next inch mark. you could use a lead pencil instead of a perma-ink pen, anything that is visible from the other side and does not smudge is fine.

Using the inch grid as a guide,I drew lines on the sheet with a perma-pen.
That was quick! Now the other side…

Draw perpendicular lines to get your inch grid.
Note to self – I could have drawn a grid any size with this method, only skipping the inch lines appropriately.
I marked the centre with a cross. This will help me in placing the fabric squares.

Mark the centre with a cross. (Use a pencil instead of the pen I used here)
Step One is done!
Step 2. Cutting the fabric
Here are my four rectangles of fabric 6′ x 10″ nicely starched and pressed. Do not spare the starch, the success of this method depends on it!

My four shades of blue – 6″ x 10″ each – starched, pressed and ready to cut!
I cut 42 squares from each of the fabrics – using 6″x 7″ of the fabric. I kept aside the 3″ x 6″ strips

I cut 1″ squares from the fabric, except a 3″ x 6″ strip.
Step 3 Pixellating
As I started off, I realized that an 18″ square was going to be difficult to handle, so I cut it into twoalong a grid line just above the centre row.
I now arranged my inch fabric squares on the grid. This will be a circle, so I did not bother to add any fabric on the corners, where it will be cut away in any case. The centre line of the proposed circle ( top row here) has 13 squares and the middle column has 7 squares. At the edges, I placed 2″ x 1″ rectangles. ( I cut these from the 3″ x 6″ fabric I had put aside earlier)
I want a bigger seam than the 1/4″ we use for our quilt piecing, so I have placed 2″ rectangles at the edges! This will mean one less seam line at the edge. We will know tomorrow if this worked or not!

Arrange the fabric squares on the sticky side of grid
Once the squares were arranged to my satisfaction, I pressed them down. This is the trickiest part, because squares as small as these like to move around and even fly off!
I similarly `pixellated’ the other cut of the stabilizer and pressed the squares in place. Here is how the two halves look!

I am quite satisfied with what I achieved yesterday, which was Day One of finishing up my pending blocks of my free BOM Quilt, Round the Year! I probably could do a bit more, but am being careful with my back.
The blades, spikes and wedges of Block 8 Spiked Dresden are joined together!

Pixellated Centre for a Spiked Dresden
This month I am trying to catch up on the blocks of my Round the Year quilt, which had become pending when I was laid up for 3 months with a bad back!
I am piecing the current block, the Spiked Dresden, first. But Day Two was not as good as the first day!
This is what I did on Day One:
I finished piecing the Dresden ring of blades and started work on the pixellated centre.
Step 1 – Drew an inch grid on one-sided lightweight fusible interfacing.
Step 2 – Cut one inch squares from fabric for pixels
Step 3 – Arranged the fabric squares on the sticky side of the fusible interfacing and pressed them on place.
Yesterday I sewed the squares in place! Let me take you through my day…
Step 4 Sewing the Centre
Flipping over to the interfacing side, I crease a row along the inch grid line. I take the standard 1/4″ seam on the fold. I was glad I had cut the centre into two, because I did not have to clip the thread after every seam, I could kind of chain stitch the two pieces!

Sewing the rows.

The two sets of rows are done!

Pinned together and ready to be joined

The two halves are joined to make a single piece
Now the seams have to be opened. I insert a small pair of scissors into the stitched interfacing to do this – mine are not sharp enough. I also tried trimming off the edge with a roller cutter, but this was not very satifactory either! The thinner seam is even more unmanageable.

Inserting a pair of small scissors into the folded interfacing to cut open the seam.
This was the stage I discover that a small square had a mind of its own. I have to rip open the seam to insert it into the interfacing.

The offending fabric square that had to be coaxed back into the seam line
I then press open the seams. This was the toughest part – I hated it! That is why I probably forgot to take a picture! Now for the columns. I crease the columns on the grid and start sewing a 1/4″ seam…
…and again I discover a problem! I had left too much of the interfacing on the corners bare. So there is more ripping and insertion of fabric squares…

Inserting more squares into the interfacing.
At long last, the columns are also done!

At last, the piecing is done!
This is how it looks from the back.

The pieced back
Oh my God! I shudder at the thought of more pressing of those seams. So I skip the pressing and decide to move to the next step.
Step Five- The Final Step
The centre will be ready at 7″, and I wanted a 1/2″ seam allowance, so I cut an 8″circle (diameter) from freezer paper. I press it on the right side of the pieced centre and cut out the citcle.

Cutting the circle.
Back to the ironing table. This time I use steam, and have instant success!

Steamed into obedience!

Pretty!
I have had a tough day and am still trying to work out how this will be attached to the ring…but I will think about it tomorrow.

A preview
Tomorrow is another day.
https://betukbandi.wordpress.com/category/free-stuff-tutorials-and-patterns/page/3/