galina
“Red Cat” (chinese silk embroidery kit)
2042010
Started Nov. 15, 2009
Finished: April 2, 2010
Number of Hours: 21 hours
Diameter: 20cm.
Kit from www.fildesoie.fr (kit code: Chat02)
This is my first silk embroidery needlepainting project. I am so enthusiastic and I decided to document my progress.
1. Attach the pre-designed satin fabric in a frame or hoop. (I am using a small canvas frame and tacks from my silk painting materials, because I don´t have any free scroll frame at the moment. )
2. Prepare the silk threads and needles No. 12 necessary to complete the design.
A. Divide or separate the skein of silk threads in 3 equal sections (length about 30cm each). There is no need for longer lengths of threads since this is a very fine embroidery.
B. Braid the threads loosely (makes drawing out of threads easier). Remember to braid loosely. You will not be able to draw threads if it is too tight.
Prepare the silk threads: (left-right) twisted, untwist, cut in equal lengths, braid loosely into plaits
Find the knot and make the first cut there.
Use a paperweight when braiding.
Figuring out which colors go to which parts of the design, make a color plan:
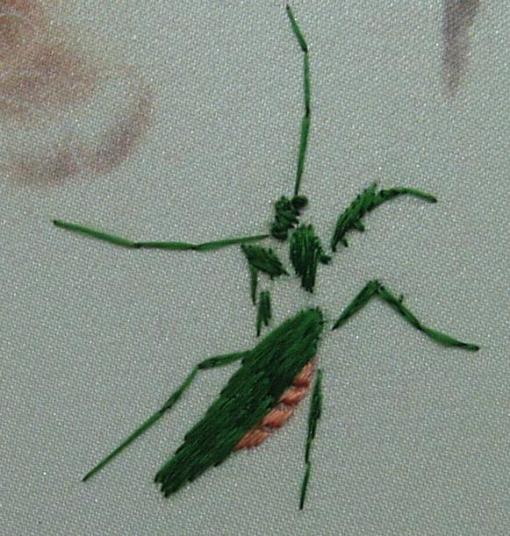
From left to right: Red cat (white for highlights, yellow-browns, Red brown, brown and reddish gold for the eyes), Praying Mantis (old rose for the thorax, green for the body), brush painting bamboos (green-grey and black)
I made sketches of my plan (stitch directions, colors and order of stitching – which parts comes first)
3. Divide the threads prior to embroidering:
Divide the threads so that you have 4 – 8 silk strands. I untwist a thread, then carefully divide the 2 parts into half again. Cut skin easily catch the fine silk strands, so be careful so as not to tangle the strands.
4. Embroidering
Choose a part of the design or a center of visual sensation to start with the embroidery.
I started with the Mantis, then the Bamboos. The body of the insect is in green. I made french knots for the eyes. I made the divisions on the abdomen using the old rose.
For the bamboos, I used the green in the lightest parts and black on the darkest parts. Make sure to vary the thicknesses of the stems. In some leaves I mixed green and black silks.
For the red cat, I started with the eyes and the nose, using 4-6 silk strands. Black for the outlines. Filled the pupil with dark reddish brown, the eye with gold and finally adding the highlights with white. Make sure to vary the black outlines of the eyes. The nose is with black and the flat snout with white.
Then I embroider the parts that are “behind”, like the tail, right ear and the paws.
For the striped tail, I first embroider the darkest reddish brown, then medium reddish brown. Then I added the darkest red gold and medium dark red gold. I did not follow the normal satin stitch. I just “paint-stitch” randomly, finally adding small highlights here and there. In the photo I was not able to capture the shine of the silk. But it is very nice needlepainting.
Making the Paws: First I add the black then the white. Then I add very light gold here and there. Finally, I finish with some more white on top.
Making the right ear: I first add the dark reddish brown and the medium reddish brown on the top of the ear and some dark hairs coming from inside the ears. Then gradually add in the dark to medium reddish gold shades. White and lightest red gold are added to the light hairs coming from the inside of the ears. The outline of the ear´s edge is made of black, medium reddish gold and lightest red gold for the highlighted areas.
Making the front legs: I begin with the darkest redbrowns and gradually add the shades.
Making the hind leg: Starting with the outer edges going inwards, carefully mix the shades.
Making the body: I went through the darks and lights then the medium shades. Then add the standing hairs.
Making the head: Like always, I filled in the lightest and darkest areas, then the medium shades. Then added the standing hairs, whiskers and other fine details.
5. Optional Finishing: (I did not iron this embroidery. The instructions come with the kit. I mounted this project on a white foam board.)
A. Ironing: between your design and iron, do not forget to place a sheet of whitepaper.Set iron in the lowest temperature (silk setting).
B. put some liquid glue on the fabric around the embroidered part of your chart and paste it onto a wooden platform.
C. frame your embroidery.
Finished Red Cat, added the signature too:
Click on the picture for detailed view of the stitches:
 https://worksofhands.wordpress.com/2010/04/02/red-cat-silk-embroidery/
Red Cat close-up without signature


